📖 Table of contents
Sprint 3
For the final Sprint of the course, the Sprint 3, we have a new set of requirements from the Product Owner. On top of working on new user stories, we will be covering topics related to testing.
During this Sprint, each team member will write a peer review in which they asses themselves and other team members. The results of the peer review will heavily impact the personal grade of a team member. The final grade will be based on the project and personal grade.
At the end of this Sprint, each team member has to submit the final report and the peer review. Both of them are required to pass the course. Submitting either of them after the Sprint deadline will decrease the personal grade.
Retrospective
Organize a similar Mad, Sad, Glad retrospective in Flinga for the Sprint 2 as we did at the end of the Sprint 1.
Exercise 1
Organize a similar Mad-Sad-Glad Retrspective as during the previous Sprint. Remember to come up with concreate actions for fixing possible problems in your process. Once you have completed the Retrospective, check the board from your previous Retrospective. Did similar issues arise as in Sprint 1 retrospective? If so, try to come up with different actions as before or ask the teacher for tips on how to solve these issues.
Finally, add a link to the Sprint 2 Retrospective Flinga board under the “Retrospectives” subheading in the
README.mdfile.
Exercise 2
Choose a new (not the same team member as during the previous Sprint) Scrum Master among the team members for the third Sprint.
🏃♂️ Sprint 3 planning
If you weren’t able to implement all the user stories during the previous Sprint, start by finishing those before starting to implement the user stories for this Sprint.
The Product Owner was delighted to see how the project has advancend during Sprint 2. The Sprint Review event gave the Product Owner many new ideas on how to improve the application. Here’s how the Product Owner is describing the Sprint 3 goals in the Sprint Planning event:
“We now have the basic features for managing and taking quizzes. What we still need is a way for the students to share their thoughts about quizzes by writing reviews in the student dashboard.
To provide valuable feedback for the teacher and recommendations for their fellow students, the student should be able to share their thoughts about a quiz by writing a review. For this purpose there could be a separate review page. A review has a reviewer’s nickname, a numeric rating between 1 and 5 and a review text. The student should not be able to review a non-published quiz.
The review page should list the added reviews and summarize them by displaying the number of reviews and the rating average. Each review should display the information submitted by the student and the date when the review was written. It should also be possible for the student to edit and delete reviews in the review page.”
– The Product Owner
After some discussion the Scrum Team planned the following user stories for the student dashboard application:
- As a student, I want to review a quiz so that I can share my thoughts about the quiz with others
- As a student, I want to see the reviews of a quiz so that I can learn what others think about the quiz
- As a student, I want to delete a review so that I can get rid of reviews I don’t need
- As a student, I want to edit a review so that I can change its information
Exercise 3
Make sure that all task related issues that have been completed during the Sprint 2 are closed and their status is “Done” in the Backlog project. Do the same with the user story related issues accepted by the Product Owner during the Sprint Review event.
Create a new milestone for the third Sprint. If you didn’t manage to implement all user stories during the previous Sprint, set the third Sprint’s milestone for the unfinished user story and task issues. If the Sprint Review brought up implementation improvements or flaws (e.g. bugs), create appropriate issues for the tasks.
Exercise 4
Create an issue for each user story. Add the “user story” label for each issue. Set the Sprint milestone and add the issues to the backlog.
Exercise 5
Plan the tasks for the first user story, “As a student, I want to review a quiz so that I can share my thoughts about the quiz with others”. Read the Product Owner’s Sprint Planning description regarding the user story again and split it into small coding tasks.
Create an issue for each task. Set the Sprint milestone and add the issues to the backlog.
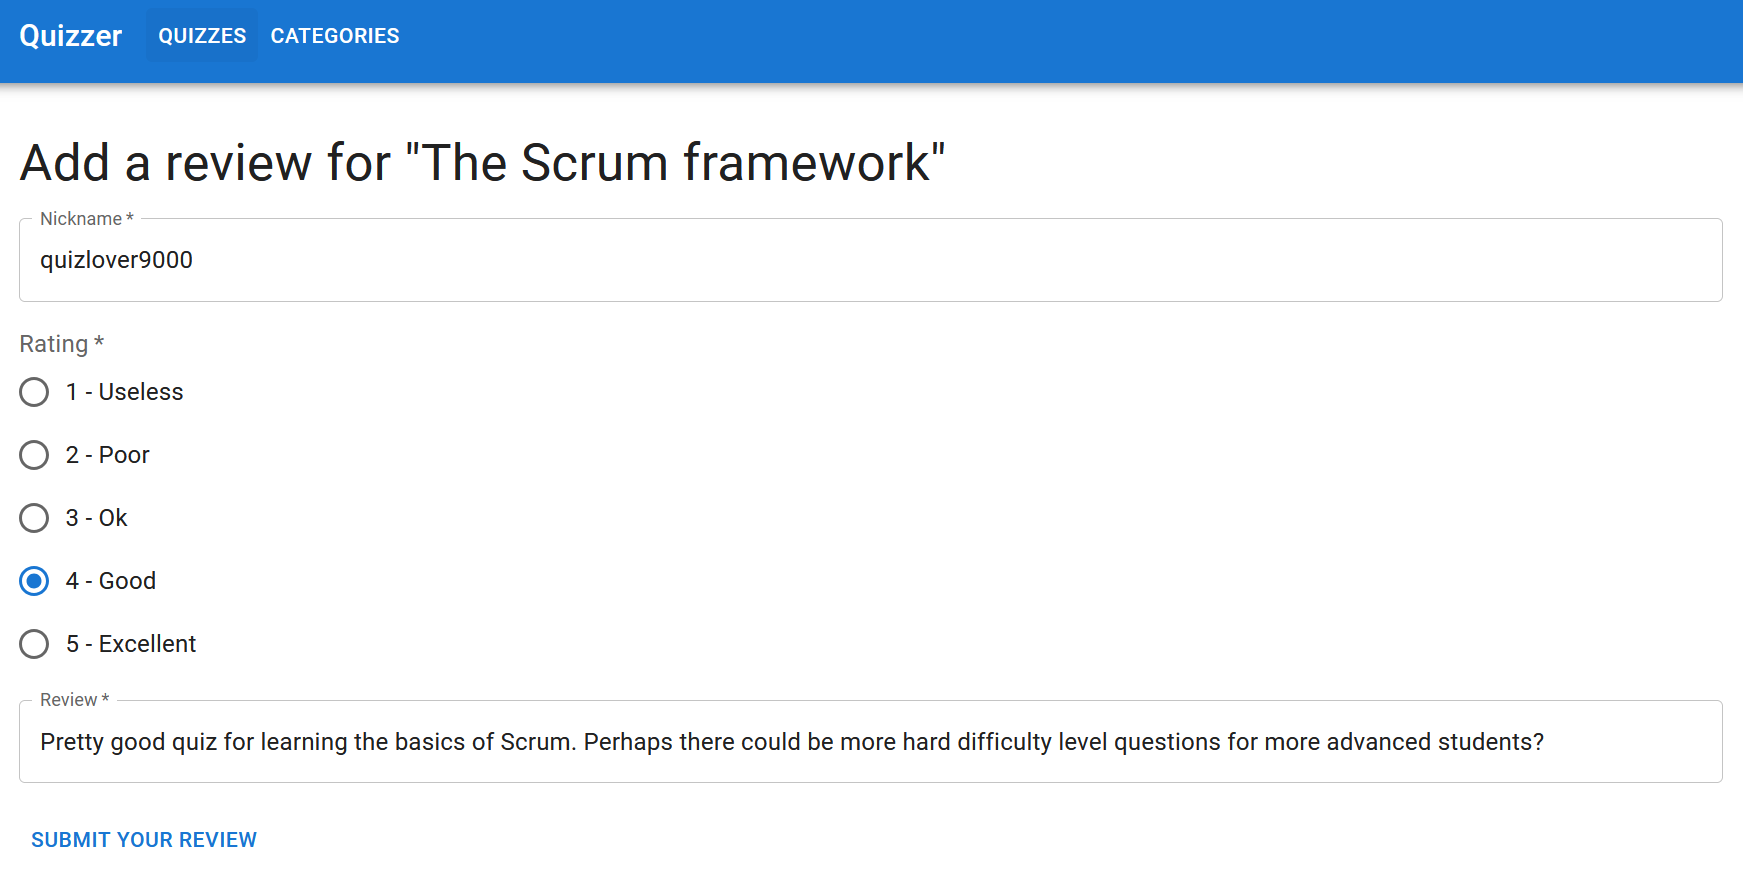
The Scrum Team’s UI Designer’s vision is that the implementation could look something like this:
Exercise 6
Plan the tasks for the second user story, “As a student, I want to see the reviews of a quiz so that I can learn what others think about the quiz”. Read the Product Owner’s Sprint Planning description regarding the user story again and split it into small coding tasks.
Create an issue for each task. Set the Sprint milestone and add the issues to the backlog.
The Scrum Team’s UI Designer’s vision is that the implementation could look something like this:


Exercise 7
Plan the tasks for the third user story, “As a student, I want to delete a review so that I can get rid of reviews I don’t need”. Read the Product Owner’s Sprint Planning description regarding the user story again and split it into small coding tasks.
Create an issue for each task. Set the Sprint milestone and add the issues to the backlog.
Exercise 8
Plan the tasks for the fourth user story, “As a student, I want to edit a review so that I can change its information”. Read the Product Owner’s Sprint Planning description regarding the user story again and split it into small coding tasks.
Create an issue for each task. Set the Sprint milestone and add the issues to the backlog.
Testing
When we implement a new feature for the application we need to make sure that it works as intended. That is, we test the implementation of a feature against the requirements. During the development of a feature we are constantly performing manual testing for the implementation, meaning that we use the application ourselfs and see that we can perform certain actions successfully.
Manual testing is important, but we can’t perform it at scale. When our application becomes more complex, each change to code can potentially break any part of the application. This type of bug where a feature that has worked before stops working is referred to as regression.
Testing each feature manually after each code change to spot regression bugs is too time-consuming. That’s why we implement automated tests: programs that test our code. We can usually execute hundreds of automated tests within just a minute. Martin Fowler explains the purpose of different kind of automated tests and their pros and cons in his article TestPyramid.
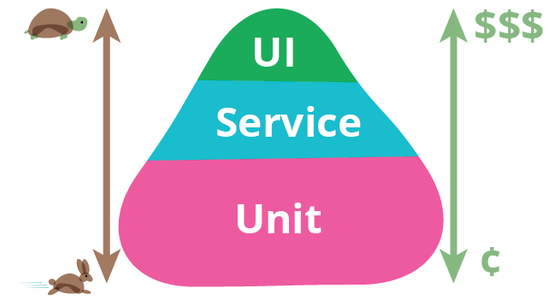
Fowler categorizes different tests in three categories: unit, service and UI (user interface) tests. The test pyramid represents the amount of these different kind of tests we should have for our application. There are pros and cons for the different kind of tests. While we go up in the pyramid we get better reliability that our application works as inteaded as a whole, but the tests becomes laborious to maintain, difficult to implement, and time consuming to run. Ideally, our project should include multiple types of tests that complement each other, forming a balanced test pyramid.
Automated tests are implemented with programming language specific testing frameworks, such as Java’s JUnit and JavaScript’s Vitest. During this Sprint we will implement some integration tests for our backend’s REST API endpoints using JUnit and the MockMVC framework.
Unit tests
Unit tests constitute the bottom of the test pyramid. Most of our application’s tests should be unit tests. Unit tests test the smallest testable parts of an application, called units. These are commonly simple methods that does some operation based on their parameters and return some value. Units never integrate to other parts of the application code, such as the database.
Here’s an example of unit tests for a calculateWords method, which returns the number of words in the string provided as the paratamer:
@Test
void calculateWordsCalculatesSingleWordCorrectly() {
    String message = "Hello";
    assertEquals(1, MessageUtils.calculateWords(message));
}

@Test
void calculateWordsCalculatesManyWordsCorrectly() {
    String message = "Hello world";
    assertEquals(2, MessageUtils.calculateWords(message));
}

@Test
void calculateWordsCalculatesZeroWordCorrectly() {
    String message = "";
    assertEquals(0, MessageUtils.calculateWords(message));
}
Unit tests have these pros and cons:
- 🟢 Simple to implement and easy to maintain
- 🟢 Fast to run
- 🔴 Doesn’t provide good reliability that the application works as a whole
Integration tests
Integration tests (also known as service tests) constitute the middle of the test pyramid. We should have quite many integration tests for our application. As the name suggests, integration tests test that different parts of our application code work as inteded once they are integrated. For example, methods that perform database operations are tested with integration tests.
Here’s an example of integration tests for a REST API endpoint /api/messages implemented by the getAllMessages method:
@Test
public void getAllMessagesReturnsEmptyListWhenNoMessagesExist() throws Exception {
    this.mockMvc.perform(get("/api/messages"))
            .andExpect(status().isOk())
            .andExpect(jsonPath("$", hasSize(0)));
}

@Test
public void getAllMessagesReturnsListOfMessagesWhenMessagesExist() throws Exception {
    Message firstMessage = new Message("First message");
    Message secondMessage = new Message("Second message");
    messageRepository.saveAll(List.of(firstMessage, secondMessage));

    this.mockMvc.perform(get("/api/messages"))
            .andExpect(status().isOk())
            .andExpect(jsonPath("$", hasSize(2)))
            .andExpect(jsonPath("$[0].content").value("First message"))
            .andExpect(jsonPath("$[0].id").value(firstMessage.getId()))
            .andExpect(jsonPath("$[1].content").value("Second message"))
            .andExpect(jsonPath("$[1].id").value(secondMessage.getId()));
}
These tests send a request to the REST API endpoint and verify that the JSON response body contains the required information.
Integration tests have these pros and cons:
- 🟢 Fairly simple to implement and easy to maintain
- 🟢 Fairly fast to run
- 🟡 Provides a reasonable reliability that the application works as a whole
UI tests
UI tests (also known as end-to-end tests) constitute the top of the test pyramid. We should have a moderate amount of UI tests in our application. As the name suggests, UI tests test that the application works by actually performing actions on the user interface similarly as a real user. This means opening a page on a web browser, filling form fields, clicking buttons and expecting the page to have some content. Because UI tests need the user interface to operate on, they are slow to execute. In addition, because the application’s user interface commonly changes more often than the code, UI tests are laborious to maintain.
Here’s an example of testing the submission of the message form with the Robot Framework test automation framework:
*** Test Cases ***
Submit Valid Message
    Go To http://localhost:8080/add/message
    Input Text content "Hello world!"
    Click Button "Add"
    Go To http://localhost:8080
    Page Should Contain "Hello world!"
UI tests have these pros and cons:
- 🔴 More difficult to implement and laborious to maintain
- 🔴 Slow to run
- 🟢 Provides a good reliability that the application works as a whole
Configuration for tests
Because our tests will alter the database we should consider using a different database for tests. This is a common practice because we don’t want the tests to alter (for example delete) any data we are using during the development. We can use a separate, in-memory database for the tests. To achieve this, we can add a test-specific src/test/resources/application.properties configuration file (note the test folder in the path):
spring.datasource.url=jdbc:h2:mem:quizzer-test;DB_CLOSE_ON_EXIT=FALSE;AUTO_RECONNECT=TRUE
The configuration in the src/test/resources/application.properties file will be used while we are running the tests, which makes it suitable for all test-specific configuration.
Exercise 9
Add a test-specific configuration file and configure a separate database for the tests. Make sure that running the tests doesn’t alter (for example delete any data) the development environment database.
Testing REST API endpoints
“Write tests. Not too many. Mostly integration.”
– Guillermo Rauch, CEO of Vercel
Integration tests are a great balance of reliability and performance. Kent C. Dodds covers the importance of integration tests in his article Write tests. Not too many. Mostly integration. As the name of the article implies, Dodds suggests that most of the tests for the application should be integration tests. He makes some fair points to justify this claim:
“One thing that it doesn’t show though is that as you move up the pyramid, the confidence quotient of each form of testing increases. You get more bang for your buck. So while E2E tests may be slower and more expensive than unit tests, they bring you much more confidence that your application is working as intended.”
– Kent C. Dodds, creator of React Testing Library
To get some confidence that our application is working as inteded, let’s implement some integration tests for our REST API endpoints.
In Java applications, tests are implemented and executed with the JUnit testing framework. JUnit tests are implemented as test classes. Test classes can be annoted with the @SpringBootTest annotation to access the Spring application context in tests. This, for example makes the dependency injection work. Methods annotated with the @Test annotation are the test methods, which test a specific test scenario.
Test methods usually share certain common setup code, which should be executed before each test method. This setup can be put inside a method annotated with the @BeforeEach annotation. The tests should be independent from each other, meaning that for example the order in which the tests are executed should not matter. To achieve the independence, each test needs to start with an empty database. This is achieved by deleting all entities in the setUp method before each test.
As an example, let’s consider testing the following methods of a MessageRestController class:
@RestController
@RequestMapping("/api")
@CrossOrigin(origins = "*")
public class MessageRestController {
    private final MessageRepository messageRepository;

    // ...

    @GetMapping("/messages")
    public List<Message> getAllMessages() {
        return messageRepository.findAll();
    }

    @GetMapping("/messages/{id}")
    public Message getMessageById(@PathVariable Long id) {
        return messageRepository.findById(id).orElseThrow(
            () -> new ResponseStatusException(HttpStatus.NOT_FOUND, "Message with id " + id + " does not exist"));
    }

    @PostMapping("/")
    public Message createMessage(@Valid @RequestBody CreateMessageDto message, BindingResult bindingResult) {
        if (bindingResult.hasErrors()) {
            throw new ResponseStatusException(HttpStatus.BAD_REQUEST,
                bindingResult.getAllErrors().get(0).getDefaultMessage());
        }

        return messageRepository.save(message);
    }
}
The test class files should be placed to the src/test/java folder and the name of the test class should have a Test prefix. For example, we can test the MessageRestController class with a MessageRestControllerTest class.
To make sure that the tests in the test class are independent, the setUp method should delete all messages at the beginning of each test:
package fi.haagahelia.messenger.controller;

import org.junit.jupiter.api.BeforeEach;
import org.junit.jupiter.api.Test;
import org.springframework.beans.factory.annotation.Autowired;
import org.springframework.boot.test.autoconfigure.web.servlet.AutoConfigureMockMvc;
import org.springframework.boot.test.context.SpringBootTest;
import org.springframework.http.MediaType;
import org.springframework.test.web.servlet.MockMvc;
import com.fasterxml.jackson.databind.ObjectMapper;
import static org.springframework.test.web.servlet.request.MockMvcRequestBuilders.*;
import static org.springframework.test.web.servlet.result.MockMvcResultMatchers.*;
import java.util.List;
import static org.hamcrest.Matchers.*;
import static org.junit.jupiter.api.Assertions.assertEquals;
import fi.haagahelia.messenger.model.Message;
import fi.haagahelia.messenger.repository.MessageRepository;

@SpringBootTest
@AutoConfigureMockMvc
public class MessageRestControllerTest {
    @Autowired
    private MessageRepository messageRepository;

    @Autowired
    private MockMvc mockMvc;

    private ObjectMapper mapper = new ObjectMapper();

    @BeforeEach
    void setUp() throws Exception {
        // Make sure that the database is empty before each test
        messageRepository.deleteAll();
    }

    // The test methods go here
}
The test methods test specific scenario. We come up with scenarios by analyzing the code (for example a certain method) that we are testing: how does the code behave based on different parameters or database state? For example if we call a method with certain parameters, we expect it to return a certain value. We need to cover all divergences in the code behavior with a test scenario.
For example, we could have the following test scenarios for the getAllMessages method introduced above:
- If we send a request to the
/api/messagesendpoint and there is no messages in the database, the JSON response body should be an empty list - If we send a request to the
/api/messagesendpoint and there are messages in the database, the JSON response body should contain the messages as a list
To structure these test cases as test methods, we can follow the popular Arrange-Act-Assert pattern:
- Arrange inputs and targets. Arrange steps should set up the test case. Does the test require any objects or special settings? Does it need to prep a database? Does it need to log into a web app? Handle all of these operations at the start of the test
- Act on the target behavior. Act steps should cover the main thing to be tested. This could be calling a function or method, calling a REST API, or interacting with a web page. Keep actions focused on the target behavior
- Assert expected outcomes. Act steps should elicit some sort of response. Assert steps verify the goodness or badness of that response. Sometimes, assertions are as simple as checking numeric or string values. Other times, they may require checking multiple facets of a system. Assertions will ultimately determine if the test passes or fails
Here’s the two test methods for our test scenarios:
@Test
public void getAllMessagesReturnsEmptyListWhenNoMessagesExist() throws Exception {
    // Act
    this.mockMvc.perform(get("/api/messages"))
    // Assert
            .andExpect(status().isOk())
            .andExpect(jsonPath("$", hasSize(0)));
}

@Test
public void getAllMessagesReturnsListOfMessagesWhenMessagesExist() throws Exception {
    // Arrange
    Message firstMessage = new Message("First message");
    Message secondMessage = new Message("Second message");
    messageRepository.saveAll(List.of(firstMessage, secondMessage));

    // Act
    this.mockMvc.perform(get("/api/messages"))
    // Assert
            .andExpect(status().isOk())
            .andExpect(jsonPath("$", hasSize(2)))
            .andExpect(jsonPath("$[0].content").value("First message"))
            .andExpect(jsonPath("$[0].id").value(firstMessage.getId()))
            .andExpect(jsonPath("$[1].content").value("Second message"))
            .andExpect(jsonPath("$[1].id").value(secondMessage.getId()));
}
The tests use the perform method of the MockMVC class to send a GET request to the /api/messages endpoint. Then, we expect that the HTTP status of the response is 200 OK and the JSON of the response body contains the messages we saved in the arrange step.
For another GET request example, here’s the test methods of the getMessageById method introduced above:
@Test
public void getMessageByIdReturnsMessageWhenMessageExists() throws Exception {
    // Arrange
    Message message = new Message("Message");
    messageRepository.save(message);

    // Act
    this.mockMvc.perform(get("/api/messages/" + message.getId()))
    // Assert
            .andExpect(status().isOk())
            .andExpect(jsonPath("$.content").value("Message"))
            .andExpect(jsonPath("$.id").value(message.getId()));
}

@Test
public void getMessageByIdReturnsNotFoundWhenMessageDoesNotExist() throws Exception {
    // Act
    this.mockMvc.perform(get("/api/messages/1"))
    // Assert
            .andExpect(status().isNotFound());
}
For a POST request example, here’s the test methods of the createMessage method introduced above:
@Test
public void createMessageSavesValidMessage() throws Exception {
    // Arrange
    Message message = new CreateMessageDto("Hello world!");
    String requestBody = mapper.writeValueAsString(message);

    // Act
    this.mockMvc.perform(post("/api/messages").contentType(MediaType.APPLICATION_JSON).content(requestBody))
    // Assert
            .andExpect(status().isOk())
            .andExpect(jsonPath("$.content").value("Hello world!"));

    List<Message> messages = messageRepository.findAll();
    assertEquals(1, messages.size());
    assertEquals("Hello world!", messages.get(0).getContent());
}

@Test
public void createMessageDoesNotSaveInvalidMessage() throws Exception {
    // Arrange
    Message message = new CreateMessageDto("");
    String requestBody = mapper.writeValueAsString(message);

    // Act
    this.mockMvc.perform(post("/api/messages").contentType(MediaType.APPLICATION_JSON).content(requestBody))
    // Assert
            .andExpect(status().isBadRequest());

    List<Message> messages = messageRepository.findAll();
    assertEquals(0, messages.size());
}
The basic test functionalitis are provided by the spring-boot-starter-test library. Let’s add it to the <dependencies> list in the pom.xml file
<dependency>
    <groupId>org.springframework.boot</groupId>
    <artifactId>spring-boot-starter-test</artifactId>
    <scope>test</scope>
</dependency>
The jsonPath method used to access the JSON payload in the test expectations is provided by the json-path libary. Before we start testing our REST API endpoints, let’s add the json-path dependency to the <dependencies> list in the pom.xml file:
<dependency>
    <groupId>com.jayway.jsonpath</groupId>
    <artifactId>json-path</artifactId>
    <version>2.8.0</version>
    <scope>test</scope>
</dependency>
While testing your application’s REST API endpoints, refer to the examples above and guides, such as Integration Testing in Spring.
You can run the tests for the project either in your editor or by running the
./mvnw testcommand on the command-line.
To keep the tests organized, it is good idea to implement a separate test class for each REST collection (e.g. “quizzes” and “categories”).
If the implementation of the endpoint doesn’t work as described in the test scenarios, fix the implementation.
Exercise 10
Implement a test class within the
src/test/javapackage with the following test methods for the endpoint for getting all (published) quizzes:
getAllQuizzesReturnsEmptyListWhenNoQuizzesExist: send a request without saving a quiz to the database. Then, the response should have an empty listgetAllQuizzesReturnsListOfQuizzesWhenPublishedQuizzesExist: save a few published quizzes to the database and send a request. Then, the response should have a list of the published quizzesgetAllQuizzesDoesNotReturnUnpublishedQuizzes: save a few published and unpublished quizzes to the database and send a request. Then, the response should only have a list of the published quizzesCreate an issue for this task.
Exercise 11
Implement the following test methods for the endpoint for getting the questions of a quiz:
getQuestionsByQuizIdReturnsEmptyListWhenQuizDoesNotHaveQuestions: save a quiz without questions to the database and send a request. Then, the response should have an empty listgetQuestionsByQuizIdReturnsListOfQuestionsWhenQuizHasQuestions: save a quiz with a few questions and answer options to the database and send a request. Then, the response should have a list of the quiz’s questions. Remember to also check, that the response contains the answer options of each questiongetQuestionsByQuizIdReturnsErrorWhenQuizDoesNotExist: send a request without saving a quiz to the database. Then, the response should have an appropriate HTTP status
Exercise 12
Implement a test class with the following test methods for the endpoint for creating an answer:
createAnswerSavesAnswerForPublishedQuiz: save a published quiz with a question and an answer option to the database and send a request with the answer option id in the request body. Then, the response should have the saved answer and the database should have one answer with the attributes matching the request bodycreateAnswerDoesNotSaveAnswerWithoutAnswerOption: send a request without an answer option id in the request body (e.g.{ "answerOptionId": null }). Then, the response should have an appropriate HTTP status and the database should not have any answerscreateAnswerDoesNotSaveAnswerForNonExistingAnswerOption: send a request with a non-existing answer option id in the request body. Then, the response should have an appropriate HTTP status and the database should not have any answerscreateAnswerDoesNotSaveAnswerForNonPublishedQuiz: save a non-published quiz with a question to the database and send a request with a valid request body. Then, the response should have an appropriate HTTP status and the database should not have any answers
Exercise 13
Implement appropriate test methods for at least two more endpoints of your choice. Analyze the behavior of the endpoints based on different requests (e.g. different kind of invalid requests like in the test cases covered in the previous exercises) and database states and implement test scenarios to cover these cases. Use descriptive names for the test methods so that they properly describe the test case.
Exercise 14
Add instructions on how to run the tests on the command-line to the “Developer guide” section in the
README.mdfile.
Exercise 15
Repository’s license defines how others can use, modify, and distribute the code within your repository. Read the GitHub’s documentation on Licensing a repository. Then, choose a license for your repository and place the license text in a file named
LICENSEat the root folder of your repository (the same folder that has theREADME.mdfile). If you don’t have a strong opinion on the license, you can consider the MIT license.Add a “License” subheading to the
README.mdfile and under that the chosen license name and the link to theLICENSEfile in the GitHub repository. As a reference, you can take a look how the license is specified in the React project’s README.md file.
Exercise 16
Deploy the final versions of the backend and frontend applications to the production environment. Make sure that both applications work properly in the production environment.
Exercise 17
Make sure that all project-related documentation, such as project description, data model documentation, developer guide documentation and Swagger documentation is up-to-date.
Exercise 18
Once you have implemented the user stories of the Sprint and the main branch has a working version of the application, create a GitHub release for the project. Create a new tag called “sprint3”. The release title should be “Sprint 3”. Give a brief description for the release that describes the features implemented during the Sprint.
Peer review
Writing a peer review for each team member and receiving a passing grade from the peer reviews is required to pass the course.
The peer review is used to assess each team member. The personal grade is based on the peer reviews and the teacher’s observations. Every team member must write a peer review.
The peer review is conducted with a form. You will receive the link to the form via email from the teacher at the beginning of the Sprint. In the form you will need to assess every team member’s (including yourself) efforts in the team work in the following aspects:
- Activity in team work: Attendance and active presence during team meetings and communication with team members outside the meetings
- Technical contributions: amount of working code written or active participation in the writing process of the code (for example pair-programming)
- Project management and documentation contributions: Backlog management, efforts to improve the process (for example in Retrospectives), writing project related documentation
You will need to grade each these aspects in scale of 0-5 and provide a short reasoning for the grade. The peer reviews are anonymous, the team members won’t see each other’s peer reviews.
Exercise 19
Write the peer review for your team members. You will receive the peer review form via email. If you haven’t received the peer review form link, contact the teacher.
Final report
Write the final report for the course, which covers the following questions:
- Scrum defines four events which take place during the Sprint. What are these events and what is the purpose of each event? How well did you succeed as a team to fulfil the purpose of each event?
- In which areas did you succeed as a team? In which areas there was room for improvement?
- In which areas did you succeed personally? In which areas there was room for improvement?
- Based on your experiences during the course, what would be three important advice you would give to a new software development team? Justify why these advice are important
- What did you learn during the course? What would you have wanted to learn more about?
Submit the final report as a single PDF file to Moodle (you’ll find the submission in the “Exercise submissions” tab). Your final points will be visible in the submission’s feedback once the assesment is done. Contact the teacher, if you have questions related to your assesment.
Exercise 20
Write the final report as instructed above.
Make sure that you have pushed your work to the project’s GitHub repository before the Sprint 3 deadline on Before the Wed 13.5.2026 session.