📖 Table of contents
Version control: Git and GitHub
This material is based on the execellent course material of University of Helsinki’s Computing tools for CS studies course.
Submitting this week’s exercises
Submit this week’s exercises to Moodle (you’ll find the submission in the “Exercise submissions” tab). The submission should contain the information mentioned in exercises 7, 15 and 16. Other exercises must be done as well, but they don’t contain anything that should be added to the Moodle submission. The submission deadline is on Before the Wed 8.4.2026 session.
Version control
This part of the course handles version control. Version control refers to a service used for storing code. There are two primary reasons for using it: Version control allows storing backups of both the current and older versions of an application. In addition, code and projects can easily be shared with others, which makes collaboration easy.
Version control tools allow marking a specific state of a project as so that one can return to it later. Thus, if something goes wrong in the development of new features, one can return to an older and functional version of the project. Version control stores all the marked states. Therefore all the developers can follow the evolution of the application, like who has done what and when. This also makes finding bugs, or errors in the application, a lot easier.
Contrary to what many people think, software development is mostly done in teams. With version control tools it is possible to use and develop others’ code, even without ever meeting in person. People can give verbal feedback, such as report issues, as well as make concrete suggestions for improvement by providing code to the project. All developers are kept up to date about the state of the project, which makes cooperation smoother.
Visual Studio has summarized reasons for using version control on their website. Bitbucket has also written a longer text about version control.
There are several different version control tools available, but this part will focus on using Git and GitHub, especially in the context of software development projects.
About Git
The material has steps that you need to perform outside the exercises as well. So, don’t just skip to exercises. Read through the material carefully and perform the instructed steps.
Git was initiated by Linus Torvalds, who is most likely more famous for being the primary developer of the Linux kernel, which is the “heart” of many operating systems, such as Google’s Android. Torvalds started developing Git for his own needs when coding the Linux kernel. He needed a tool for storing different versions of his own code and sharing it with other people.
GitHub is a service which was created later on, used for storing and publishing projects. There are several sites similiar to GitHub, such as GitLab.
Git and GitHub are used in solo as well as collaborative projects in the industry. It’s usage isn’t limited only to code, and many people like to for example backup their course material using Git. Nevertheless, this part focuses on sharing code with GitHub, and some of the common problems faced in the process. Git will certainly be useful in your studies, and especially if you choose the software developer career.
Exercise 1
Start by creating a GitHub account at https://github.com/. Software developers often use GitHub as a sort of code protfolio, so make sure to choose a username which you don’t mind adding to your CV.
Exercise 2
Before we can start, we need to install Git. Here’s the instructions for different operating systems:
- On Windows, install Git for Windows
- On macOS and Linux, read the Git installation instructions
Now, depending on your operating system do one of the following:
- On Windows Git is used through the Git Bash application. Open the Git Bash application.
- On macOS Git is used through the Terminal application. Open the Terminal application.
Visual Studio Code also provides an integrated terminal, which makes the usage of Git more fluent while writing code.
In front of you is a so called command line interface (CLI). A command line interface is a simple user interface: it accepts a textual command as input and prints the command output below. Type in the following command and press the enter key to execute it:
git
The command should print basic introductions on how to use the git command.
Exercise 3
Let’s configure Git a bit.
Link your name and email address to Git so that all the changes you make to different projects are properly associated with you. This can be done by running the following commands with your own personal details:
git config --global user.name "My Name"
git config --global user.email email@address.com
git config --global init.defaultBranch main
Use the same email address as you used with your GitHub account.
Run the commands one command (one line) at a time. Write the command and press enter to execute it.
If you don’t want your email to be public, GitHub offers a specific noreply email.
This configuration is computer-specific. If you work on more than computer, you’ll need to configure each separately.
Starting a Git project
A project is simply a folder containing some files. These files can for example have code in them. You can turn a folder into a Git project by running the command git init inside it. This will allow running git commands inside the folder. The initialization command will create a subfolder called .git. This folder stores all sorts of information about the project in the folder it is located in.
Commits
Information is stored to Git with commits. A commit is a bundle of changes which have been made into files inside the project. In practice these changes are often adding or removing text from a file, for example.
You can think of a commit as a step towards a finished project. Every commit adds some changes to the previous commit. For example, when developing an application, it would be natural to add a new feature in a new commit.
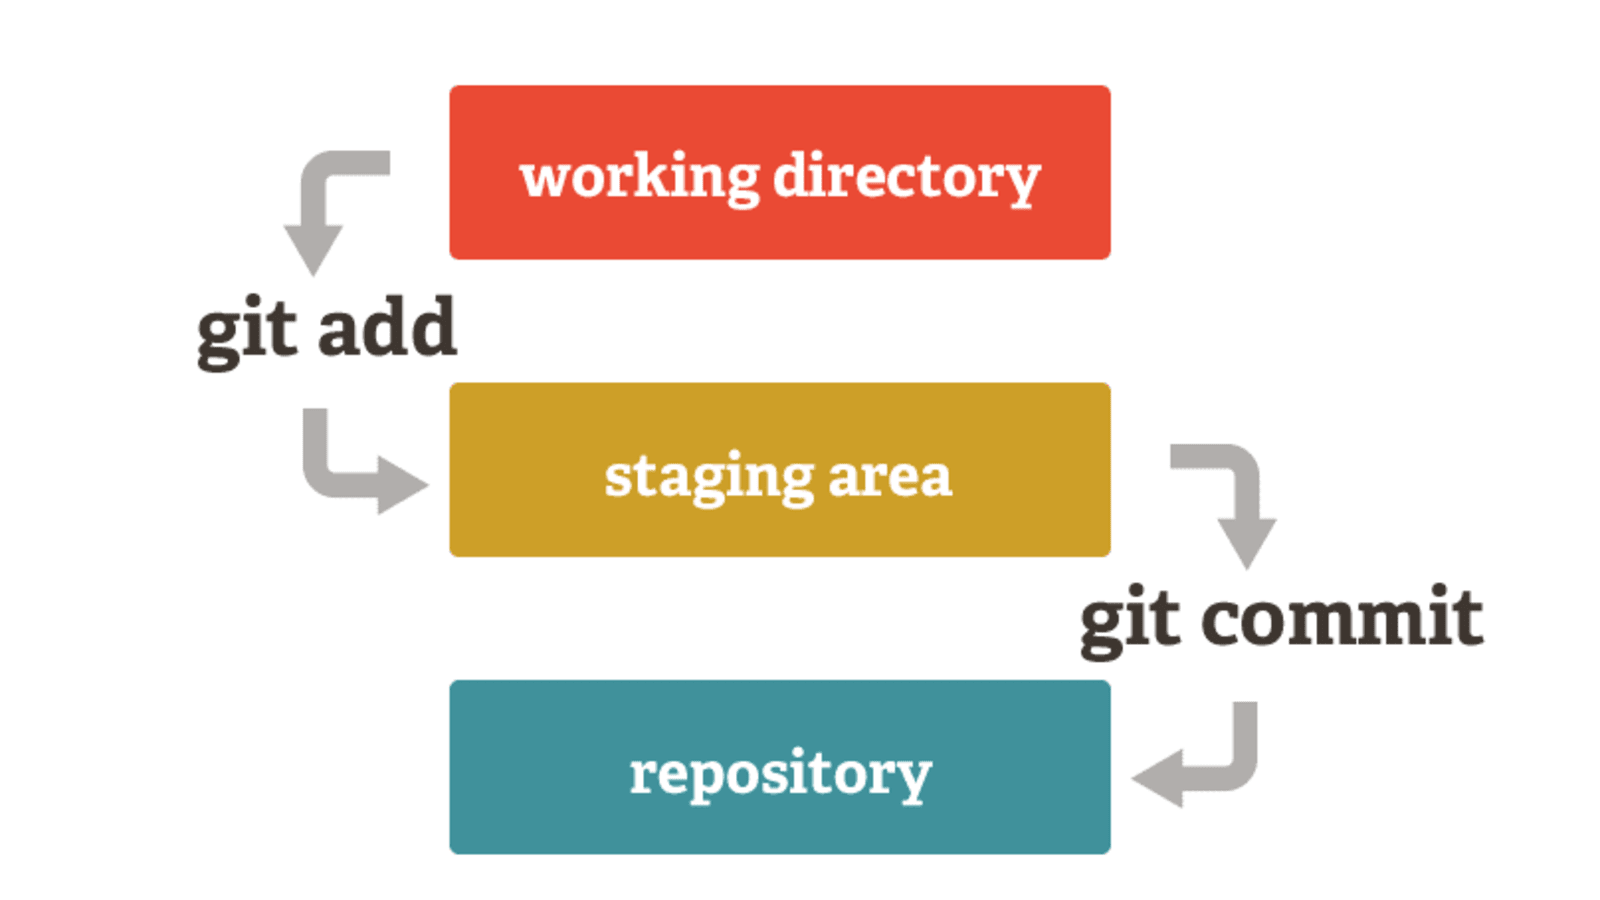
Let’s go through how a commit is created. First, the changes one wants to include in the commit are added to the staging state. When all the desired changes are in staging, the commit is wrapped together, sealing all the changes together.
The command git status will turn out to be very useful in the process of creating commits, as it gives information avout the current state of the project and all the files inside it.
Let’s create a Git project folder. Create an empty folder named git-practice for example on your Desktop or any other location. Next, depending on your operating system do the following:
- On Windows, open the folder in Git Bash by right-clicking the folder name and choosing “Git Bash Here”.
- On macOS, open the folder in Terminal by right clicking the folder name and choosing “New Terminal at Folder”
Now, initialize the folder as a Git project with the git init command.
Copying or pasting text into Git Bash won’t work with keyboard shortcuts. Instead, you can right-click on the Git Bash window and click “Paste” or “Copy”.
Open the Git project folder in an editor such as Visual Studio Code and add an a empty file called git_practice.txt inside. When a new file is added to a fresh Git project, running the git status command will print the following:
On branch main

No commits yet

Untracked files:
  (use "git add <file>..." to include in what will be committed)
        git_practice.txt

nothing added to commit but untracked files present (use "git add" to track)
Next we’ll take a closer look on the output of git status.
The different states of changes
Changes can be added to the next commit by running git add. The command requires one argument, that is the path to the file containing the changes one wishes to move to staging and consequently include in the next commit. Before a file has been added to Git, it is under Untracked files. This also means that the changes inside that file will not be added to the next commit.
Now let’s add the changes in the file we created earlier by running git add git_practice.txt. Then, let’s add some text into the file and save. After that, we’ll run git status:
On branch main

No commits yet

Changes to be committed:
  (use "git rm --cached <file>..." to unstage)
        new file:   git_practice.txt

Changes not staged for commit:
  (use "git add <file>..." to update what will be committed)
  (use "git restore <file>..." to discard changes in working directory)
        modified:   git_practice.txt
Next we’ll add one more file to the project, called empty.txt. We’ll then run git status again, which outputs the following:
On branch main

No commits yet

Changes to be committed:
  (use "git rm --cached <file>..." to unstage)
        new file:   git_practice.txt

Changes not staged for commit:
  (use "git add <file>..." to update what will be committed)
  (use "git restore <file>..." to discard changes in working directory)
        modified:   git_practice.txt

Untracked files:
  (use "git add <file>..." to include in what will be committed)
        empty.txt
Now let’s break down the output.
The first title is called Changes to be committed. The changes under this title will be added to the next commit. The second title, Changes not staged for commit, refers to the changes which Git is aware of, which will not be added to the next commit. Finally Untracked files contains all the files which are unknown to Git, meaning that the changes inside them are not being followed. For example, Git cannot distinguish what sort of changes have been done to the untracked files. In consequence, the changes are not being added to the next commit.
You probably noticed that the file git_practice.txt is in the output twice. This is because Git tracks changes. The first change added to Git was where the file git_practice.txt was created. Only after adding the change to Git was some text insterted into the file. Thus only the change where the file git_practice.txt was created will be added to the next commit, and not the change when some text was added inside it. The interpretation of the output of git status is made easier with some colors. The changes which will be added to the next commit are displayed in green, and next to the filename is written what was done to the file (for example new file, modified, deleted).
Changes can also be cancelled with Git. Adding some text to git_practice.txt could be cancelled by running git restore git_practice.txt. The file will be empty after running the command because the command cancelled the change which added some text into git_practice.txt. In conclusion, the command git restore enables cancelling changes in tracked files.
By running git add -p one can choose change by change, which ones to add to the next commit (letter “y” means add, “n” means don’t add). Type in the letter (“y” or “n”) and press the Enter key. The command only takes into consideration changes in files which are being tracked, i.e. have already been added to Git once. Thus new files cannot be added to Git with git add -p. Running git add file will add all the changes in the file. It is also possible to add entire folders to Git using the same command. Another quite handy shorthand is the git add . (note the dot at the end of the command), which will add all files to the next commit.
Here’s a few different ways to add changes with the git add command:
git add name_of_folder/some_file.txt: add changes in filesome_file.txtin foldername_of_folder.git add name_of_folder: add all changes in foldername_of_folder.git add .: add all changes in the project. Always check the changes withgit statusbefore using this.git add -p: choose change by change, which ones to add. This only works for tracked files.
If we check the
git statusand confirm that we want to add all the changes to the next commit, thegit add .command is the fastest way to do it.
If you think there is a possibility that you will want to share a project with other people some day, don’t add anything secret to Git. Even if you remove the secret content in the next commit, the delicate information stays in the project’s history, and can be found from GitHub easily.
A good habit to form is to constantly check which changes will be added to the next commit with git status. This might save you a lot of trouble later on.
You can navigate trough the command history by pressing the up (↑) and down (↓) arrow keys on the keyboard. Pressing the up arrow key goes to previous command. This is handy when you perform the same command multiple times. Instead of writing the same command again and again, just press the up arrow key and press enter to execute the command.
Creating a commit
After choosing which changes will be included in the next commit, you can finally create the commit with the command git commit. Every commit has a message attached to it, describing the changes included in the commit. The message is added upon creating the commit by running: git commit -m "a descriptive message", where your descriptive message specifies what has changed since the last commit. If you leave out the flag -m and the message, a text editor will open, where you can write a longer, detailed description below the title message. The commit is then created by saving and exiting the text editor.
Git uses a command line text editor for commit messages by default. Let’s use a bit more user-friendly editor, Visual Studio Code. If you haven’t installed it yet, start with that. Once installed, we can use Visual Studio Code as the Git text editor by running the following command:
git config --global core.editor "code --wait"
However, it is usually more convinient to commit changes using the git commit -m "the commit message" command instead of using the git commit command and saving and exiting the text editor.
Here are some quick instructions about writing a good commit message.
We’ll continue where the previous example left off. Let’s add all the changes we made to the next commit, except the creation of the file empty.txt. Before running git commit, the output of git status is:
On branch main

No commits yet

Changes to be committed:
  (use "git rm --cached <file>..." to unstage)
        new file:   git_practice.txt

Untracked files:
  (use "git add <file>..." to include in what will be committed)
        empty.txt
Then we’ll run git commit -m "Add new file". Now the output of git status is:
On branch main
Untracked files:
  (use "git add <file>..." to include in what will be committed)
        empty.txt

nothing added to commit but untracked files present (use "git add" to track)
The changes which were committed are no longer visible in the output. However, they are not lost, they have just been moved to the commit. You can view the commits of a project with the command git log:
commit 51bf544c786a671c28f70713b6cb33d87cc38
Author: Jukka Remes <jukka.remes@haaga-helia.fi>
Date:   Wed Sep 6 12:51:07 2023 +0300

    Add new file
You can navigate the log by pressing the up (↑) and down (↓) arrow keys on the keyboard. You can exit the log by pressing
q.
The command git log outputs the author of the commit, the time of its creation and its title. Every commit has a unique id, formed with SHA-1. In the output of git log the id can be seen as a long string next to the word “commit”, which is 51bf544c786a671c28f70713b6cb33d87cc38 in this case.
gitGraph
   checkout main
  commit id: "Initialize repo and add practice file"
  commit id: "Add initial story draft"
  commit id: "Add shopping list file"
  commit id: "Add school folder and notes file"
  commit id: "Update shopping list with new items"
  commit id: "Clarify story text and fix typos"
The process of creating a commit might seem unintuitive at first. The following analogy might help: Picture the commit as a package. You are sitting on the floor, with all the changes layed out in front of you as wooden blocks. The staging state, denoted with the title
Changes to be committedis a piece of wrapping paper, which is spread out in front of you. With the commandgit addyou can move the wooden blocks representing changes on top of the wrapping paper, and withgit commityou tie the wrapper aroung the changes to create a commit.
Branches
At the top of of the output of git status, you can see the following text: On branch main. Branches allow separating some commits from others. This means that a new branch can be developed independently from an old branch. It is customary for projects to have a main branch, usually called literally main or alternatively master, containing the version currently in use. Traditionally git has used the term master to refer to the main or default branch. Currently, many platforms such as GitHub, Gitlab and Git itself, create a branch named main by default.
Branches are usually used for testing out new features without breaking a working version of the application. Since branches don’t affect each other states, the new branch can be played with without worrying about other ones. When the changes made to the new branch are deemed ready, the branch can be merged to the main branch, and thus the new features will be published. For now it suffices to understand that we will only use the main branch in the exercises.
Exercise 4
- Open the
git-practicefolder we turned it into a Git project earlier both in an editor (for example Visual Studio Code) and in Git Bash.- Create a file called
story.txtin your project. Add a lot of text inside.- Add another file called
shopping_list.txtto the project, and write down what you need from the store (or just many rows of text).- Create a subfolder called
schoolinto the project, and create a file calledschool_file.txtinside. You will need these files in the future exercises.- After doing all the changes described above, create a total of three commits: one, where you add the story, a second on where you add the shopping list, and a third one where you add the school folder. Make sure that each commit message is truly descriptive.
- Using the command
git log, check that you have properly created three commits. You can pressqto exit the log.- Add something new to the shopping list, and create another commit. Use the command
git add -p.- Make sure you can see all the commits in the output of
git log.
Exercise 5
- Find out how you can remove changes from the state where they are being added to the next commit (under
Changes to be committed), and move them under the headlineChanges not staged for commit? Hint:git statuswill help.- Add some new products to the shopping list and save the file.
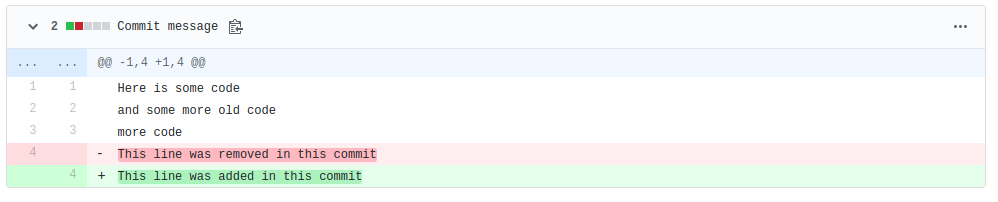
- Before adding the changes to the next commit, inspect the changes using the
git diffcommand. You can navigate the diff by pressing the up (↑) and down (↓) arrow keys on the keyboard. The removed lines have a “-“ prefix and a red highlighting. The added lines have a “+” prefix and a green highlighting. You can exit the diff by pressingq.- Add the changes to the next commit (so that they are under
Changes to be committed). Don’t create the commit yet.- Then remove the changes from the next commit.
- Then remove the changes, using Git, so that when you open the shopping list, the new products are not there.
Sharing code via GitHub
Next we’ll learn how GitHub can be used alongside Git for sharing and publishing code.
Creating a remote repository
In order to share a project through GitHub, a repository (or simply a repo) has to be created for it, and it has to be linked to a local Git project. After a remote repository has been added to a project, information can be shared between them. In consequence, two concurrent versions of the project will exist: the remote in GitHub and a local version on a specific computer.
This shows how GitHub functions as a backup storage. When the state of a project is updated to its remote in GitHub, it can be accessed from anywhere with internet. Thus the project can be continued even if its local version is destroyed or damaged.
You can create a repository to GitHub by pressing the button on the upper right corner:
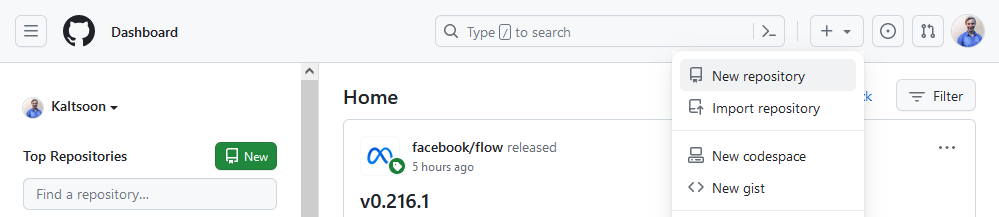
A window will open where you can add the repository a name and a description. A repository can be public or private: a public repository can be accessed by anyone, whereas a private repository can only be seen by people chosen by the owner.
You can also create a README, a license and a .gitignore file when creating a repository. The point of a README file is to display useful information about the project. A good README contains, for example, a short description of the project, installing instructions and a link to the documentation. A license refers to a document stating the responsabilities and rights of the creator and the users of the project. The .gitignore file allows automatically ignoring some files when creating a commit, and it is often quite useful. You can read more about it here.
When you wish to add a pre-existing project to GitHub, it is not a good idea to let GitHub create files such as a README automatically. This will lead to problems, because GiHub contains files initially which are not found in the local project. You’ll learn more about these kinds of situations later in this part.
The button Create repository adds the project to your personal account. When you navigate to the empty project, you can see some useful instructions about adding a new project to tour profile. You can find all your projects from your profile, or navigate to them directly with https://www.github.com/username/projectname.
Adding a remote
A remote can be linked to a local project with the command git remote add.
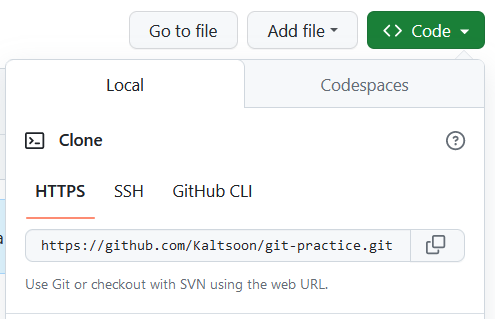
The command takes the name and the address of the remote repository as arguments. GitHub offers two options for the repository address protocol: SSH and HTTPS. We’ll choose the HTTPS address for the remote project:
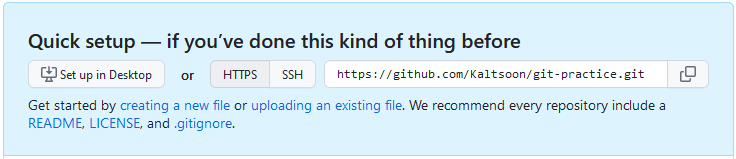
A new repository called “origin” is added using an HTTPS connection by running the command git remote add origin <https-address-of-the-repository>. An HTTPS address would be almost identical to the URL in your browser. A remote can be called practically anything besides “origin”, but it is a good and a common choice. It is possible to add several remotes, when properly naming them becomes important.
Exercise 6
When we start making changes to a remote repository on GitHub, we need to authenticate. So that we don’t need to input our GitHub credentials every time we access the remote repository, let’s configure the Git’s Credential Storage:
- On Windows, run
git config --global credential.helper managerin Git Bash.- On macOS, run
git config --global credential.helper osxkeychainin the TerminalOptionally, you can install GitHub CLI and authenticate via the
gh auth logincommand.
Exercise 7
Create a remote repository in GitHub for the project you created locally as instructed above. Don’t let GitHub create a README, license or a .gitignore file when creating the repository. Doing so will cause problems later. Also, make sure that the repository is public (the “Public” option is selected).
Add the repository as a remote to your local project using the
git remote addcommand as instructed above. Remember to use the HTTPS address when you copy the repository address in GitHub. Note that the paste keyboard shortcut does not work on Git Bash. You need to right click the Git Bash window and choose “Paste”.Add the link to this GitHub repository to the Moodle submission.
Publishing
After a project has been added to a repository in GitHub, commits can be published by pushing them to the remote repository.
Changes can be pushed to a specific branch in the remote repository as follows: git push remotename branchname. In this part we will only use the main branch. If you add the flag -u after the command push, next time you do not need to specify the name of the remote and the branch to push changes to the same place. Using the flag -u is recommended.
Let’s push the changes we made to the file git_practice.txt by running git push -u origin main, since we named the remote origin and we are using the main branch. Next we’ll navigate to the project site on GitHub. There we will find the file git_practice.txt.
Running
git pushmight ask for your GitHub username and password, because chaging a GitHub repository’s contents requires authentication. Once you have submitted those successfully, return to Git Bash.
Exercise 8
- Push the three commits you made earlier to the main branch of the remote repository.
- Check on GitHub that you can find all the changes in the remote.
Fetching code from GitHub
There now exists two versions of the project: one locally, and one in the remote at GitHub. Let’s see what happens, when these two versions don’t stay properly synced.
We’ll start by making changes to the project via GitHub. This simulates another team member changing the repository contents. You can edit files via GitHub by clicking on their name and then clicking on the pen icon on the right side of the page.
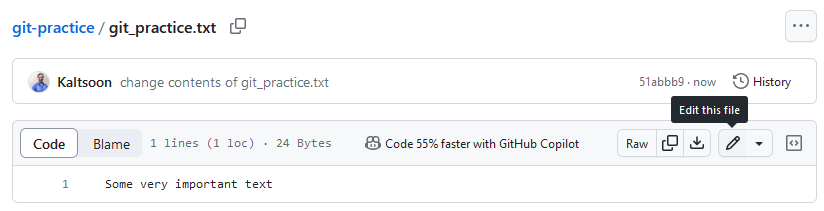
Next we’ll add a new line of text to git_practice.txt, and create a commit of the change by clicking the green “Commit changes…” on top right corner and then inside the dialog click the green “Commit changes” button. Now, if you take a look at the repository’s files on your local computer, you can’t see these changes locally. This is because our local version and the remote version of the repository aren’t in sync.
We can get the new changes to our local version by running git pull. If you used the flag -u with push earlier, there is no need to specify a remote or a branch. We’ll run git pull, which results in an output along the lines of the following:
remote: Counting objects: 3, done.
remote: Compressing objects: 100% (3/3), done.
remote: Total 3 (delta 0), reused 0 (delta 0), pack-reused 0
Unpacking objects: 100% (3/3), done.
From github.com
 * branch            main     -> FETCH_HEAD
   8793615..c661629  main     -> origin/main
Updating 8793615..c661629
Fast-forward
 git_practice.txt | 1 +
 1 file changed, 1 insertion(+)
Now you can find the new line of text in the file you changed via GitHub.
Exercise 9
Create a new file to the
schoolsubfolder via GitHub, and fetch it to your local version. You can add file in GitHub by click theschoolfolder name on GitHub and cliking “Add a file” on top right corner. Then commit changes similarly as while editing the file.
In practice the situation handled above corresponds to working on a collaborative project, where someone else has added commits to the project and pushed them to GitHub. Other developers should then fetch the new changes with the command git pull.
Stash
Next we’ll find out what happens, if GitHub contains some information not found in the local version, and vice versa.
Let’s change the first row of git_practice.txt via GitHub. This will create a new commit to the remote version. Then let’s add a new line at the end of the same file in the local version, but without creating a new commit of the new change.
Now if we try to fetch the latest changes with the command git pull we’ll get:
From github.com:
 * branch            main     -> FETCH_HEAD
Updating 061ca96..6920cd0
error: Your local changes to the following files would be overwritten by merge:
	git_practice.txt
Please, commit your changes or stash them before you can merge.
Aborting
Pulling the new commit from the remote does not work, because the local verison holds changes to the same file as the remote repository, and the local changes have not been wrapped into a commit.
In situations like this one can put the local changes aside to the stash (as Git was suggesting with “commit your changes or stash them before you can merge”). This is done with the command git stash. When the command is run, the local changes in files tracked by Git will by hidden, but not lost completely. In order to also stash changes in untracked files, add the flag -u. Changes can be returned from the stash by running git stash pop.
Use
git stashin a situation where you have existing local changes you don’t want to commit yet, but you need to pull changes from the remote GitHub repository (for example, your team member has pushed changes you need).
Exercise 10
- Make changes to some files which you have already added to Git once (i.e. they are not under the headline
untrackedin the output ofgit status).- Stash the changes you just made using Git.
- Open the files you changed and check if you can still see the changes.
- Edit the first line of the file
story.txtin GitHub and create a commit. Do this in browser as shown previously, by editing the file in GitHub.- Then edit the last line of the same file locally, but don’t create a commit.
- Fetch the changes you made to
story.txtfrom the remote GitHub repository to the local version. After seeing the problem with fetching the remote changes, stash your current changes and fetch the changes again.- After you have successfully fetched the changes from GitHub to the local version, pop the changes you have in the stash and create a commit of the changes you made to the last line of
story.txt.- Push the end result to GitHub.
- Make sure you can see both the changes you made to the first line and the ones to the last line in the remote GitHub repository.
If you see “CONFLICT” outputted to the terminal when popping changes from the stash, the section “Merge Conflicts” will help.
Merge
We’ll continue working with two parallel states, as they are probably the biggest stumbling block for new users of Git.
In the previous example, the remote and local versions had different states, because both contained infromation which the other did not have. Because local changes hadn’t been committed, they could be put aside to the stash. What would have happened if the local changes had been committed, i.e. the remote repository and the local project had commits which the other one doesn’t have?
The situation can be solved by merging together the commit in the remote version and the commit in the local version. Merging simply means combining parallel states. If the two states do not conflict, meaning that they do not contain changes overriding each other, Git can merge them automatically. A new commit, called a merge commit, is created in the process.
Actually, merging is built into the command git pull. In other words, it suffices to run git pull in order to combine the state of the remote to the state of the local version. In order to finish the automatic merge, the merge commit has to be given a message. Thus when you run git pull, a text editor will open, where Git has added a suggestion for the commit message. You can edit this message as you please, and create the commit by saving the message and exiting the editor, which concludes the merge.
Let’s test merging in practice. We’ll start by creating two non-conflicting commits by creating two new files, one in the remote repository and the other in the local version. After creating the two commits, running git status will output:
On branch main
Your branch and 'origin/main' have diverged,
and have 1 and 1 different commit each, respectively.
  (use "git pull" to merge the remote branch into yours)
nothing to commit, working directory clean
Notice how Git is kind enough to notify us of the two parallel, differing states, and it even advices us on how to proceed.
Remember that if
git statuscommand doesn’t display the newest state of the remote, you shoud rungit pullcommand first.
Pushing the new commits will not work, as the command git push will output the following:
To git@github.com:user/repo.git
 ! [rejected]        main -> main (non-fast-forward)
error: failed to push some refs to 'git@github.com:user/repo.git'
hint: Updates were rejected because the tip of your current branch is behind
hint: its remote counterpart. Integrate the remote changes (e.g.
hint: 'git pull ...') before pushing again.
hint: See the 'Note about fast-forwards' in 'git push --help' for details.
However, Git gives instructions on what to do next. We’ll fetch the new state of the remote and combine it with the local version by running git pull. When a text editor opens, we’ll give the merge commit a message, save it, and exit. The following will be printed out to the terminal:
From github.com:user/repo
 * branch            main     -> FETCH_HEAD
Merge made by the 'recursive' strategy.
 new_file.txt | 1 +
 1 file changed, 1 insertion(+)
 create mode 100644 new_file.txt
Now according to the output of git status we have created two commits, (ahead by 2 commits). The first one is the commit we created locally, which added one new file to the project, and the other one is the merge conflict. Pushing the two commits to GitHub should not result in any errors.
Exercise 11
- Create two non-conflicting commits, one directly to the remote repository, and another to the local version. For example, edit the first line of your shopping list via GitHub, and the last line on the local version.
- Try pushing the local commit to the remote repository and observe the error message.
- Pull the commit from the remote repository to your local version and write “my first merge” as the commit message. If you see “CONFLICT” printed out while pulling, read the next section “Merge Conflicts”.
- Finally, push all the changes to GitHub.
Merge Conflicts
When several people are working on the same project, it is not uncommon for two developers to make changes to the same lines in some file. When merging the two changes together, how does Git know which of the changes to discard and which one to keep? Well, it doesn’t, and so when mutually exclusive changes are found when merging, the automatic merge will fail. The conflict between two commits (or branches) is called a merge conflict. In these cases, someone has to hand pick the changes which will be kept in the project. This is called resolving a merge conflict.
Next we’ll create a merge conflict. We’ll start by writing “Greetings from GitHub” to a line in the git_practice.txt file via GitHub, and finish off by creating a commit. Then we’ll edit the exact same line locally by replacing it with “Greetings from my computer”, and wrap the change up to another commit.
Now when we try to combine the newest states from the remote and local versions together with git pull, we get the following error message:
Auto-merging ...
CONFLICT (content): Merge conflict in git_practice.txt
Automatic merge failed; fix conflicts and then commit the result.
This means that we have successfully created a merge conflict. The line starting with CONFLICT tells us where the overlapping changes can be found. Let’s open the file in question, git_practice.txt. We see the following:
<<<<<< HEAD
Greetings from my computer
======
Greetings from GitHub
>>>>>> baaf2c96cw031e11138d42c1a35065b9bf8b4400b
The mutually exclusive changes are separated with the symbols <, > and =. The word “HEAD” refers to the current commit (or the latest commit of the current branch in the local version), and the long letter and number combination is the id of the conflicting commit, coming in from the remote version. Advanced editors such as Visual Studio Code enable resolving conflicts with just a simple click, but otherwise the only option is to simply remove the lines one doesn’t wish to keep in the project.
Visual Studio Code has excellent features for Git, including features for solving merge conflicts quickly. These features are covered in the Visual Studio Code’s documentation.
Notably, we’ll remove the lines starting with <, > and =. In addition, we could for example combine the two greetings into one. In essence, the person resolving the conflict decides what remains in the file where the conflict is located.
In this case, we’ll combine the greetings into a more concise one:
Greetings from my computer and from GitHub
Now running git status will output a message reminding us that we are currently resolving a merge conflict:
On branch main
Your branch and 'origin/main' have diverged,
and have 1 and 1 different commit each, respectively.
 (use "git pull" to merge the remote branch into yours)
You have unmerged paths.
 (fix conflicts and run "git commit")

Unmerged paths:
 (use "git add <file>..." to mark resolution)

	both modified:   git_practice.txt

no changes added to commit (use "git add" and/or "git commit -a")
Let’s add the resolved file to Git with git add (note that the flag -p would not work in this particular case). Running git status will then yield:
On branch main
All conflicts fixed but you are still merging.
  (use "git commit" to conclude merge)

Changes to be committed:

	modified:   git_practice.txt
Finally, we’ll wrap up resolving the conflicts by, you guessed it, creating a new commit. The finishing touch is to push the result to GitHub, so that other developers can use the newest version.
Merge conflicts are enfuriating, but rather common when collaborating with others. The easiest way to avoid them is by making sure to always start developing on the newest version from the remote, i.e. by pulling before starting development. However, sometimes they cannot be avoided, in which case one must patiently go through the conflicting files.
Merge conflicts can also occur when taking changes out of the stash, if the hidden changes overlap with new ones.
Exercise 12
Create a merge conflict in your project and resolve it. Make sure to push the end result to GitHub.
Commit history
All the commits added to a Git project add up to its commit history. Commit history is like a chain of commits, formed when commits are created on top of each other.
Storing a project’s commit history is one of the greatest benefits of using version control. It allows returning back in time to a working version of the application, or observing how certaing files and features have changed over time.
Examining commit history
GitHub provides arguably the easiest tool to examine a project’s commit history. We’ll start revisiting our project’s commits from there.
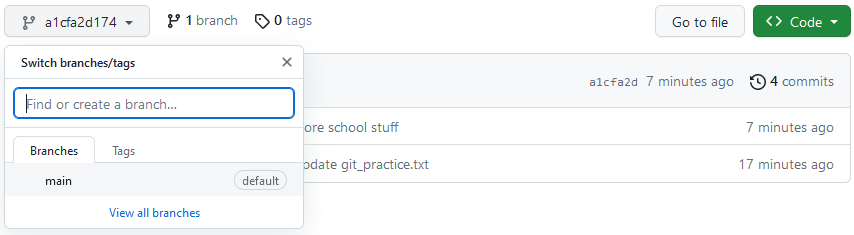
Let’s navigate to our project’s front page. Above the file list on right corner, there’s a link that says the number of commits in the repository. Here the link says “4 commits”. Clicking this link allows us to view the old commits.

When you click the link, you’ll see a list of all the commits which have been added to the project. There are three buttons on the right side of this view.
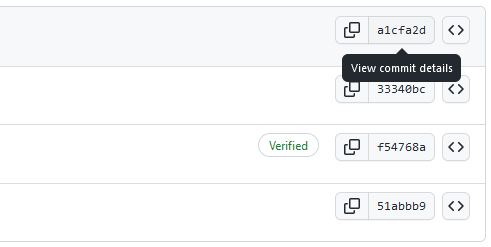
The button at the center of those three shows the beginning of a given commit’s id. Pressing the button shows all the changes made in that particular commit. The additions are shown in green, and removed lines in red.
Then by pressing “Browse files”, or the rightmost button with <> written on it from the previous view, you can browse the state of the project after a specific commit. A commit only contains a set of changes, but Git still enables revisiting the whole project after a given commit. You can return back to the latest commit of the main branch by pressing the button the “tree” icon on the left, and by choosing “main”.
Of course, the same procedure can be repeated on the command line. You can browse the state of the project after a specific commit by running git checkout commit_id. You should check the id using git log for example. Similarly, you can move back to a specific branch by running git checkout branch_name, most commonly git checkout main. The changes made in a specific commit can be viewed with git show commit_id.
Exercise 13
- Create a new file to you project called
secret.txt, and write something inside such as “this is a very important secret”.- Create a new commit of the new file and the contents added to it.
- Then remove the file
secret.txt, and create a new commit of the deletition.- Push the changes to GitHub.
- Navigate to the project page on GitHub. You shouldn’t see the secret on the front page. Find the secret from your commit history. Find the secret also using the command line.
Remember, don’t push anything secret to the remote repository: no passwords, personal API keys, your student number, or anything you wouldn’t want to share with the whole Internet.
GitHub’s workflow
Sites like GitHub make collaboraton in development projects a lot easier. No one notices problems more efficiently than the actual users, and GitHub creates a platform for reporting those complications. Any user can create an issue to a public project in GitHub, where one can report any problems with regards to using the software. Common issue subjects are error messages in edge cases, problems in installing, or missing features.
If one knows the solution to a problem, they can even suggest their own improvements to the project. However, this requires having access to the source code of the project. A public project can be copied to a local computer with the command git clone <https-address-of-the-repository>. The command takes the address of the remote repository, which can be acquired from the upper right corner of the project page, as an argument.
Note that this is actually the same address you used before when adding a remote repository with the command git remote add. The owner of a project will not know who has cloned their project. The command creates a new folder named by the repository containing the contents of the repository to the folder where we run it.
In the future, when you start a new Git project, you have two options for linking the local project to a repostory in GitHub. One option is to start by running git init inside a folder, create a repository to it in GitHub, and link them together. Another possibility is to create the remote first and simply clone the empty project to your local machine. The latter option has less steps so it is a bit more convinient.
In order to push some new commits to a project one has cloned, the project’s owner has to add the user as a collaborator. Otherwise the command git push will fail, because the user doesn’t have sufficient permissions to the repository. In other words, when starting a collaborative project, all the developers should be added as collaborators, allowing them to push code to the remote repository freely.
However, there exists another way of suggesting changes to an existing project. This is called forking. When one forks a project, a copy of it is added to the users own profile. This will create an event to GitHub’s “feed”, and the project’s owner can see who has forked their repository. After forking a project, you can clone the project from your own profile, and push changes to your own version, which has been separated from the original one. The difference to cloning is, that the cloned repository will not appear in your GitHub profile.
If the chages you have done to your own version are good enough in your own opinion, you can suggest merging them to the original project with a pull request. The owner of the original project can then go through your suggested changes and to integrate them to the project if they wish.
Let’s clone the git-practice repository we have been working on from GitHub to our local computer. First, check that you don’t have any commited changes in the local repository using the git status command. If so, add, commit and push any changes you currently have. Then, delete the current git-practice folder on your computer.
Once the folder has been deleted, open Git Bash in the folder where you want to clone the repository. For example, we can right-click on the Desktop and choose “Git Bash Here” to clone the repository on the Desktop. Finally, let’s clone the repository by using the HTTPS address of the repository we get from GitHub:
git clone <https-address-of-the-repository>
We should now have a git-practice folder in the folder we ran the command in. Open the folder for example in Visual Studio Code. We can see that the folder contains everything we have in GitHub. To open the repository in Git Bash we can either right-click on the repository folder or we can run the command cd git-practice. The cd command will change the current folder.
Exercise 14
- Delete the current
git-practicefolder on your computer and clone the git-practice repository from GitHub to your local computer as instructed above. Then, open the repository folder in Git Bash and in an editor such as Visual Studio Code.- Change the contents of some file (for example the
git_practice.txt) file and push the changes to GitHub. Open the repository in GitHub and see that it has the commit you created.- Find out (e.g. using Google or ChatGPT), how you can find out the names and addresses of the remote repositories of a Git project. The answer is a command you should run inside the Git project, when a remote has been set. Run the command and see that the remote repository address matches your GitHub repository. Add the command and the command output to a
remote.txtfile and push it to GitHub.
Meet your team and setting up the project
Next, you will get to know your team start working on the project by doing some setup work together.
Exercise 15
This is a team exercise. Let’s start by getting to know your team. If you are uncertain who your team members are, check their names in Moodle. Get to know each other by introducing yourself to other team members. You can e.g. share the following things about yourself:
- Which parts of software development you are most interested in? (e.g. backend development, frontend development, databases…)
- Which parts are you the most comfortable with?
- Which parts are you less comfortable with?
- What are your goals and expectations towards the course? For example, what do you want to learn during the course?
Also, discuss which platform (e.g. Teams, Slack or Discord) you’ll be using for communicating outside the weekly session. Then, setup the communication platform of your choice.
Finally, write down the following things:
- What are the names and GitHub usernames of your team members?
- What is the name of your team?
- What are the strenghts and weaknesses (e.g. skill-related) of your team?
- Which communication platform you will be using?
Every team member should add these to their Moodle submission. One team member can write down the information and share it with others.
Project setup
Next, let’s create the project repository and setup the Spring Boot project. To avoid future issues, make sure that your Spring Boot project is in the repository’s root folder, like this ✅:
src/
pom.xml
...
That is, it is not inside a sub folder, like this ❌:
somesubfolder/
    src/
    pom.xml
    ...
It is highly recommended that the Spring Boot project doesn’t require a higher Java version than 25. That is, versions 17, 21 and 25 are good choices.
Exercise 16
This is a team exercise. Next, let’s setup the GitHub repository for your team’s project. Do the following:
- GitHub organizations are a way to apply fine-grained access permissions to repositories. Create a GitHub organization for your team by following these instructions. You can name the organization for example based on your team’s name you came up with previously
- Invite other team members to the organization by following these instructions. When sending the invitation on the “Role in the organization” step, choose role “Owner” for each member of the team
- Create a public GitHub repository for the project. Choose the “Owner” as the organization you created previously and give the repository a descriptive name and a description
- Initialize a Spring Boot project for example using Spring Initializr. Choose a Maven project. Adding the Spring Web, Spring Boot DevTools, Thymeleaf and Spring Data JPA dependencies by clicking the “Dependencies” button will get you started. Push the generated project to the GitHub repository
- Each team member should clone the project’s GitHub repository for their local computer with the
git clonecommand. Remember to use the HTTPS address of the GitHub repository with the command. Start the Spring Boot application in the repository and make sure that there are no errors- Add a
README.mdfile with some content in it to the repository and push it to GitHub- To make sure that the repository is accessible to the whole team, each team member should make a small change to the
README.mdfile and push the changes to GitHub. You might not be able to edit the file in Eclipse, but Visual Studio Code should work. Check the commit history in GitHub and make sure that the commit’s author is your GitHub account. If your commit’s author’s avatar is a grey GitHub logo (see below) and the username doesn’t match your GitHub ussername, revisit exercise 3
Every team member should add the link to the GitHub repository to their Moodle submission.
Markdown and the README file
The README file mentioned previously has a special meaning in software development projects. When a software developer starts exploring a project, the first thing they should do is to look for the README file. This file should have all the relevant information about the project, for example:
- What’s the project about?
- How to use the project?
- How to develop the project?
- Who are the project contributors?
In practice, every repository should have a README file with at least some basic information about the repository.
In GitHub, the README files commonly have the .md extension. These are Markdown files. Markdown is markup language similar to HTML and you can use it to add formatting elements to plaintext text documents. Compared to HTML, Markdown syntax is much simpler and that’s why it is an excellent choise for formatting text documents.
This guide demonstrates the Markdown syntax compared to HTML. As an example, here’s what the React project’s README.md file looks like and here’s what the Markdown markup looks like. You can use the Markdown Live Preview to try out different kind of Markdown markup.
If you can’t edit a Markdown file in Eclipse, try in Visual Studio Code.
Exercise 17
This is a team exercise. Open the
README.mdfile of your project for editing for example in GitHub or in Visual Studio Code. Replace the current contents of the repository’sREADME.mdfile with the following information using Markdown syntax:
- At the beginning of the file add the project name “Quizzer” as a heading.
- Below the heading add a description of the project as paragraphs. Check the project description for some inspiration.
- Below the description, add a subheading “Team members” and below that add a list of each team member’s name.
- Each team member’s name on the list should be a link to their GitHub profile page. The GitHub profile link is in format https://github.com/GITHUB_USERNAME, for example https://github.com/Kaltsoon
You can also include other information about the project, which you find useful. Push the
README.mdfile changes to GitHub and see that the file formatting looks correct in GitHub.
The Awesome README repository contains a curated list of great README files. You can use it as an inspiration for your projects README file.
The Moodle submission should only contain the link to your GitHub repository created in exercise 7 and the information mentioned in exercises 15 and 16. Other exercises must be done as well, but they don’t contain anything that should be added to the Moodle submission.
The End
As a novice software developer it is easy to lose and even break code with version control. However, learning how to use one is definitely one of the most vital skills required in the working life. Though the system in use may not be Git, the same principles often apply.
If you run into a strange error message, don’t be afraid to ask for help. Avoid running commands blindly. Keeping a close eye on the output of git status will get you a long way. Also remember to make commits a sensible size, push them to the remote repository regularly, and communicate with your team mates. The best way to learn how to use Git is to just do it, so don’t give up and remove the project upon the first error message. Remember, that you can always just clone the repository to your computer again.
Hungry for more? You can read about Git from the following sources:
- Conventional commits
- The Conventional Commits specification describes how to write clean commit messages using structural conventions in the commit messages
- Git branch and Git feature branch workflow
- Git branches are commonly used to isolate work-in-progress code from the main branch. The first article covers the basics of Git branches.
- The second article describes a common software development workflow which utilizes Git branches.
- Oh Shit, Git!?!
- A fun way of getting help to most common Git problems.
- Some commands include overwriting Git history, which was not covered in this part. This might cause more problems than it helps. However, the site may be helpful in desperate times. Especially the first command
git reflogcan get you out of many complicated situations.
- The Pro Git book
- Pro Git Book is rather heavy, but a comprehensive guide to using Git. It might be best to use as a reference for specific problems. Reading it from cover to cover might be unnecessarily cumbersome.
- If you’ve already gotten to know Git, you might be interested in learning more about its history. Storing commit history, demonstrated in the exercise “A Secret”, also enables overwriting history. Although this can be useful for covering up mistakes, rewriting history can be dangerous in collaborative projects, since it can make other people’s versions invalid. There is a tutorial on the subject by Atlassian. They also have other advanced tutorials.