📖 Table of contents
Sprint 1
This week we’ll start working on the project described by the Product Owner in the project description. As we have learned, in Scrum the project advances in short iterations called Sprints. Each of our three Sprints last two weeks. This week is the start of the Sprint 1.
This Sprint doesn’t have a Moodle submission. It is enough that you have pushed your work to the project’s GitHub repository before the Sprint deadline on Before the Mon 20.4.2026 session, so we will be working on the Sprint requirements for the next two weeks. The Sprint ends with the Sprint Review event in which the team will share their progress with the Product Owner.
Sprint Planning
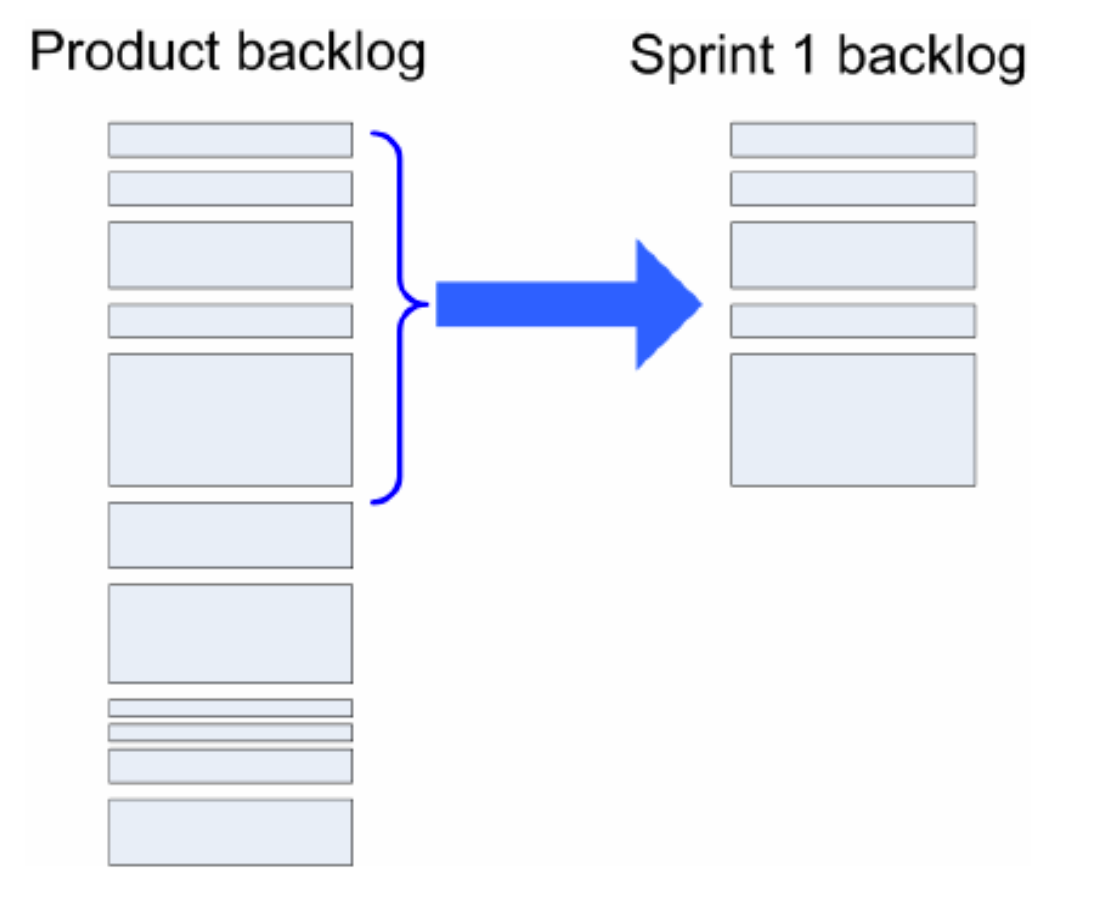
At the beginning of each Sprint, the Sprint Planning event is organized. During this event the whole Scrum Team participates in planning the requirements for the Sprint. As we have learned, these requirements are commonly documented as user stories, which are a short, simple description of a feature told from the perspective of the person who desires the new feature in the software. These user stories are added to a Product Backlog, which sort of an prioritized todo-list of user stories for the project.
The idea of Sprint Planning is not to make long term plans, for example what project should look like after three months. Because requirements tend to change, we should only do planning for the near future, usually just for the upcoming Sprint. That’s why Sprint Planning event commonly only takes at most a few hours.
The Product Owner’s responsibility during the event is to prioritize the user stories on the Product Backlog so that the Developers know what to focus on during the upcoming Sprint. Developers help the Product Owner in prioritization by proving insights on the technical feasibility of the user stories and estimates on how much work each user story requires.
Developers discuss themselves which of the highest priority user stories they are able to implemented during the upcoming Sprint. The chosen user stories for the Sprint are commonly divided into more technical tasks, which focus on the technical requirements of the user story. Chosen user stories and their related tasks are then added to a Sprint Backlog, which sort of an Developers’ todo-list for the Sprint.
User stories and tasks
User story should be described from the perspective of the user and should not contain technical details about the implementation. This way, the non-technical Product Owner and the Developers speak the same language.
Still, the Developers need to make technical planning to know how to actually implement the features described by the user stories. During Sprint Planning event each user story chosen for the Sprint are split into multiple technical tasks. User story’s tasks are basically technical descriptions of what needs to be done to implement the feature described by the user story. Tasks are just for the Developers, so not even a tiny technical detail should be omitted.
For example, let’s consider the following user story:
As a content creator I want to create a new blog so that I can start writing blog posts.
During Sprint Planning Developers discuss the technical steps required to implement the described feature:
“We’ll need a page with a form that has text fields for the blog’s name and description. Also, there needs to be a button to submit the form.”
– John, one of the Developers
“That’s right, John. To render the page we’ll need a controller class for the backend. The controller class should have a method that renders the template of the page. Maybe the class name could be for example BlogController. What do you guys think?”
– Mary, one of the Developers
“Sounds good to me, Mary. What about the form submission? I think we need a controller method for that as well. We should add a new blog entry to the database based on the submitted name and description. For this we could use the H2 database and Hibernate. We need a JPA entity and JPA repository class class for the blog.”
– Jane, one of the Developers
While discussing the technical details, the Developers document a todo-list of tasks with a short description. Developers also consider the order of the tasks:
Add a Blog JPA entity class and a BlogRepository JPA repository class
Add a template for the blog creation form containing fields for name and description
Add a BlogController controller class and methods for rendering and handling the submission of the blog creation form
These tasks are added to the Sprint Backlog.
Scrum backlogs
The “Scrum Artifacts” section of the Scrum Guide describes the artifacts used in Scrum. Artifacts are information that the Scrum Team and stakeholders use to detail the product being developed, actions to produce it, and the actions performed during the project. These artifacts increase the transparency of the process. Two of the most important artifacts are the Product Backlog and Sprint Backlog.
Product backlog
The Product Backlog is a prioritized list of requirements for the developed software. Commonly these requirements are documented as user stories. On top of new features, Product Backlog items can also be for example bug fixes or other technical tasks. The Product Backlog is altered constantly during the Sprints, mostly during the Sprint Planning event. For example, new user stories are added, old ones are edited or their priority is changed.
The Product Owner’s responsibility is to prioritize the user stories in the Product Backlog, but the whole Scrum Team participates in the definition of the user stories. The Product Owner should also make sure that the user stories implemented during a Sprint match the stakeholder’s requirements. Once a user story is implemented during a Sprint and the implementation is accepted by the Product Owner, the user story can be removed from the Product Backlog.
Product Backlog can be thought as the todo-list of user stories for the project. Like in a todo-list, the user stories are in the order that they should be completed. That is, most important user stories are on the top of the list.
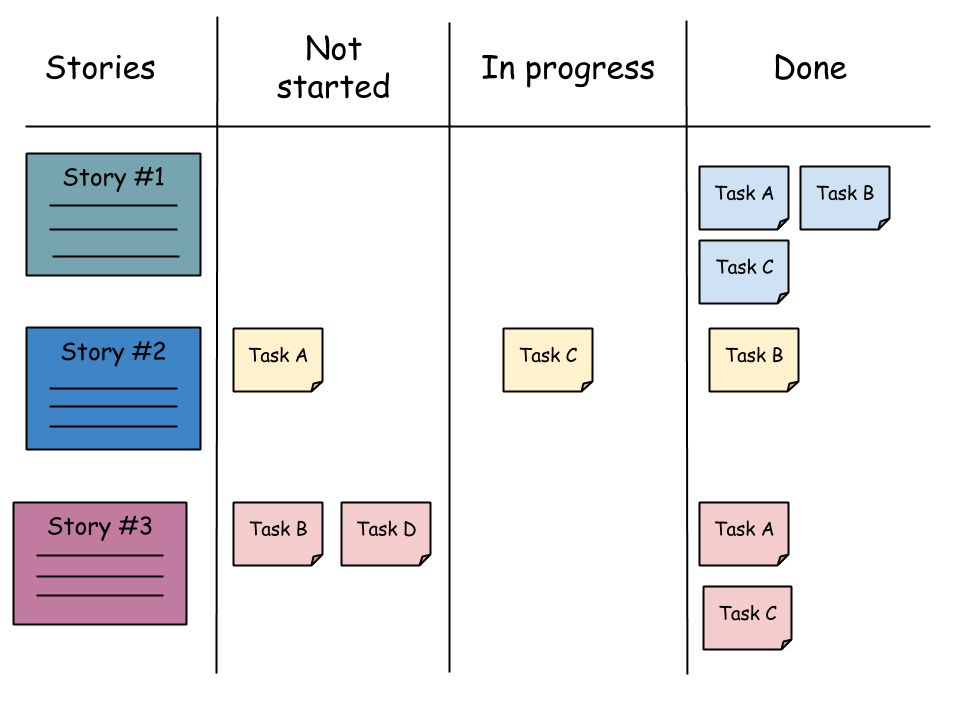
Sprint backlog
During Sprint Planning event, the Developers decide the amount of user stories they manage to implemented during the upcoming Sprint. The selected user stories are chosen from the top (highest priority) of the Product Backlog. The chosen user stories are split into technical tasks, which are both added to a Sprint Backlog.
The Sprint Backlog should represent the work needed to be done during the Sprint and the progress of that work. That is, the following points should be seen from the Sprint Backlog:
- Which user story is each task related to?
- Which team member is assignment to each task, i.e. who is working on the task?
- What’s the progress of each task? For example, has somebody started working or the task, or is the task done?
This information is constantly kept up-to-date during the Sprint. For example, if a certain task is completed, it should be seen from the Sprint Backlog.
Sprint Backlog can be thought as the todo-list of tasks for the current Sprint. Each task is commonly related to a certain user story.
Backlog platforms
Sprint Backlog is commonly organized as taskboard that has columns for different progress states. These states can be for example “Not started” (nobody has started working on the task), “In progress” (somebody is currently working on this task), and “Done” (the task is completed). The tasks themselves are cards assigned to one of these states depending on their progress. The tasks are moved from one state to another until they are done.
Taskboards are either physical taskboards, for example whiteboards in an office, or virtual taskboards. These days, it is quite common that a virtual taskboard are used as Product Backlogs and Sprint Backlogs. Jira and GitHub projects are perhaps the most widely used taskboard platforms in the industry. During this course we will be using GitHub projects because it integrates very well with our GitHub workflow.
GitHub Projects
GitHub Projects is a platform for managing taskboards. We will be using it for managing the user stories and tasks in our Product Backlog and Sprint Backlog.
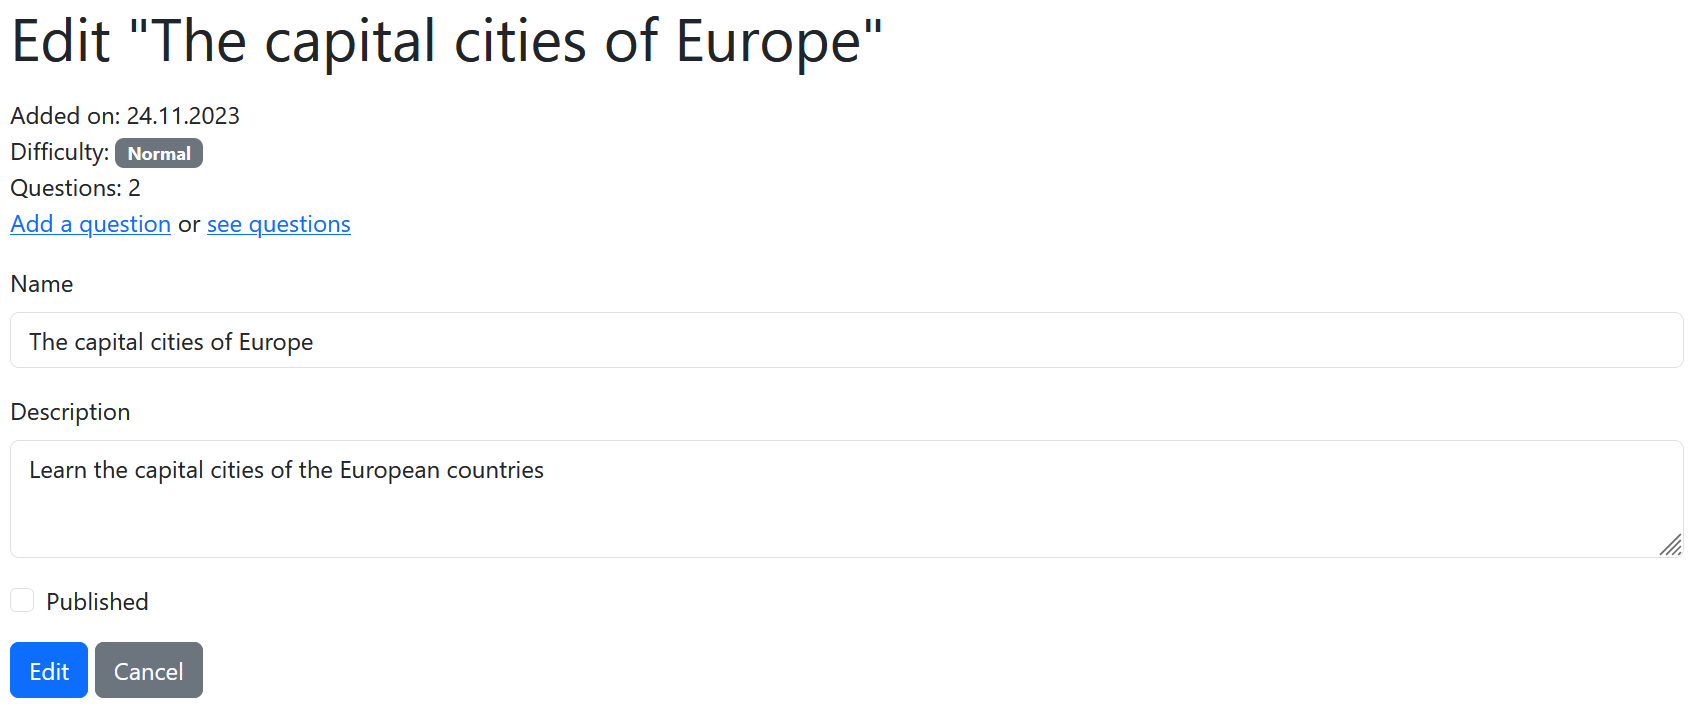
Taskboards in GitHub Projects are called projects. Let’s create a project for our backlogs. Open your repository in GitHub and click the “Projects” tab. Then, click the green “New project” button on the right. Click the arrow next to the button, if the button label is different. This should open a dialog. From the left side of the dialog, choose “Board”. This determines what the project will look like and you can change it later. Name the project “Backlog”. Finally, click the “Create” button to create the project.
We now have a project with the default columns: “Todo”, “In progress” and “Done”. The column will determine the status of the backlog items. We can edit the column names by clicking the three dots at the top-right corner of the column. We can add a new column by pressing the “+” button on the right side of the last column. Let’s change the columns so that they are the following from left to right:
- “Product Backlog”. This column is for the Product Backlog items. That is, items that are requirements for the project but aren’t currently worked on. The items should be listed in the priority order defined by the Product Owner.
- “Sprint Backlog”. This column is for the Sprint Backlog items. That is, user stories and tasks that are chosen for the current Sprint.
- “In progress”. This column is for the items that some team member is currently working on.
- “Done”. This column is for the items that have been completed.
Finally, let’s make sure that our project is public. Click the project’s name and the project’s settings should open. Scroll down to “Danger zone” section and choose “Visibility” as “Public” from the dropdown menu.
The project will be empty for now, but we will add some user stories and tasks for the project after the Sprint Planning event.
The Issues and Projects in GitHub video covers thoroughly the usage and purpose of GitHub Projects and Issues (covered soon in the material).
There are as many different backlog implementations as there are software development teams. The presented backlog implementation isn’t the industry standard or the only correct one but perhaps a fairly good starting point. Scrum emphasizes constant process improvement and the backlog implementation should be constantly improved to better suit your team’s needs.
Exercise 1
Create the “Backlog” project as instructed above. Make sure that the project is public. Add a link to the Backlog project to the
README.mdunder a “Backlog” subheading (open the Backlog project in GitHub and copy the URL from the web browser’s address bar).
🏃♂️ Sprint 1 planning
Here’s how the Product Owner is describing the Sprint 1 goals in the Sprint Planning event:
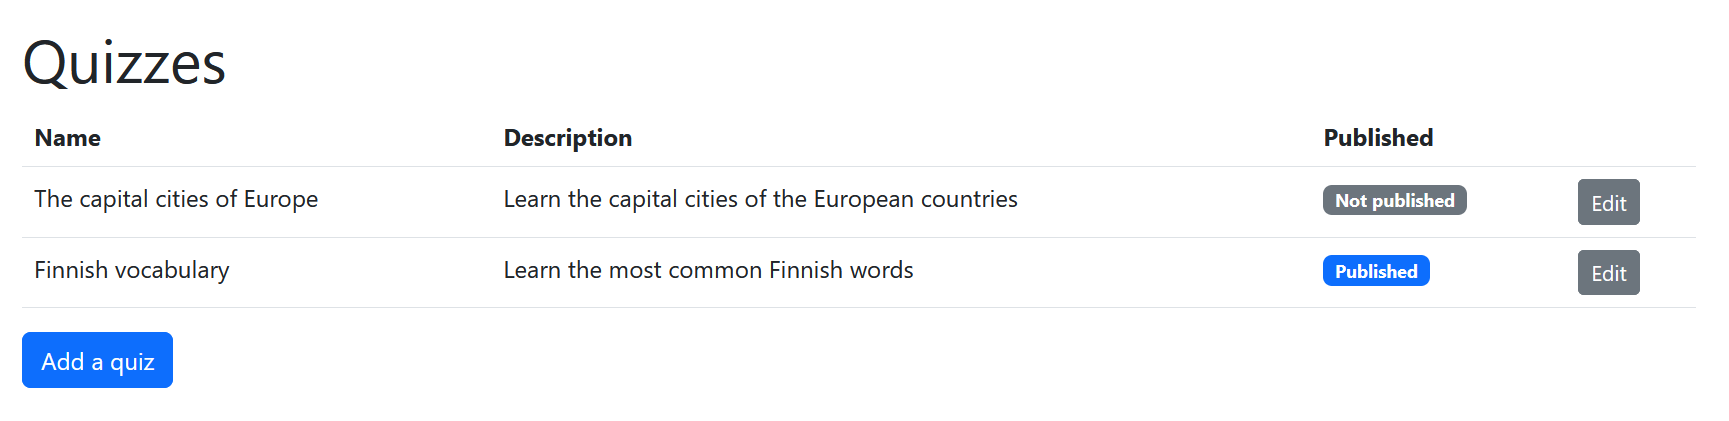
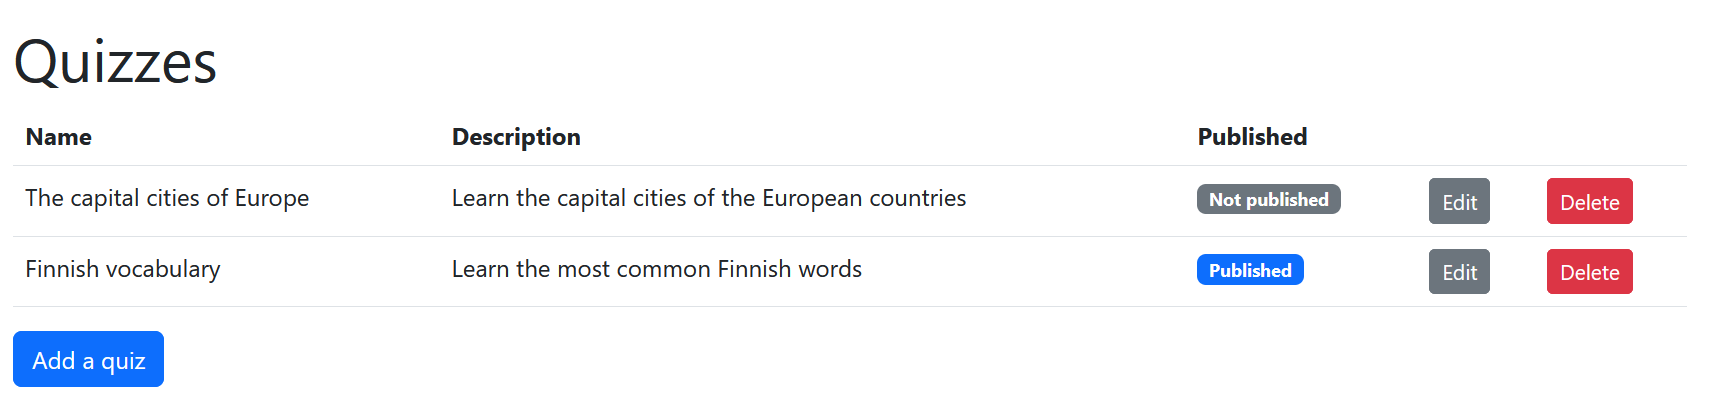
“To get started with the project, we need to implement a basic set of features for the teacher dashboard application so that the teachers can manage quizzes and their questions and answer options.
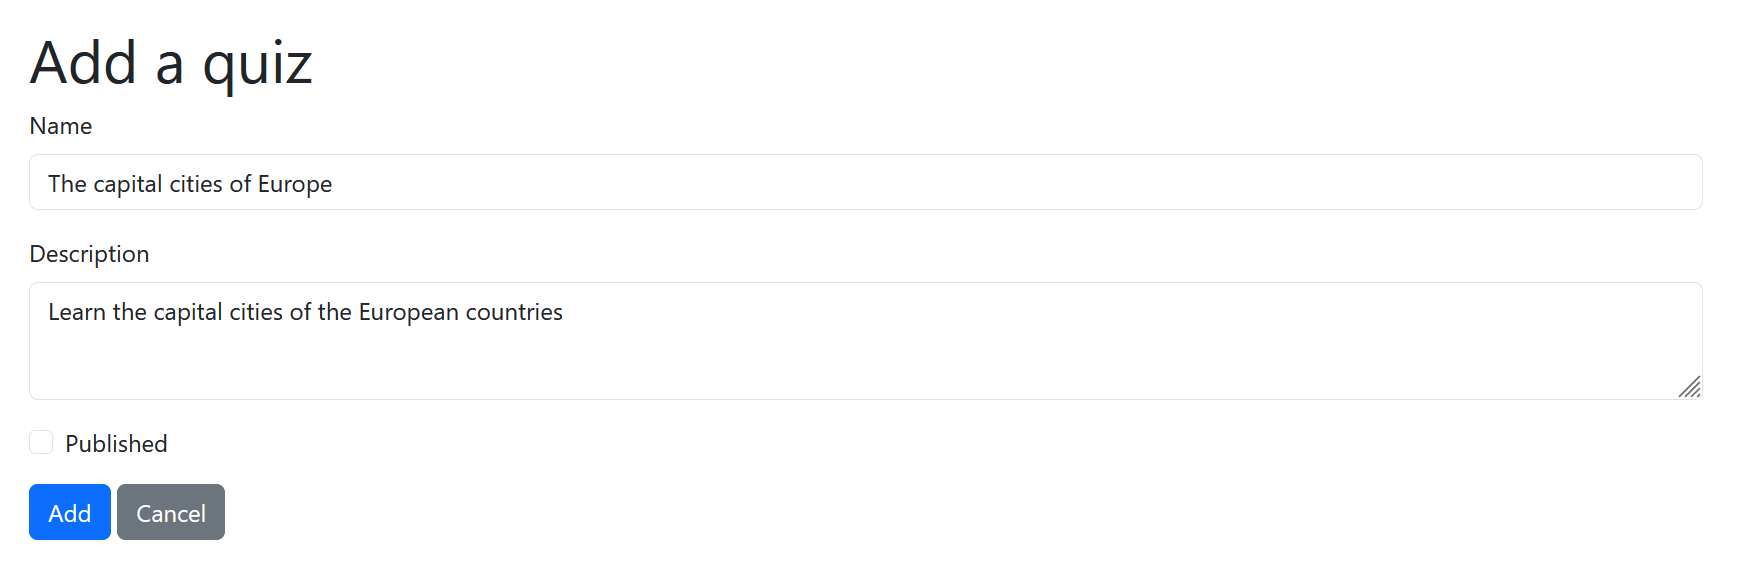
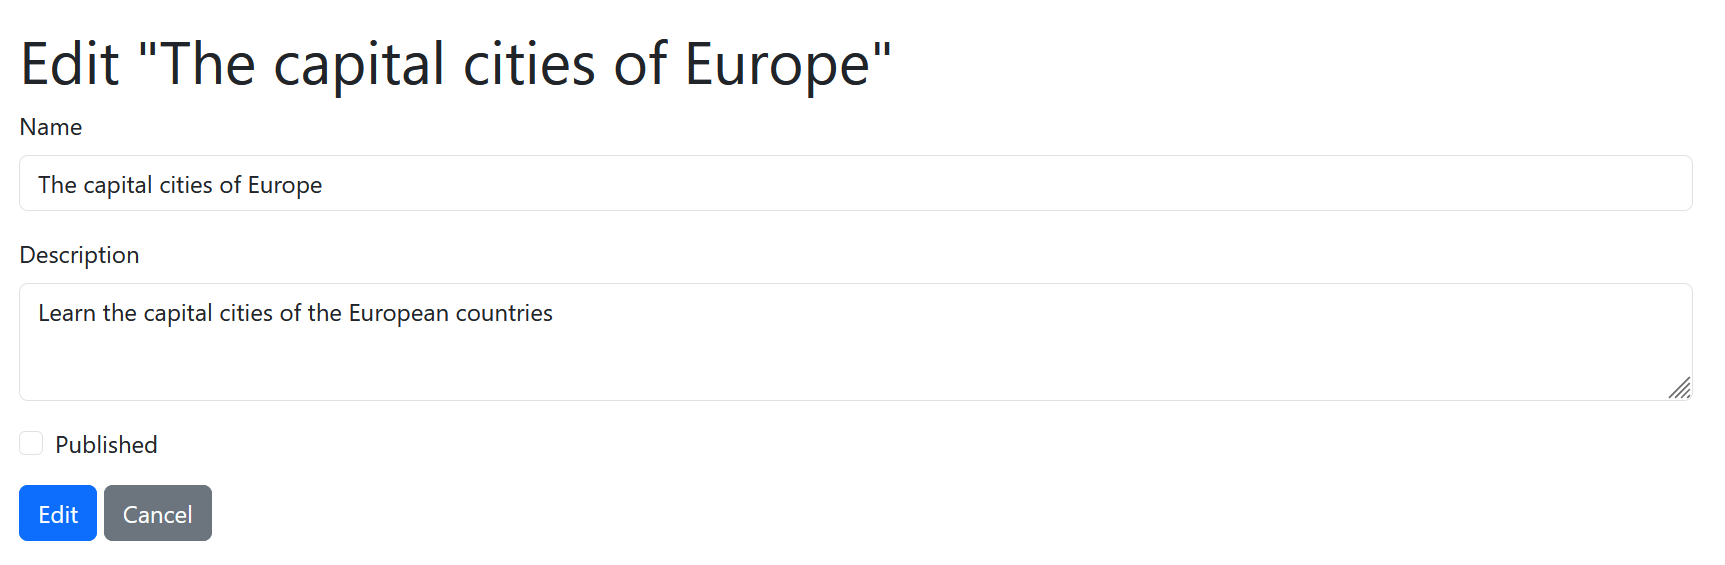
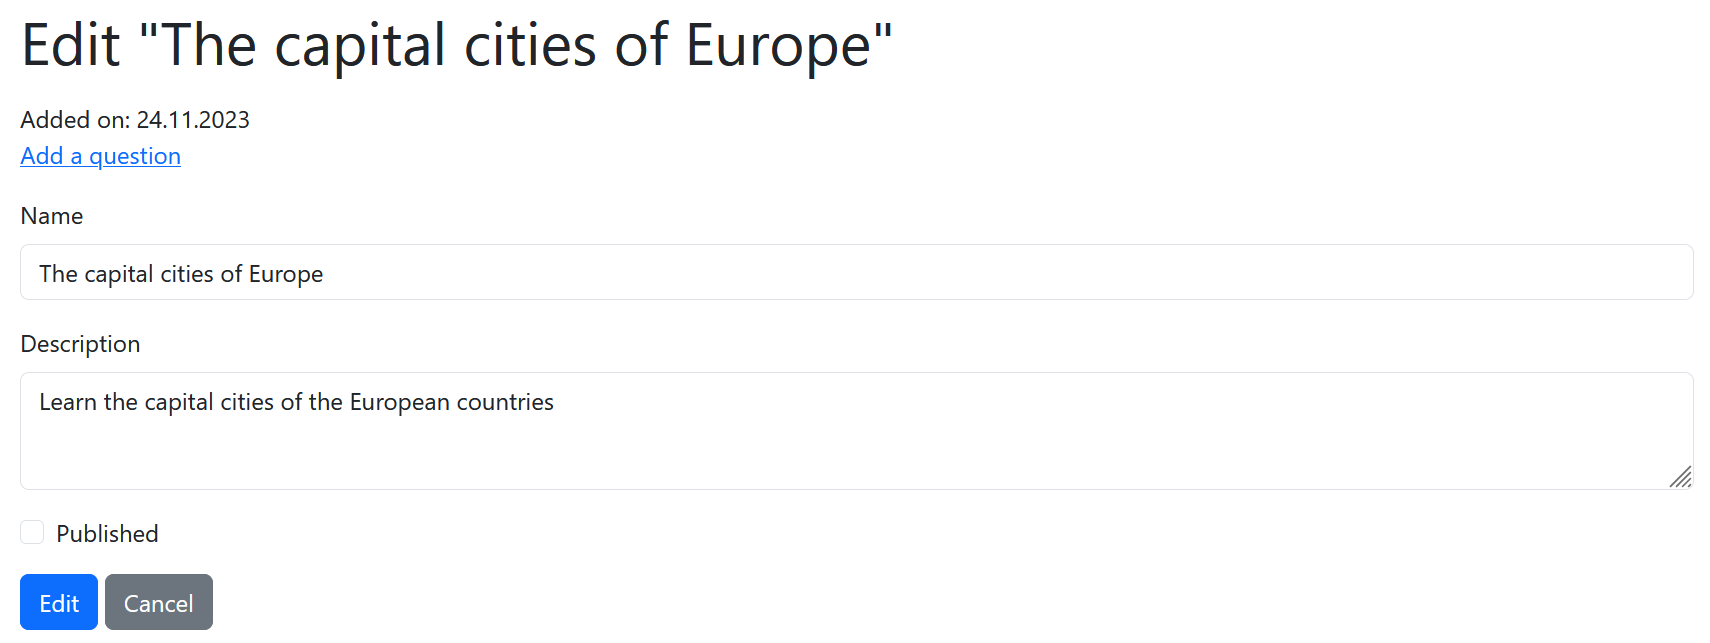
The teacher should be able to add a quiz related to a topic of a course using a form. A quiz has a name, for example “The Scrum framework”, a description, for example “Learn about the roles, events and artifacts of the Scrum framework”, a Haaga-Helia course code, for example “SOF005AS3AE” and a published status. A quiz is either published or not. Students can only see and take published quizzes. Each of these values should have a field in the form.
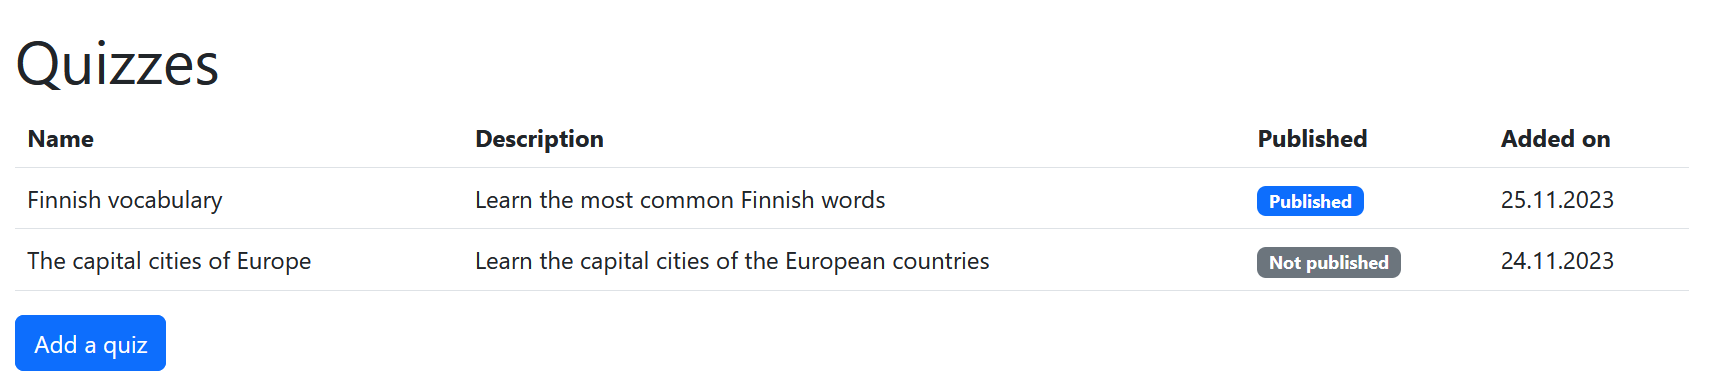
The front page of the application should have a list of added quizzes. The list should display the information provided by the teacher while adding the quiz and the date when the quiz was added. The page should also have a link that takes the teacher to the page where they can add a quiz.
The teacher should be able to edit the information of a quiz if, for example they want to publish the quiz or change its name or description. The quiz list should have a link next to each quiz which takes the teacher to an edit form, where they can edit all the information of the quiz. The teacher should also be able to get rid of quizzes they don’t need. There should be a delete button next to each quiz in the quiz list. When the user clicks the button, the quiz should be deleted.
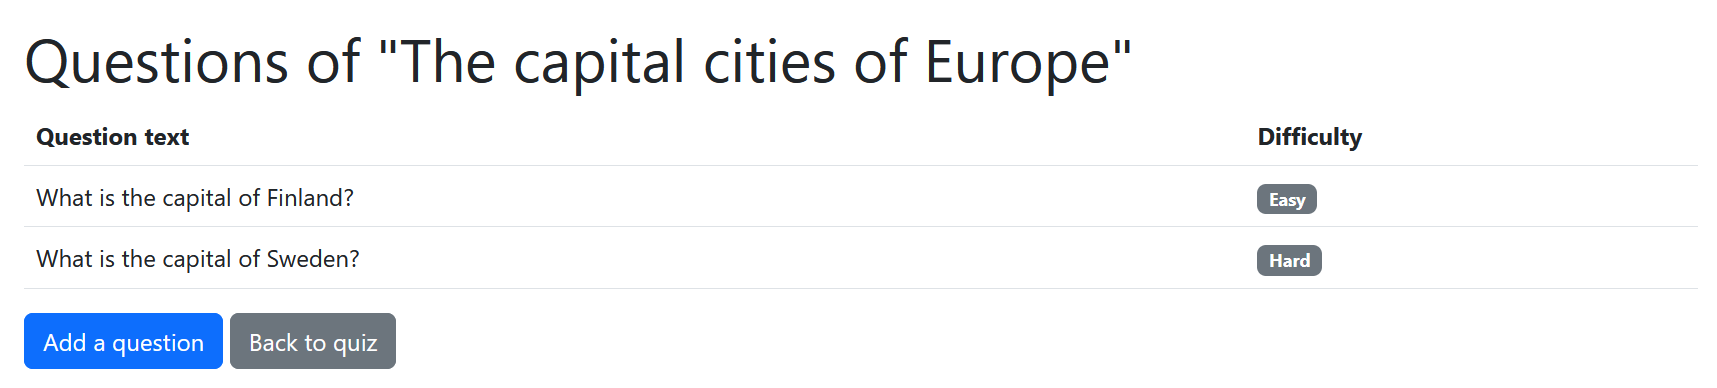
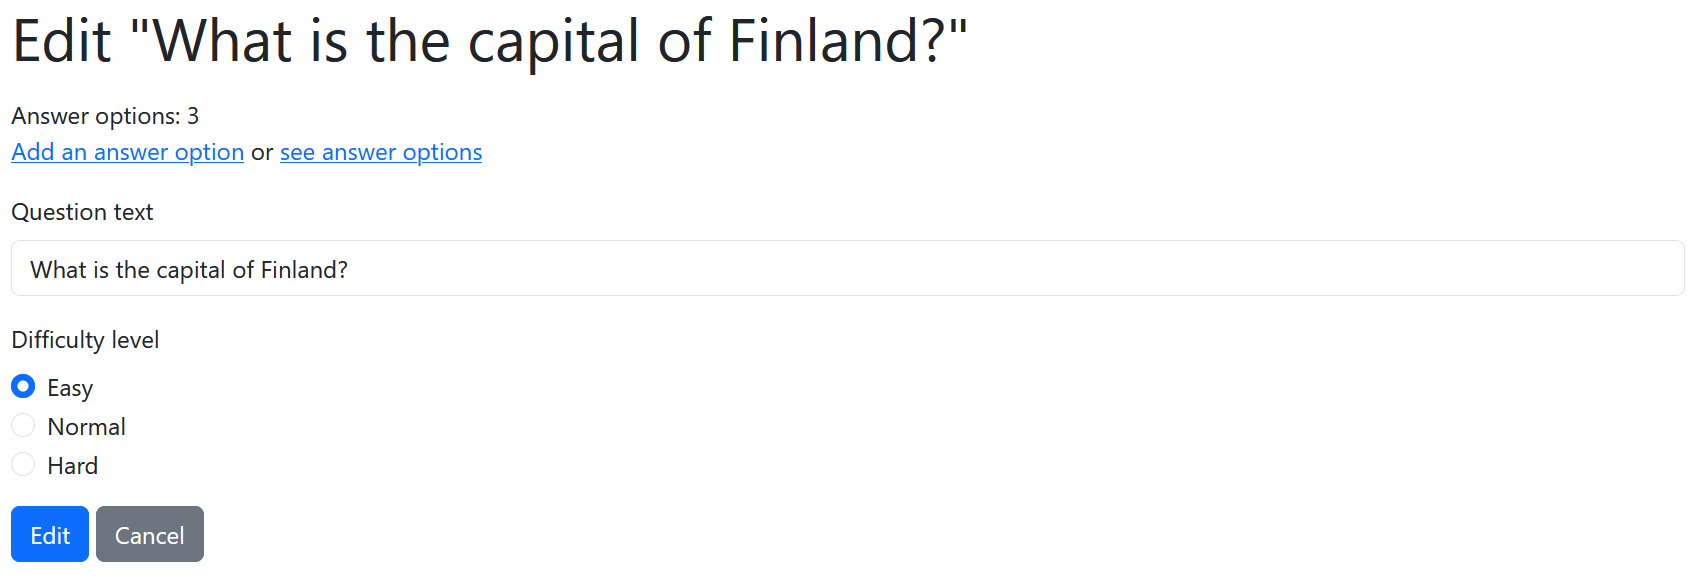
The teacher should be able to add questions to a quiz. For example, the “The Scrum framework” quiz could have a question “What is the purpose of the Retrospective event”. A question has a question text, for example “What is the purpose of the Retrospective event?” and a difficulty level. The difficulty level is either “Easy”, “Normal” or “Hard”. The default difficulty level is “Normal”.
The questions of a quiz should be listed on a separate page. Once a question has been added to a quiz, the teacher should be able to delete it.
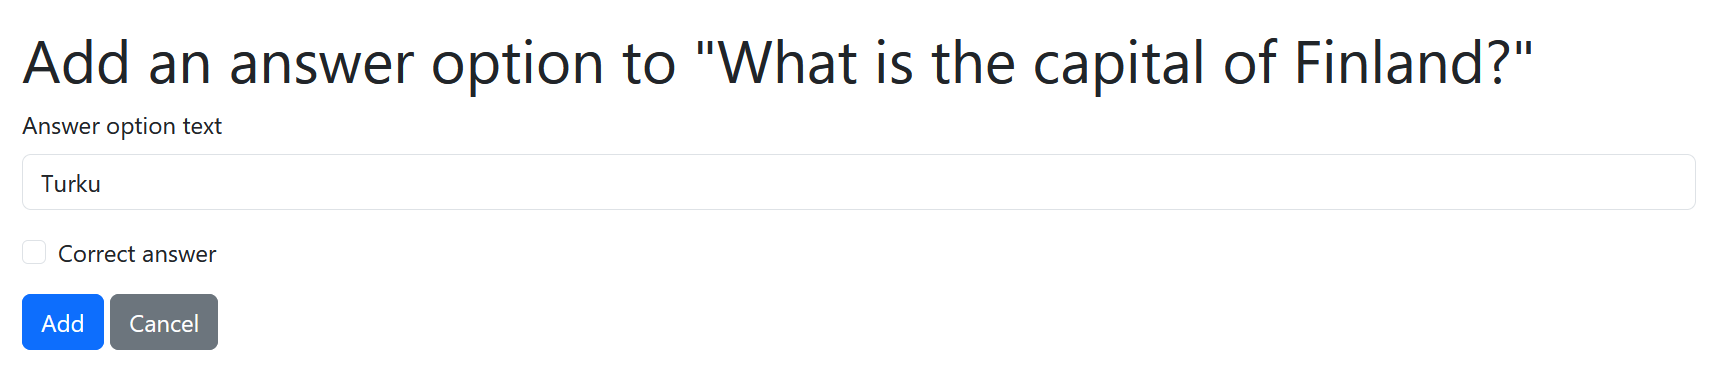
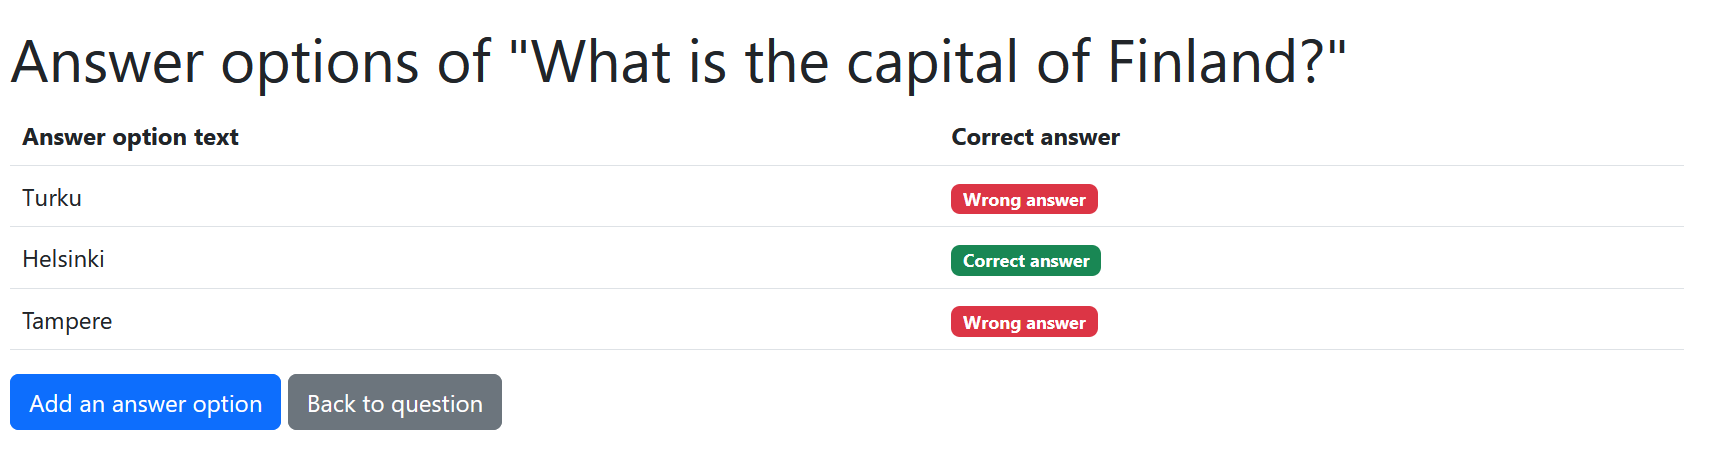
The teacher should be able to add answer options to a question. For example, the “What is the purpose of the Retrospective event?” question could have answer options “Planning the requirements for the upcoming Sprint”, “Finding ways to improve the process” and “Tracking the progress of the Sprint”. An answer option has an answer option text, for example “Planning the requirements for the upcoming Sprint”, and a correctness status. Answer is either correct or not. For example, the “Planning the requirements for the upcoming Sprint” answer option would not be correct where as “Finding ways to improve the process” answer option would be correct.
The answer options of a question should be listed on a separate page. Once an answer option has been added to a question, the teacher should be able to edit and delete it.
If would be great if we would be able to get started with the student dashboard application as well. A page with a simple list of published quizzes would be enough at this point.”
– The Product Owner
After some discussion the Scrum Team planned the following user stories:
- As a teacher, I want to add a quiz so that students can learn about course-related topics
- As a teacher, I want to see a list of added quizzes so that I know which quizzes are added
- As a teacher, I want to edit a quiz so that I can change its information
- As a teacher, I want to delete a quiz so that I can get rid of quizzes I don’t need
- As a teacher, I want to add a question to a quiz so that students can learn about course-related topics
- As a teacher, I want to see a list of quiz’s questions so that I know which questions the quiz has
- As a teacher, I want to delete a quiz’s question so that I can get rid of questions I don’t need
- As a teacher, I want to add an answer option to a question so that students can learn about course-related topics
- As a teacher, I want to see a list of questions’s answer options so that I know which answer options the question has
- As a teacher, I want to delete an answer option so that I can get rid of answer options I don’t need
The order of the user stories represent the priotity provided by the Product Owner. That is, this should be the order of the user stories in the Product Backlog. The Developers should also implement the user stories in this order.
These are the user stories, that you will be working on as a team during this Sprint. The next step of the Sprint Planning event is to split these user stories into codings tasks.
Exercise 2
Choose the Scrum Master among the team members for the first Sprint. The Scrum Master should help other team members with following the Scrum process, for example by facilitating the team’s meetings and making sure that the backlogs are kept up-to-date.
GitHub issues
GitHub issues are used to track ideas, feedback, tasks, or bugs for work on GitHub. Open source projects commonly use issues for feature suggestions and bug reports (something is not working as inteded). Here is an example of issues in the React library’s repository. We will use issues to organize the user stories, tasks and bug reports in our project.
Before we start creating issues, let’s add some labels so that we can categorize our issues. Open your repository in GitHub and click the “Issues” tab. Then, on the right, click the “Labels” button. So that we can separate the user story issues from other issues, let’s add a “user story” label by clicking the “New label” button.
If you don’t see the “Issues” tab in the repository, follow this guide to enable the issues. In our case the “Issues” checkbox should be checked.
Exercise 3
Create the “user story” label to classify user story related issues.
Next, we need to specify the Sprint the issue is worked on. We can use Sprint-specific milestones to group the issues based on a Sprint. Let’s create a milestone for the first Sprint. First, click the “Issues” tab to open the issues page. Then, click the “Milestones” button next to the “Labels” button. On the Milestones page, click the “Create a new Milestone” button. Set the milestone title as “Sprint 1”. You can also specify a due date and a description if you want. Finally, click the “Create milestone” button to create the milestone.
Exercise 4
Create the “Sprint 1” milestone to group the issues of the first Sprint.
Now that we have the “user story” label and the “Sprint 1” milestone, let’s create an issue for each user story. Click the “Issues” tab and click the green “New issue” button on the right. Set the issue title as “As a teacher, I want to add a quiz so that students can learn about course-related topics”. With the description we can provide additional details if we can’t fit everything in the title. On the right, click “Labels” and choose the “user story” label which indicates that this issue is a user story. Then, click “Projects” and choose the “Backlog” project. This will add the issue to the Backlog project. To specify the issue’s Sprint, click “Milestone” and choose “Sprint 1”. Finally, click the “Submit a new issue” button to create the issue.
Next, let’s open the “Projects” tab and open the Backlog project. We should see that the issue we created is now in the project. We can move the issue to a column by dragging the issue card. This will change the status of the issue. Let’s move the issue we created to the “Sprint Backlog” column, which indicates that this user story is in the current Sprint.
By default we can’t see the labels or the milestone on the issue cards. We can click on the arrow button next to “View 1” below the project name and click “Fields” under “Configuration”. There, check “Labels” and “Milestone”. Finally, click the green “Save” button to save the configuration.
Exercise 5
Create an issue for each user story. Add the “user story” label for each issue. Set the milestone as “Sprint 1”. Add the issues to the Backlog project and move them to the “Sprint Backlog” column.
Database setup
Data is the backbone of almost every application. That is why it is a good idea to start planning user stories by considering the data requirements. It is also necessary to decide and setup an appropriate database to suit the application’s needs.
For example, H2 database is a good choice as the development environment database (the one that the developers use during the development) due to its easy setup and use. We will discuss more suitable choices as the production environment database (the one that the actual user’s of the application use) later. First, make sure that your project has the required dependencies for, for example, the H2 database (or some other database of your team’s choice). Then, add the database configuration to the application.properties configuration file. This article covers the details of the H2 database setup.
Exercise 6
Setup the database (for example, H2) for the project. Start the Sprint planning by discussing the database schema based on the requirements. What kind of entities and attributes should be added and what are their relationships?
Tips for the teamwork
Here’s a few tips before you start implementing the tasks:
- Use the full potential of your team and work together. Plan the tasks together, implement the tasks together and support each other
- Maintain active communication regarding the Sprint progress. Keeping the Sprint Backlog up-to-date is important but also share your progress and problems actively with your team members face-to-face or via Teams or other communication platform
- Push code to the GitHub repository often. Once you have some working code, use
git add,git commit,git pushcommands to push the code to GitHub - Pull the code from the GitHub repository often. Run the
git pullcommand to get the latest changes to your local computer - While pulling the code from the GitHub repository, you’ll probably face merge conflicts. You can spot a merge conflict from the
git pullcommand ouput:CONFLICT (content): Merge conflict in .... If you have trouble solving the merge conficts, see the Git instructions
The tasks that you come up with during the Sprint Planning event should not be set in stone. These tasks are there to get you started with implementing the user stories. You might come up with new tasks or notice that the current tasks need alterations during the actual implementation. In such case, do the necessary changes for the Sprint Backlog.
The user stories related to the teacher dashboard can be implemented as a backend-only application and there’s no need to include any frontend features (meaning using Thymeleaf templates instead of React for the user interface). The student dashboard application we get to later will be implemented as a frontend application.
Exercise 7
Read through the User stories and tasks section. Then, plan the tasks for the first user story, “As a teacher, I want to add a quiz so that students can learn about course-related topics”. Read the Product Owner’s Sprint Planning description regarding the user story again and split it into small coding tasks.
Consider for example the following things in the tasks:
- What kind of data requirements does the user story have?
- What kind of user interface requirements does the user story have?
- What kind of controller requirements does the user story have?
Create an issue for each task. Set the milestone as “Sprint 1”. Add the issues to the Backlog project’s “Sprint Backlog” column.
The Scrum Team’s UI Designer’s vision is that the implementation could look something like this:
This video covers GitHub’s sub-issues, which can be used for example to clarify the user story and task hierarchy.
Exercise 8
Plan the tasks for the second user story, “As a teacher, I want to see a list of added quizzes so that I know which quizzes are added”. Read the Product Owner’s Sprint Planning description regarding the user story again and split it into small coding tasks.
Create an issue for each task. Set the milestone as “Sprint 1”. Add the issues to the Backlog project’s “Sprint Backlog” column.
The Scrum Team’s UI Designer’s vision is that the implementation could look something like this:
Exercise 9
Plan the tasks for the third user story, “As a teacher, I want to edit a quiz so that I can change its information”. Read the Product Owner’s Sprint Planning description regarding the user story again and split it into small coding tasks.
Create an issue for each task. Set the milestone as “Sprint 1”. Add the issues to the Backlog project’s “Sprint Backlog” column.
The Scrum Team’s UI Designer’s vision is that the implementation could look something like this:
Exercise 10
Plan the tasks for the fourth user story, “As a teacher, I want to delete a quiz so that I can get rid of quizzes I don’t need”. Read the Product Owner’s Sprint Planning description regarding the user story again and split it into small coding tasks.
Create an issue for each task. Set the milestone as “Sprint 1”. Add the issues to the Backlog project’s “Sprint Backlog” column.
The Scrum Team’s UI Designer’s vision is that the implementation could look something like this:
Exercise 11
Now that there’s some work to be done, discuss how you will divide the tasks among the team members. Then, add an assignee for each issue. This can be done by opening the issue and clicking “Assignees” on the right. Then, choose your GitHub account from the dropdown menu. Issue can also have more than one assignee if multiple team members work on the same issue together.
The Sprint Backlog helps your team to track the process of the Sprint. So, while working on the tasks, keep the Sprint Backlog up-to-date:
- When you start working on a task, assign it to you and move it to the “In progress” column in the project
- When you complete a task, move it to the “Done” column in the project. Also remember to close the task related issue. This can be done by clicking the issue title in the Backlog project and clicking the “Close issue” button
- When all user story related tasks are completed, move the user story issue to the “Done” column
Use the Sprint Backlog to track the Sprint progress. Always start a team meeting by looking at the Sprint Backlog.
You can easily find the issues assigned to you by opening the “Issues” tab and choosing your GitHub account from the “Assignee” dropdown menu.
Daily Scrum
The Daily Scrum is a 15-minute event, commonly held on daily basis. The purpose of the Daily Scrum is for the Scrum Team to inspect and adapt its progress. The Scrum Master is typically in charge of facilitating the meeting. During the event each team member typically answers the following three questions:
- What did you do previously?
- What will you do next?
- Are there any obstacles in your way?
For example this could be a one team member’s statement during the Daily Scrum:
“Yesterday I started implementing the task for the blog listing template. I’ll continue working on that today. I had some trouble while trying to iterate a list in the template. I don’t remember the syntax. Could anyone have a look at it with me after the Daily Scrum?”
– Jane, one of the Developers
The Sprint Backlog should be open during the event so that the whole Scrum Team is up-to-date with the Sprint Backlog updates and the Sprint progress.
A funny fact: it is common that during the Daily Scrum the whole Scrum Team is standing. This is why the Daily Scrum is often called the “daily stand-up”. The reason is very practical: the event tends to be shorter because standing for a long period of time can become tedious.
Exercise 12
Organize a Daily Scrum event at least once a week during each Sprint. Scheduling a Daily Scrum meeting at least two days before the end of the Sprint is probably a good idea. The Scrum Master should be in charge of facilitating the event. Remember to use the Sprint Backlog to track your progress during the event.
Exercise 13
Plan the tasks for the fifth user story, “As a teacher, I want to add a question to a quiz so that students can learn about course-related topics”. Read the Product Owner’s Sprint Planning description regarding the user story again and split it into small coding tasks.
Create an issue for each task. Set the milestone as “Sprint 1”. Add the issues to the Backlog project’s “Sprint Backlog” column.
The Scrum Team’s UI Designer’s vision is that the implementation could look something like this:
Exercise 14
Plan the tasks for the sixth user story, “As a teacher, I want to see a list of quiz’s questions so that I know which questions the quiz has”. Read the Product Owner’s Sprint Planning description regarding the user story again and split it into small coding tasks.
Create an issue for each task. Set the milestone as “Sprint 1”. Add the issues to the Backlog project’s “Sprint Backlog” column.
The Scrum Team’s UI Designer’s vision is that the implementation could look something like this:
Exercise 15
Plan the tasks for the seventh user story, “As a teacher, I want to delete a quiz’s question so that I can get rid of questions I don’t need”. Read the Product Owner’s Sprint Planning description regarding the user story again and split it into small coding tasks.
Create an issue for each task. Set the milestone as “Sprint 1”. Add the issues to the Backlog project’s “Sprint Backlog” column.
Exercise 16
Plan the tasks for the eight user story, “As a teacher, I want to add an answer option to a question so that students can learn about course-related topics”. Read the Product Owner’s Sprint Planning description regarding the user story again and split it into small coding tasks.
Create an issue for each task. Set the milestone as “Sprint 1”. Add the issues to the Backlog project’s “Sprint Backlog” column.
The Scrum Team’s UI Designer’s vision is that the implementation could look something like this:
Exercise 17
Plan the tasks for the ninth user story, “As a teacher, I want to see a list of questions’s answer options so that I know which answer options the question has”. Read the Product Owner’s Sprint Planning description regarding the user story again and split it into small coding tasks.
Create an issue for each task. Set the milestone as “Sprint 1”. Add the issues to the Backlog project’s “Sprint Backlog” column.
The Scrum Team’s UI Designer’s vision is that the implementation could look something like this:
Exercise 18
Plan the tasks for the tenth user story, “As a teacher, I want to delete an answer option so that I can get rid of answer options I don’t need”. Read the Product Owner’s Sprint Planning description regarding the user story again and split it into small coding tasks.
Create an issue for each task. Set the milestone as “Sprint 1”. Add the issues to the Backlog project’s “Sprint Backlog” column.
First steps for the frontend
The Product Owner wants us to get started with the student dashboard application as well. The student dashboard will be a separate frontend application in which the students can among other things take published quizzes created by the teachers.
Exercise 19
Initialize a frontend application for the student dashboard application for example using Vite. You don’t need a separate repository for the frontend application, you can initialize it in folder within the current repository.
Exercise 20
Implement a REST controller class and a REST API method for getting all quizzes. Only published quizzes should be returned by the endpoint.
Here’s an example of a REST controller class and a REST API method for getting all messages:
@RestController
@RequestMapping("/api")
@CrossOrigin(origins = "*")
public class MessageRestController {
   private final MessageRepository messageRepository;

   // ...

   @GetMapping("/messages")
   public List<Message> getAllMessages() {
       return messageRepository.findAll();
   }
}
In this example, the frontend would be able fetch all the messages in the following way:
fetch("http://localhost:8080/api/messages").then((messages) =>
  console.log(messages)
);
Cross-Origin Resource Sharing (CORS)
The Vite development server is serving the JavaScript files from an URL that starts with http://localhost:5173. Our backend is accessible in the URL http://localhost:8080. When we send a request with the fetch function from the frontend to our backend, we send a request to a different origin. These kind of requests are called cross-orgin requests.
Web browsers don’t allow fetch functions to send cross-origin requests by default. This is called the same-origin policy. We can however allow certain (or every) cross-origin request by using Cross-Origin Resource Sharing (CORS).
The idea of CORS is that the web browser “asks” the backend if cross-origin request from a certain origin is allowed by sending a special HTTP request. If the backend allows the requests, then the web browser will send it. In a Spring Boot application we can use the @CrossOrigin annotation in the class or method level to allow cross-origin requests to certain or all paths of controller. For example we can allow cross-origin requests from all origins for all MessageRestController method paths in the following way:
@RestController
@RequestMapping("/api")
@CrossOrigin(origins = "*")
public class MessageRestController {
    // ...
}
Use the
@CrossOriginannnotation on the REST controller class to allow cross-origin requests from the frontend application.
Omit the
@OneToManyattributes from the JSON response in every entity to avoid cyclic JSON structures by using the @JsonIgnore annotation on the attributes. For example:@JsonIgnore @OneToMany(mappedBy = "user") private List<Message> messages;
Exercise 21
Implement a simple (no need for a fancy user interface at this point) listing of the published quizzes for the student dashboard frontend application.
Developer guide documentation
Now that we have implemented some features for our application that the users can use it is time to describe how to use the application. The developer guide is perhaps one of the most important pieces of documentation for the application. It will describe our fellow developers how to technically use the application. This means for example, how to start the application, how to package the application, and how to run the tests.
The developer guide shouldn’t make too many assumptions, for example, that the reader of the documentation happens to know that the application.properties file needs alterations before the application can be started. If something needs to be done, even a simple thing, mention it. It is helpful not only for others but also for yourself. We should also describe the system requirements for the application. For example, the required Java version. You can find it in the pom.xml file in the java.version property.
Because developers use different IDEs, it is easier to describe how the application can be used using a command-line interface (such as Git Bash). On the command-line, we can use the Maven command mvn or the alias ./mvnw to run different Maven commands. Using ./mvnw (the Maven wrapper) is a bit more convenient because it doesn’t require Maven to be installed.
Here’s an example of step by step instructions on how to start a Spring Boot application on the command-line:
- Start the application by running the
./mvnw spring-boot:runcommand on the command-line in the repository folder - Once the application has started, visit http://localhost:8080 in a web browser to use the application
If you have trouble starting the application with the
./mvnw spring-boot:runcommand, see if this solves the problem.
The description should be so clear that your fellow student who knows nothing about the project beforehand would be able to start the application.
Exercise 22
Write a developer guide documentation on how to start the backend application on the command-line to the
README.mdfile. Also, mention the required Java version for the project. Add it under a “Developer guide” subheading. For the sake of readability, code and command-line command text is commonly highlighted in Markdown file (like in the example above). Here’s how that is done in Markdown syntax.You can assume that the reader of the
README.mdfile is a software developer who knows how to use a command-line interface, the basic Git commands and install the required Java version. Make sure that instructions on the developer guide work by cloning a new version of the repository and executing the steps on the developer guide one by one.
Production deployment
So far we have been using and developing our application in an isolated environment on our own computer. This environment used during the development of the application is referred to as the development environment. In the software development lifecycle the deployment phase is the phase in which the implemented software is distributed to the users. For example, a web application is published online so that users can access it with their web browsers. This environment is referred to as the production environment.
The deployment phase is crucial because unless users can use the application, it has no real value for the stakeholders. That is why, in the agile software development we shouldn’t wait at the end of the project or event at the end of an iteration to deploy the application. Instead, deployment is done frequently, even on daily basis. In Scrum, the deployment should occur at least at the end of each Sprint. In real software development projects deployments commonly occur daily or even a hundred times a day.
There are many platforms for deploying web applications, such as Heroku and Render. We will be using the Rahti platform for backend deployment during this course. Our production environment will consist of two components: a production database and a production web server for the Spring Boot backend application. As the production database, we will be using the PostgreSQL database, which is among the most widely used databases.
flowchart LR
    server(Spring Boot backend)-->db[(PostgreSQL database)]
Next, we will learn how to deploy both of these components to the Rahti platform.
Exercise 23
Deploy the backend application to a production environment by following these instructions. Test that the application works in the production envinronment by adding a quiz with some questions and answer options. Add the production environment URL of the backend application (the application URL in the Rahti dashboard) to the project description section in the
README.mdfile.
GitHub release
Once the GitHub repository’s main branch has a working version of the application with the desired features at the end of the Sprint, we should release its source code for the users. GitHub release is a way to “freeze” the source code of a project at certain point of the commit history and to provide users a working version of the application.
Usually a new version of an application is released at the end of each Sprint. When we create a new release at the end of each Sprint, we will create a release history for the project. Users can easily browse and download the source code of different versions of the application by going through the release history. Release also creates a tag for the current point in the commit history, which makes it easy to browse commits in different Sprints.
gitGraph
   checkout main
   commit
   commit
   commit
   commit tag: "sprint1"
   commit
   commit
   commit
   commit tag: "sprint2"
Each release should at least include the name for the release and a short description describing the changes introduced in the release. For libraries the release name is commonly the version number of the release, for example “18.2.0”. We create a release for each Sprint, so we can name our releases based on the Sprint number, for example “Sprint 1”.
As an example, here are the releases for the React library.
Exercise 24
Once you have implemented the user stories of the Sprint and the main branch has a working version of the application, create a GitHub release for the project as instructed in the GitHub’s documentation. Create a new tag called “sprint1”. The release title should be “Sprint 1”. Give a brief description for the release that describes the features implemented during the Sprint.
Sprint Review
At the end of each Sprint, there’s the Sprint Review event. During the Sprint Review, the Developers demonstrate the outcome of the Sprint for the Product Owner. This means that the Developers should demonstrate how the implemented user stories work in the user’s perspective. So, instead of showing the code, Developers should show how the user can use the new features of the application.
Sprint Review has a huge impact on the transparency of the process. Seeing how the application actually works also brings forth many new ideas for the upcoming Sprint Planning event.
Exercise 25
The Scrum Master should prepare the Sprint Review demonstration at the beginning of the next Sprint. The Scrum Master should make sure that they have a working version of the application either deployed to Rahti (preferred) or on their computer and they are able to show how the new features work in the user’s perspective. If possible, demonstrate the features in the production environment.
Prepare some sensible test data (no lorem ipsum, “asd”, or “foobar”) for the Sprint Review. This means that you should add a few quizzes with questions and answer options using the application so that you can easily demonstrate the user stories.
Make sure that you have pushed your work to the project’s GitHub repository before the Sprint 1 deadline on Before the Mon 20.4.2026 session.
⭐ Bonus: Git branches
So far, we have only created commits for the main branch of our repository. Git branches allows us to diverge from the main branch commit history by creating a new branch. We can add commits for our branch without effecting the main branch commit history and at some point we merge the commits of a branch into the main branch.
Branches are commonly used to isolate work-in-progress code from the main branch. This can be for example the development of certain user story or task. The Git workflow where feature development is isolated into a feature-specific branch is referred to as feature branch workflow.
gitGraph
   commit
   commit
   branch user-registration
   checkout user-registration
   commit
   commit
   checkout main
   commit
   branch message-list-search
   checkout message-list-search
   commit
   commit
   checkout main
   merge message-list-search
   commit
   merge user-registration
   commit
A new branch can be created with the git branch <name-of-the-branch> command in Git Bash. Let’s create a branch and name it based on the small feature developed in the branch (for example, change-add-message-button-color). First, pull the latest changes from GitHub using the git pull command. Then, create the branch:
git branch <name-of-my-branch>
Typically, the branch name describes the feature developed in the branch or some other purpose of the branch, for example
add-messageorlist-messages.
Now, let’s check the repository’s branches with the git branch command. We should see that our branch is added to the list. We can also see that there’s an astrisk symbol (*) before the main branch. This means that we are currently on the main branch. The current branch is also displayed in brackets in the Git Bash after the path to the current folder.
We can switch branches using the git checkout <name-of-the-branch> command. Switch to the branch you just created:
git checkout <name-of-my-branch>
We usually want to create new branch of the main branch. This means that before creating a new branch with the
git branch <name-of-the-branch>command, switch to the main branch by running thegit checkout maincommand. If you are uncertain which is the current branch, check it with thegit branchcommand.
Next, make some small change for the project, for example a small user interface or code improvement. Once you have made the change, check the status with git status command, add the changes with the git add command and create a commit with the git commit command. Feel free to do multiple commits if needed.
Then let’s switch back to the main branch with the git checkout main command. If we check for the changes we made in the other branch, we see that they are no longer present. That’s because the commits we made only exist in our other branch.
Let’s switch back to our branch with the git checkout command. Then, push the changes to GitHub with the git push command. We get the following error message:
fatal: The current branch change-add-message-button-color has no upstream branch.
To push the current branch and set the remote as upstream, use

    git push --set-upstream origin change-add-message-button-color

To have this happen automatically for branches without a tracking
upstream, see 'push.autoSetupRemote' in 'git help config'.
The error means that the current branch is not in GitHub yet, just on our local computer. Let’s run the command that Git suggests:
git push --set-upstream origin <name-of-my-branch>
Now, let’s check that our branch is pushed to GitHub. Open the repository in GitHub and click the branch selector which says “main” above the file tree view in the “Code” tab. These instructions have more details, if you have trouble. We should see our branch there. Click the branch and check that the changes are visible in GitHub.
⭐ Bonus exercise
Perform the steps above to create your own branch. Implement some small change for the project in the branch by making one or more commits. Once you are done, push your branch and changes to GitHub.
Merging branches and pull requests
Once we are happy with the changes we have made in the branch, we can merge it into the main branch. This basically means applying all the commits we have made for the branch to the main branch. For this we could use the git merge command. However, GitHub supports a better way to merge branches using pull requests.
Pull requests are “requests” to merge a branch to another branch (commonly the main branch). The benefit over using the git merge command is that pull requests provide a way to perform quality assurance, for example through code reviews. In a code review other team members inspect the chanhes introduced by the pull request and give constructive feedback. This feedback is used to improve the code quality and fix bugs and other implementation flaws.
⭐ Bonus exercise
- Create a pull request for your branch by following these instructions. The pull request title should describe the changes introduced by the branch, for example “Change the submit button color in the add message form”. The description provides additional details. Once you have created the pull request, take a look at changes in the “Files changed” tab. If you want, you can also explore other team members’ pull requests in the “Pull requests” tab
- Merge your branch into the main branch by following these instructions. If the branch has conflicts with the main branch, check the section below. In practice, before the pull request is merged a code review is commonly conducted by another team member to enforce quality control. We can skip this phase
- Switch back to the main branch with the
git checkout maincommand and pull the changes from GitHub with thegit pullcommand. Make sure that you can see the changes made in your branch in the main branch as well
Resolving conflicts in branches
If the pull request can’t be automatically merged due to conflicts, we’ll need to solve them manually. First, switch to the main branch and pull the latest changes:
git checkout main
git pull
Then, switch to your branch and merge the main branch to it:
git checkout <name-of-my-branch>
git merge main
Finally, resolve the conflicts and add, commit and push the changes to GitHub. Now, we should be able to merge the pull request in GitHub.
Separate branch for the development code
A quite common Git workflow is to have a separate branch for work-in-progress development code. All commits are made to the development branch. Whenever the development branch has some new ready features, it can be merged to the main branch using a pull request. Having a separate branch for the development code makes sure that the main branch always has a stable working version of the application which can be deployed at any moment.
gitGraph
   commit
   commit
   branch develop
   checkout develop
   commit
   commit
   checkout main
   merge develop
   checkout develop
   commit
   commit
   commit
   checkout main
   merge develop
⭐ Bonus exercise
- Each team member creates a development branch with the same name (e.g.
develop) of the main branch and switch to it. Make sure you are on the main branchgit checkout main, followed by creation of the branch withgit branch developand finally switching to the branch withgit checkout develop- From now on all the commits should be made to the development branch, meaning there shouldn’t be a reason to switch back to the main branch. You can use the
add,commit,pushandpullcommands just like before- Once the development branch contains some new, working features, merge it to the main branch by opening a pull request. Set the base branch as the
mainbranch and the compare branch as the development branch. Finally, merge the pull request. Now, the main branch should be up-to-date with the development branch