Backend deployment
This guide covers Spring Boot backend and PostgreSQL database deployment using the Rahti platform. Follow the instructions carefully and perform the steps one by one.
Register to CSC
Start by registering to CSC by following these instructions.
Configuring the Spring Boot project
To ease the deployment, it is recommended that Spring Boot project is in the repository’s root folder, like this ✅:
src/
pom.xml
...
That is, it is not inside a sub folder, like this ❌:
somesubfolder/
    src/
    pom.xml
    ...
Add PostgreSQL driver as dependency in your project’s pom.xml file. Copy and paste the below snippet, place it as a child element of <dependencies> element:
<dependency>
    <groupId>org.postgresql</groupId>
    <artifactId>postgresql</artifactId>
    <scope>runtime</scope>
</dependency>
Create a file named Dockerfile (no file extension) in your repository’s root folder (same folder that has the pom.xml file). Content of the Dockerfile for a Spring Boot application should be the following:
FROM eclipse-temurin:25-jdk AS builder
WORKDIR /opt/app
COPY .mvn/ .mvn
COPY mvnw pom.xml ./
RUN chmod +x ./mvnw
RUN ./mvnw dependency:go-offline
COPY ./src ./src
RUN ./mvnw clean install -DskipTests
RUN find ./target -type f -name '*.jar' -exec cp {} /opt/app/app.jar \; -quit
FROM eclipse-temurin:25-jre-alpine
COPY --from=builder /opt/app/*.jar /opt/app/
EXPOSE 8080
ENTRYPOINT ["java", "-jar", "/opt/app/app.jar"]
This
Dockerfilewill only work for Spring Boot projects with Java version 25 or lower.
Create a new deployment profile for your application. You need to create a new file in the src/main/resources/ folder. Name the new file application-rahti.properties. Content of the application-rahti.properties should be the following:
spring.datasource.url=jdbc:postgresql://${DB_SERVICE_HOST}:${DB_SERVICE_PORT}/${DB_NAME}
spring.datasource.username=${DB_USER}
spring.datasource.password=${DB_PASSWORD}
spring.jpa.show-sql=true
spring.jpa.generate-ddl=true
spring.jpa.hibernate.ddl-auto=update
spring.jpa.properties.hibernate.dialect=org.hibernate.dialect.PostgreSQLDialect
spring.datasource.driver-class-name=org.postgresql.Driver
If you have a CommandLineRunner method inserting test data each time the server starts, add a condition checking if the database is empty before the insert. This avoids inserting duplicate data each time the project is deployed:
@Bean
public CommandLineRunner generateTestData(MessageRepository messageRepository) {
    if (messageRepository.count() == 0) {
        messageRepository.save(new Message("Hello world!"));
    }
}
Commit the above changes and push them to your GitHub repository.
Creating a project in CSC
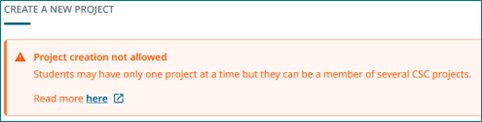
If you already have created a project in CSC, you are unable to create another one. In that case proceed to chapter “Creating a project in Rahti”.
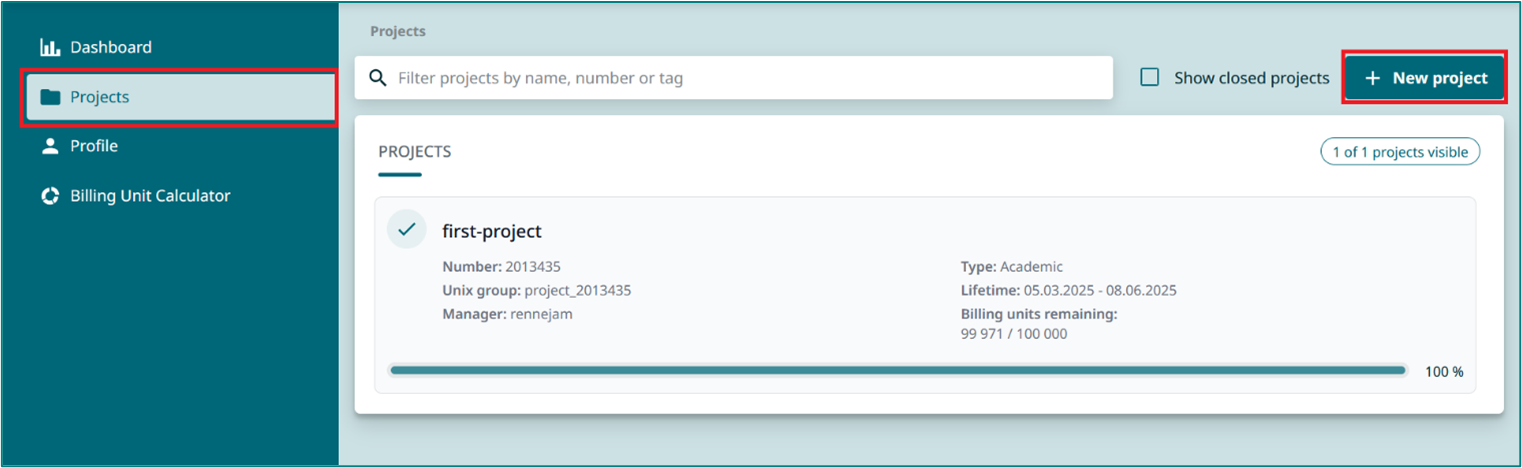
Login to CSC at https://my.csc.fi using you Haka user account (Haaga-Helia credentials) or your CSC user account (username sent to your email). Navigate to “Projects” view and start creating a new project.
Then, go through the project creation:
- In the “Category” step, select project types as “Course” and click the “Next” button.
- In the “Details” step, enter the required project details, which are the following:
- Project name and description.
- Course end date: can be at most six months from the creation date, so set it as six months from the current date.
- Primary science area: Engineering and technology.
- Secondary science area: Other engineering and technologies.
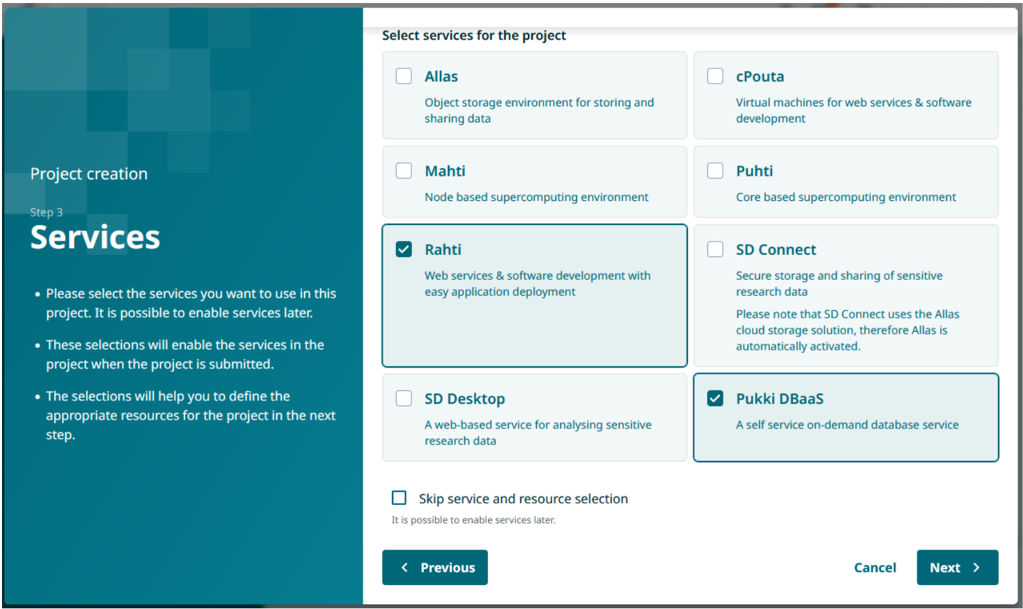
- In the “Services” step, select “Rahti” and “Pukki DBaaS”.
- In the “Static resources” step, just move on by clicking the “Next” button.
- In the “Confirmation” step, accept all terms of use for the Rahti and click the “Submit” button. NOTE! It may take several minutes for the project to generate.
Now you should have a screen that contains basic information about your project with the Rahti service.
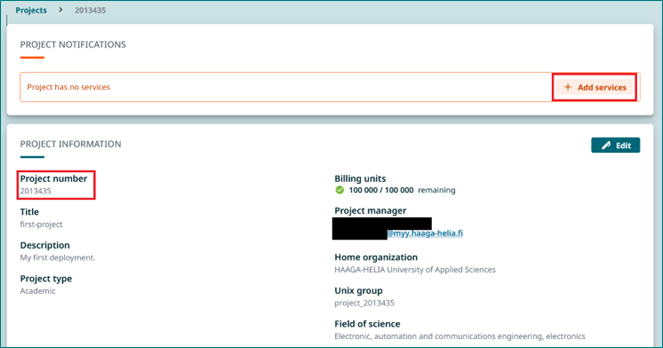
Check and copy-paste your project number in the “Project information” section somewhere temporarily. You will need it later.
Once you have added the Rahti service, you might have to wait up to 60 minutes to gain access after activation. So be patient!
You can add other team members as CSC project members by opening the project in the “Projects” view and clicking “Add members” in the “Members” section.
Creating a project in Rahti
After you have gained access to the Rahti service, you can log in to Rahti from your CSC project’s Projects view. Choose your (only) project and scroll down to “Services”. Clicking “Login” will take you to the Rahti landing page.

Proceed with the login process. You need to click Login buttons a few times on different pages. Use either Haka or CSC as your authentication method when prompted.
If you get a “Could not find user” error after login, wait for a while (10 minutes or so) and try again.
Successfully logging in directs you to Rahti console. When starting the console for the first time take the site’s tour showing important navigation options. After the tour you are ready to create your Rahti project.
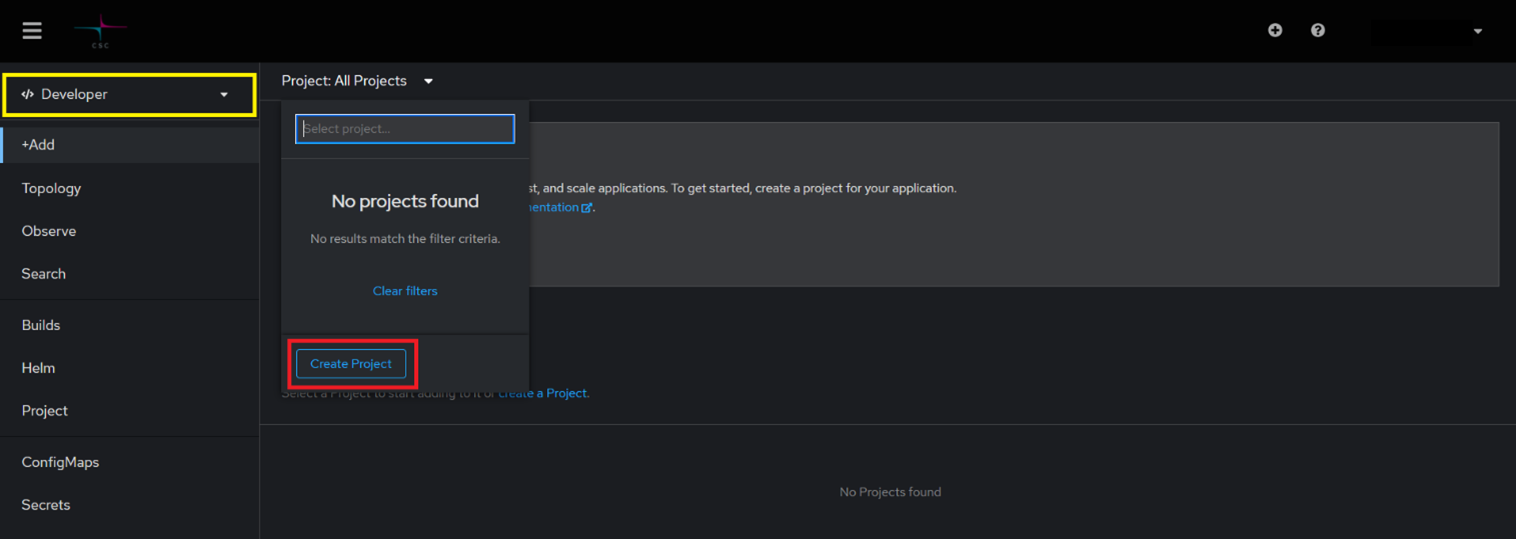
In the navigation collapse “Home” and click “Projects”. On the “Projects” page click the “Create project” button.
You can have more than one Rahti project in one CSC project.
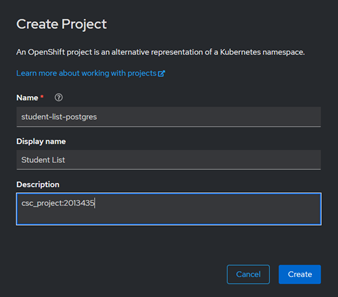
Give your project a name and a display name. In the description, write csc_project:<YOUR_CSC_PROJECT_NUMBER>. You will find your CSC project number in your CSC project’s “Project information” view. Proceed by clicking Create.
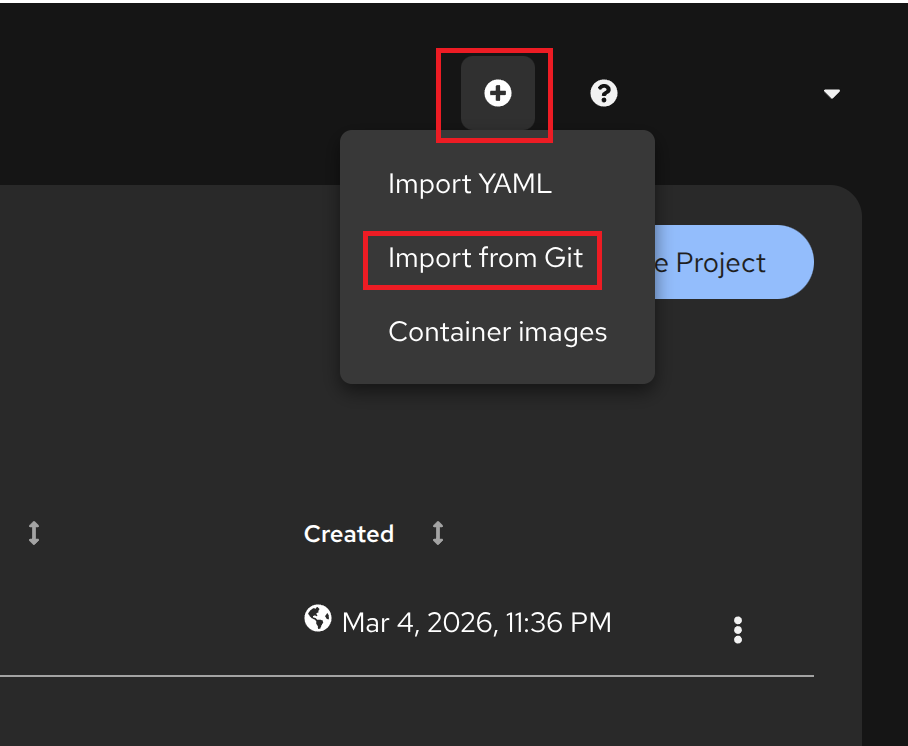
Next you will import your code from a Git repository. The following instructions assume that you have set your GitHub repository public. In the Rahti dashboard, click the “+” icon in the top-right corner and choose “Import from Git”.
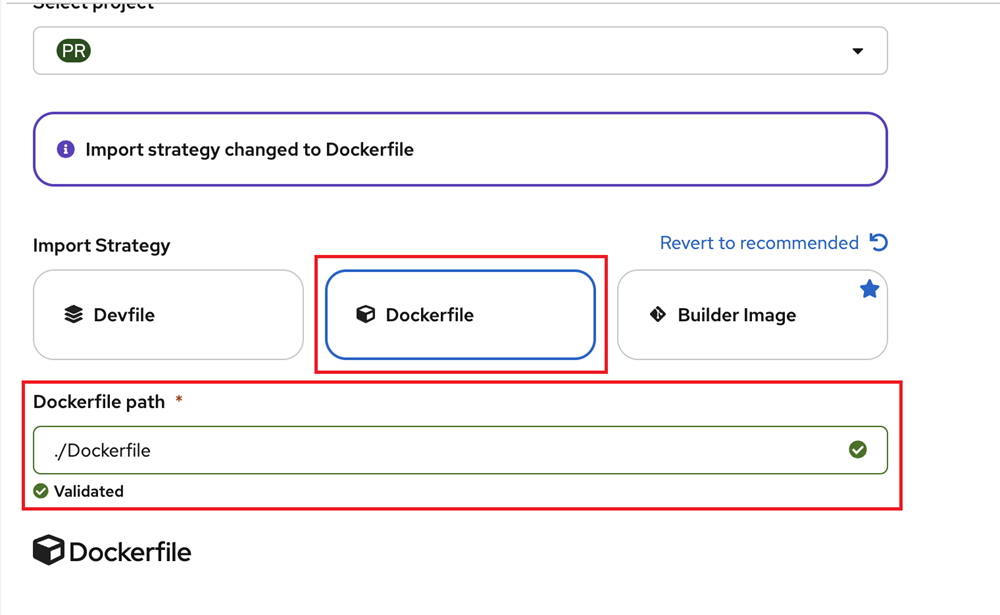
Copy and paste your GitHub repository’s URL into the corresponding form field and choose “Dockerfile” as your “Import Strategy” if it is not the suggested one. If the “Dockerfile path” has an error, type in the path ./Dockerfile. You can leave the rest of the form fields at their default values. Move on to “Create”.
Successful creation will take you to your project’s “Topology” view (accessible also by navigating to “Workloads > Topology”). Click the graphical representation of your deployment to open your deployment controls.
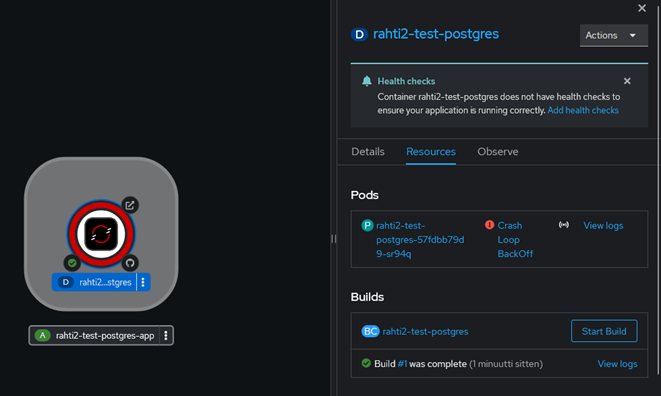
You have now deployed your application into Rahti. But it is not in working condition yet. The “Crash Loop BackOff” error is due to the build’s attempts to connect to a database that doesn’t exist and to use environment variables that haven’t been declared. (You might have to wait a minute to get the error.)
Setting up the PostgreSQL database
Now that the project’s backend is deployed to Rahti, it is time to setup a PostgreSQL database, which the backend can use in the production environment.
ℹ️ If these instructions don't work, try this alternative setup (click to open)
Prefer the Pukki DBaaS for the PostgreSQL database. Its performance is superior to the Aiven free tier database.
These instructions will guide you through setting up a PostgreSQL database in the Aiven platform:
- Sign up to Aiven (e.g. using your GitHub account).
- Once you can access your Aiven dashboard, navigate to “Services” page and click “Create Service”.
- Choose “PostgreSQL” and from the “Service tier” choose “Free”. Then, click “Create Service”.
- In the PostgreSQL service’s page, click “Quick connect” next to “Connection environment”. From the “Connect with” dropdown menu, choose “Java”. Click the “copy-to-clipboard” button on the JDBC URI snippet (starting with
jdbc:postgresql) to copy the JDBC URI for the database. Paste the URI somewhere temporarily. - Scroll to the “Step 2: Define environment variables in Rahti” section in this material (slightly below this section) and configure the following environment variables in Rahti (just these, not the ones specified in the section):
DB_URI: paste the JDBC URI from Aiven here. It should start withjdbc:postgresql.SPRING_PROFILES_ACTIVE: set it asrahti. This will load the production configuration from theapplication-rahti.propertiesfile.
- Change the project’s
application-rahti.propertiesfile into the one below and push the changes to GitHub.
spring.datasource.url=${DB_URI}
spring.jpa.show-sql=true
spring.jpa.generate-ddl=true
spring.jpa.hibernate.ddl-auto=update
spring.jpa.properties.hibernate.dialect=org.hibernate.dialect.PostgreSQLDialect
spring.datasource.driver-class-name=org.postgresql.Driver
Step 1: Create a database instance in Pukki
If you didn’t previously select “Pukki DBaaS” from the project’s services, do it first:
- Sign in to your MyCSC account at https://my.csc.fi and open your project.
- On your project’s dashboard, select “Services” and click “Add service”.
- Find “Pukki DBaaS” in the service list and select it.
You need both the Pukki service and the Rahti service, so make sure both are selected. There is a short delay when adding services to a project, so it may take a while before you can log in to Pukki.
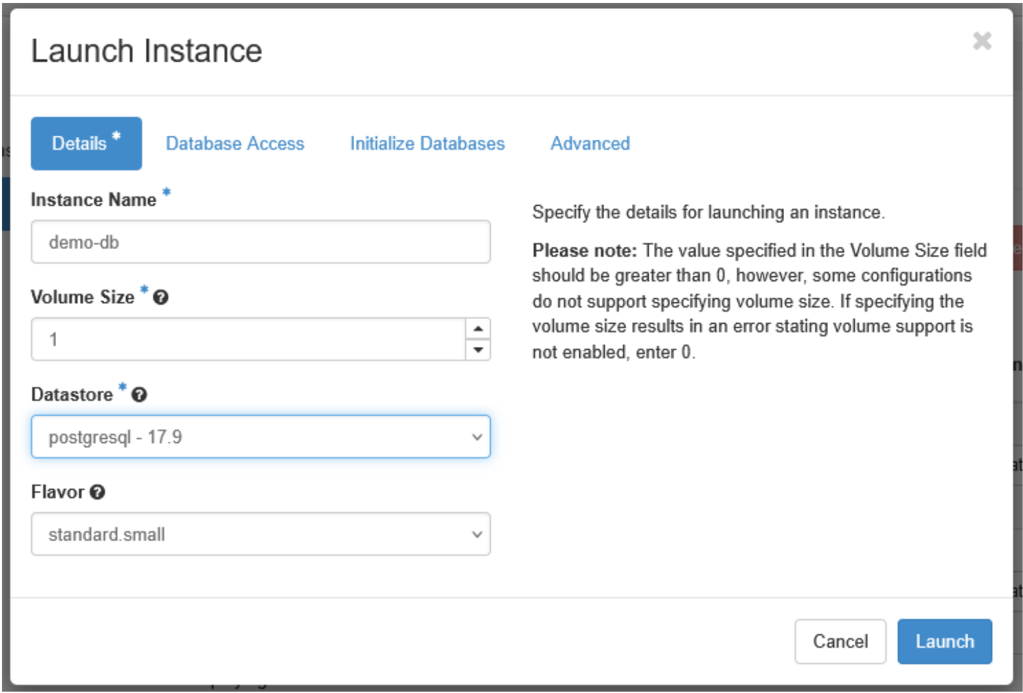
Log in to Pukki at https://pukki.dbaas.csc.fi/. In the service UI, select “Launch instance” and fill in the required details:
- Instance name: give your instance a descriptive name, for example “spring-boot-db”.
- Datastore: select the database engine and version you want. You can select e.g. “postgresql - 17.9” for PostgreSQL version 17.9.
- You can leave the other fields at their default values.
The database instance has firewall rules that block external connections. You must allow the Rahti service IP address so your Spring Boot service can connect to the database. You can allow connections from Rahti by adding 86.50.229.150/32 to the Allowed CIDRs field in the “Database Access” section.
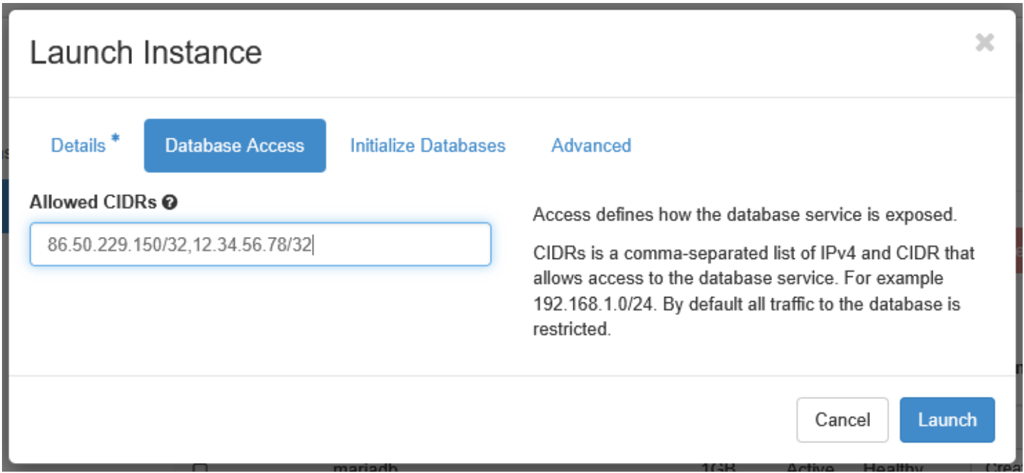
You can also allow client connections from your own IP so you can test the database connection from your local machine. You can find your public IP at https://ifconfig.me/. Add the /32 mask, for example 12.34.56.78/32. You can add multiple addresses separated by commas (commas only, no spaces).
In the “Initialize Database” section, you can create the database and database user:
- Initial Databases: enter a descriptive name for the database.
- Initial Admin User: enter a descriptive name for the database user.
- Password: set a strong password for the database user.
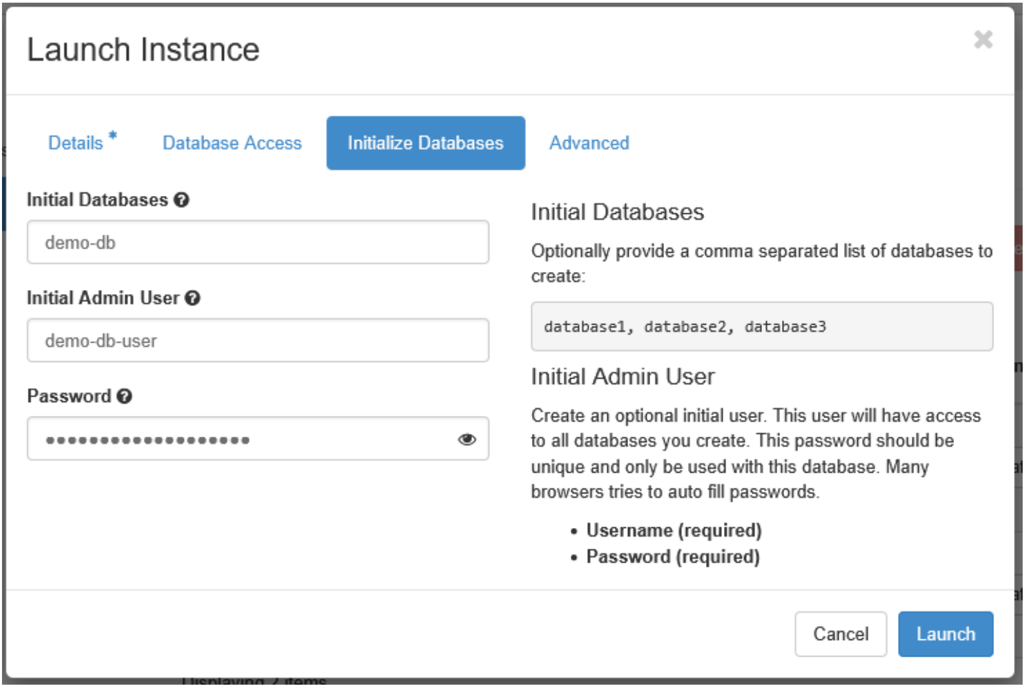
Note that this firewall rule allows connections from all Rahti service projects. Use a strong password for the database user to keep the database secure.
After filling in the required details, click Launch. Creating the database instance takes a moment. You can manage databases, database users, and firewall rules later in the Pukki service UI.
Step 2: Define environment variables in Rahti
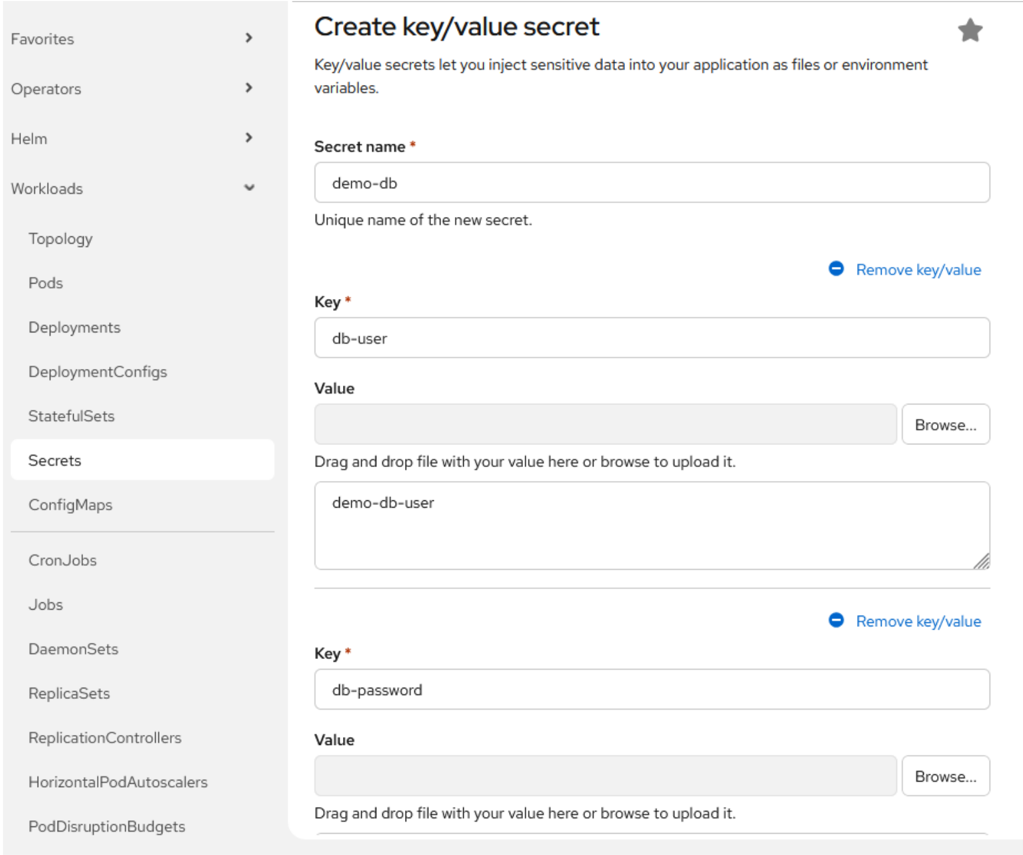
Next, pass the database configuration values to your application. It is recommended to store database user credentials as a Secret in Rahti and reference them through environment variables. This helps protect sensitive database user data.
In your Rahti project’s UI under Workloads > Secrets, create a new Key/value secret and define your Pukki database username and password there. Key is the identifier you use when referencing database user details, and Value is the actual value, such as a database username or password. You can add multiple fields using Add key/value.
Now define the environment variables used by your profile in your Rahti deployment configuration:
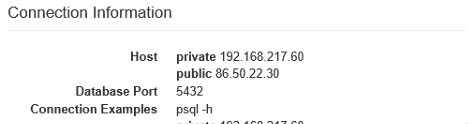
DB_SERVICE_HOST: public host address of your Pukki database instance (available in the Pukki UI).DB_SERVICE_PORT: port of your Pukki database instance (available in the Pukki UI).DB_NAME: database name you defined when creating the instance.DB_USER: reference to the database user stored in Secret.DB_PASSWORD: reference to the database password stored in Secret.SPRING_PROFILES_ACTIVE: set it asrahti. This will load the production configuration from theapplication-rahti.propertiesfile.
You can find your Pukki database connection details by opening your database instance in the Pukki UI. The details are in the Connection information section.
Open your Rahti deployment configuration and add these environment variables in the “Workloads > Environment” section.
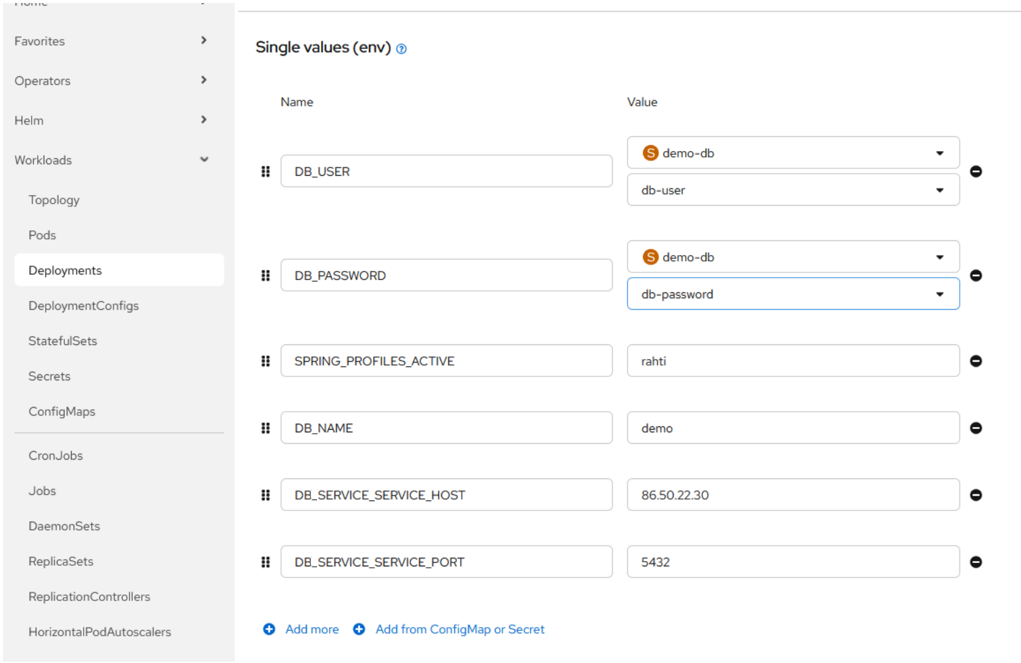
When you click “Save”, Rahti redeploys your service with the updated configuration. After redeployment, your Spring Boot service should be able to connect to the Pukki database.
You can verify the connection from your service logs. If the connection fails, you will see error messages. Common issues include incorrect connection details, missing firewall rules, incorrect database credentials, or the wrong active profile.
🎉 Congratulations! You have now deployed your Spring application with a proper database to Rahti!
Viewing the logs and troubleshooting
“Help, the application doesn’t work!”
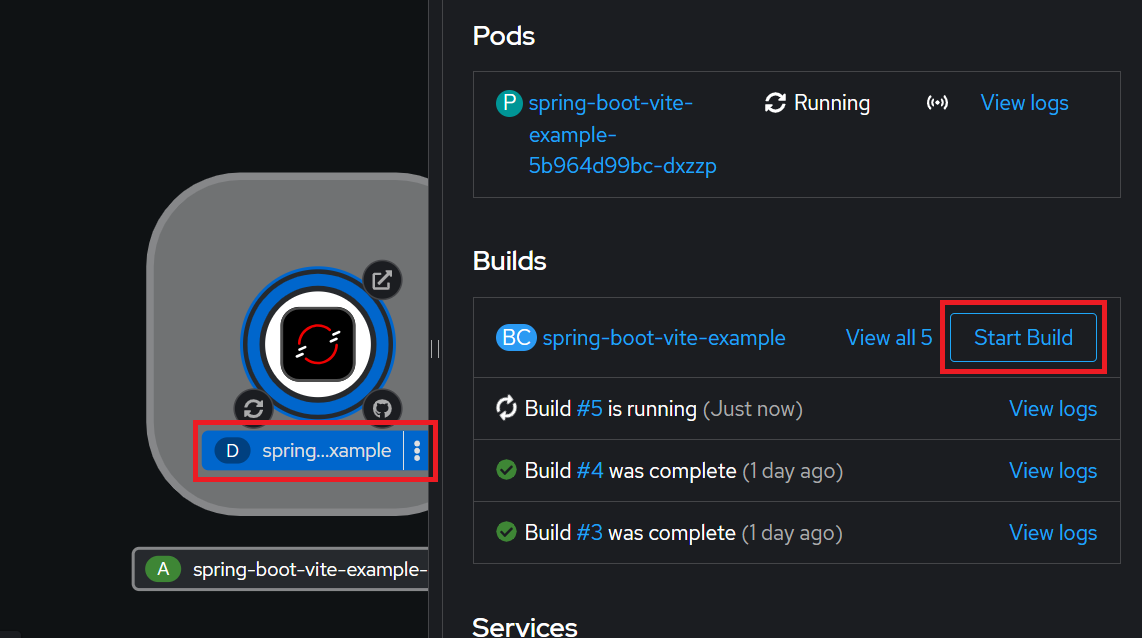
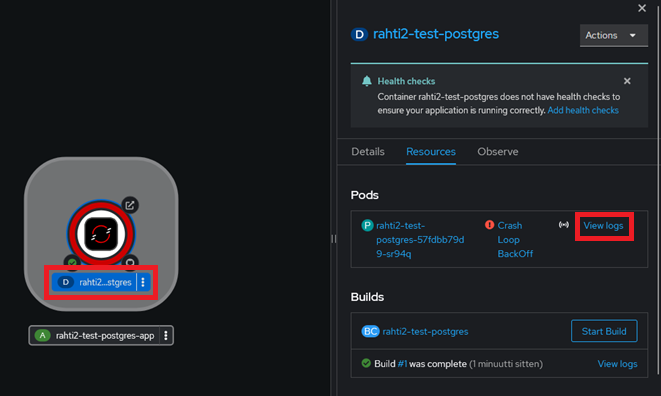
The best way to troubleshoot problems is to inspect the application’s execution logs. For example, if there’s a compilation error or something is wrong with the database connection, the execution log will have a descriptive error message. You can view the logs by navigating to “Workloads > Topology” and clicking the deployment (it has the “D” symbol before the name).
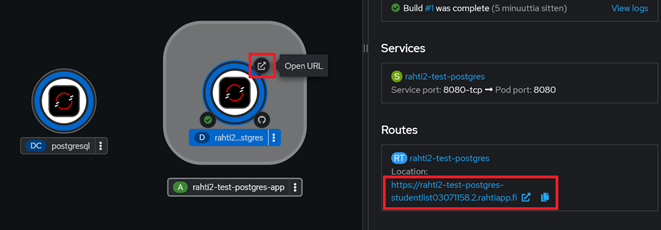
Getting the URL for the application
To get the URL for your app, go back to the “Workloads > Topology” page in Rahti. Click your application’s “Open URL” shortcut or navigate to the deployment’s quick controls (navigation pane on the right) and scroll down to “Routes”. It might take a few minutes before you are able to access your deployment’s URL in the browser.
It is a good idea to put this URL among your project’s documentation in your repository’s README.md file.
Triggering deployment
Deploying the application after changes in the GitHub repository requires a manual step. In the “Workloads > Topology” view click the deployment (has the “D” symbol before the name). Then, click “Start build” from the dialog.