📖 Table of contents
Sprint 2
For the Sprint 2 we have a new set of requirements from the Product Owner. On top of working on new user stories, we will be covering topics related to Retrospective, REST APIs and communication between frontend and backend.
Retrospective
The Scrum Guide only describes high-level guideliness for the software development process. It is not a one-size-fits-all framework suitable for every kind of project. Instead, the Scrum Team should adapt the process to match the project needs. To discuss about the issues with the process and to come up with solutions, the Scrum has a dedicated event called Retrospective.
After the Sprint Review, the Retrospective is the final event that ends the current Sprint. During the Retrospective, the Scrum Team openly discuss the issues with the process. Every member of the Scrum Team must be heard. Even more important than raising issues, is to find solutions together. These solutions are concrete actions that the Scrum Team can perform during the upcoming Sprint to improve the process. In the ideal case, after performing the necessary actions during the upcoming Sprint, the same issues aren’t raised during the next Retrospective.
Scrum doesn’t go into details how to actually arrange the event, but rather describe its purpose and goals. Luckily, there are many popular Retrospective techniques to arrange the event, such as Mad, Sad, Glad and Start, Stop, Continue. Next, we will have a look how to arrange a Mad, Sad, Glad style Retrospective. In this Retrospective, each member of Scrum Team writes down things during the Sprint that made them feel either mad, sad or glad.
The things in the mad category are the ones that are very frustrating and are stopping you from performing at your best. For example:
- The Spring Boot application won’t start on my computer.
- I always have conflicts when I try to pull code from the GitHub.
The things in the sad category are the ones that are dissapointing, but you can cope with them. For example:
- The Daily Scrum meetings take too long.
- The Sprint Backlog isn’t always up-to-date.
The things in the glad category are the ones that made you happy. For example:
- Communication was clear.
- Everybody contributed to the tasks.
Retrospectives can be organized face-to-face or using virtual platforms. During this course we will be using the Flinga platform to organize our Retrospectives. You can login to Flinga with your Haaga-Helia credentials by choosing “Haaga-Helia ammattikorkeakoulu” at the Flinga login page.
Once logged in a new session can be created by clicking the “Create a session” button. In the session you can send cards to the board by typing the message and clicking the “Send” button. You can also choose a color for the card. Other team members can join the session using the “Join link” which can be found by cliking the menu icon on the top left corner of the page.
First, create a session board that has the mad, sad and glad categories like in this board. Then, organize the Retrospective in the following manner:
- Based on their experiences during the Sprint, each team member should write cards for each of the three categories. Choose the card color based on the category. Try to come up with cards for each category. Don’t discuss about the cards at this point because the cards should represent your personal opinions
- Once everyone is done writing the cards, go through the cards from each category. If necessary, the writer of the card can shortly describe what their card means
- Together, pick at least one most urgent issue from the mad and sad categories. Come up with at least one concrete action to solve the issue during the upcoming Sprint. For example a concrete action for the issues “I always have conflicts when I try to pull code from the GitHub” could be “Pull code from GitHub more often” and “Create smaller commits and push code to GitHub more often”. Add these actions e.g. as cards to the retrospective board.
The Scrum Master should make sure that everyone follows the event structure and that each team member gets their voice heard.
Exercise 1
The Scrum Master should create a new session in Flinga as instructed above. Name the session “Retrospective 1”. Once the session is created, other team members should join the session with the “Join link”. Setup the session board and organize the Retrospective event as instructed above. Remember to come up with concreate actions for fixing possible problems in your process.
Once you have completed the Retrospective, add “Retrospectives” subheading to the
README.mdfile and below it a link to the Sprint 1 Retrospective Flinga board (link format ishttps://edu.flinga.fi/s/<BOARD_ID>).
Exercise 2
Choose a new (not the same team member as during the previous Sprint) Scrum Master among the team members for the second Sprint.
🏃♂️ Sprint 2 planning
If you weren’t able to implement all the user stories during the previous Sprint, start by finishing those before starting to implement the user stories for this Sprint.
The Product Owner was delighted to see how the project has advancend during Sprint 1. The Sprint Review event gave the Product Owner many new ideas on how to improve the application. Here’s how the Product Owner is describing the Sprint 2 goals in the Sprint Planning event:
“It’s great that we now have the basic functionality for managing quizzes! What we now need is a way for the teacher to categorize quizzes and student to take the published quizzes.
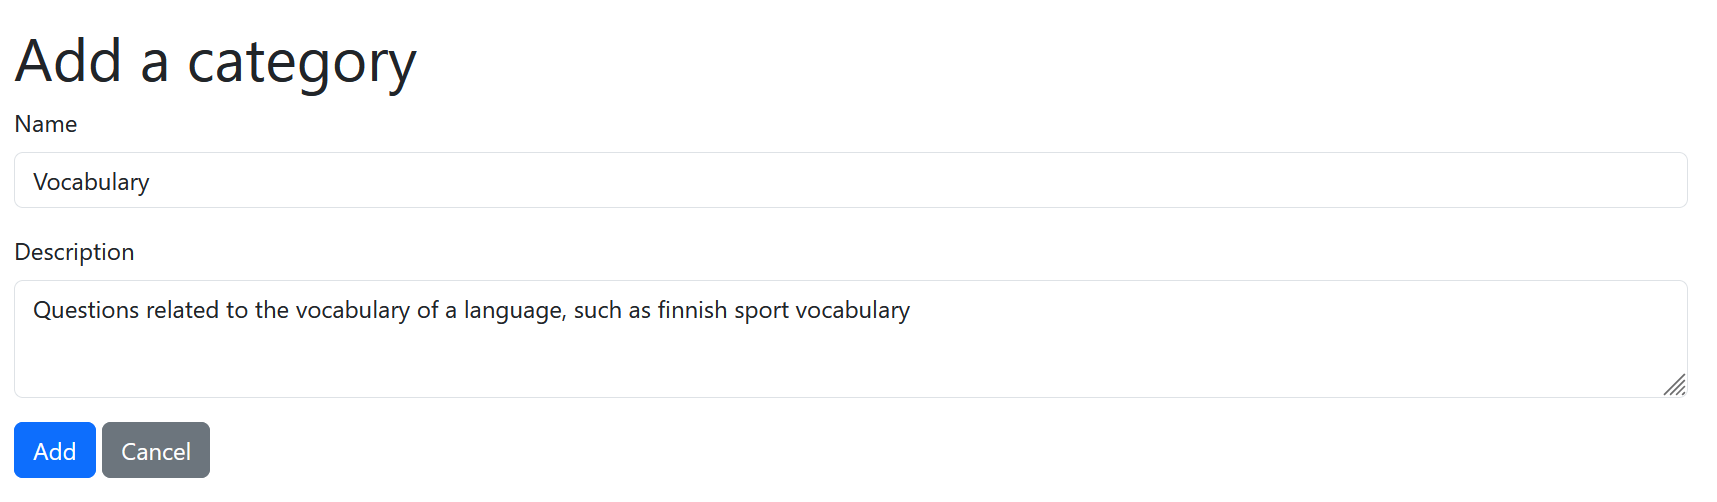
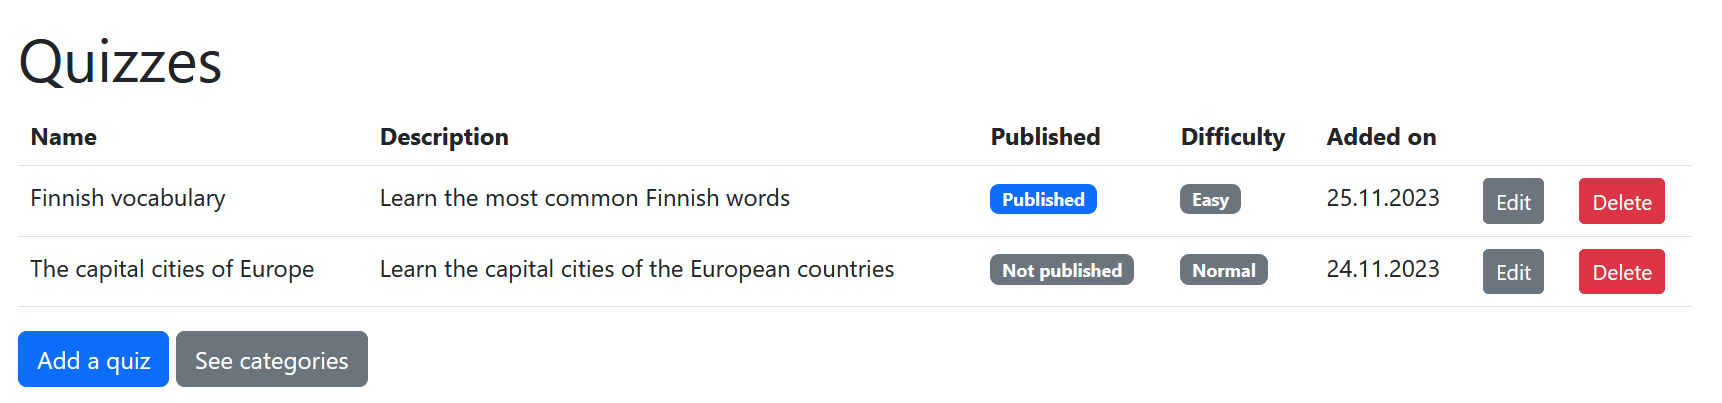
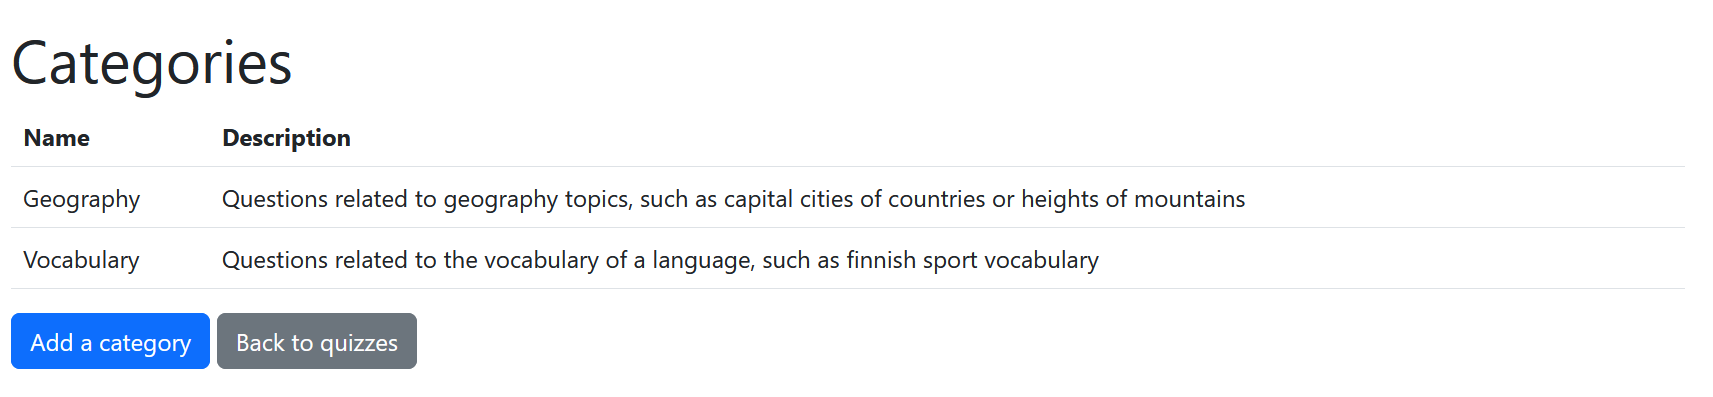
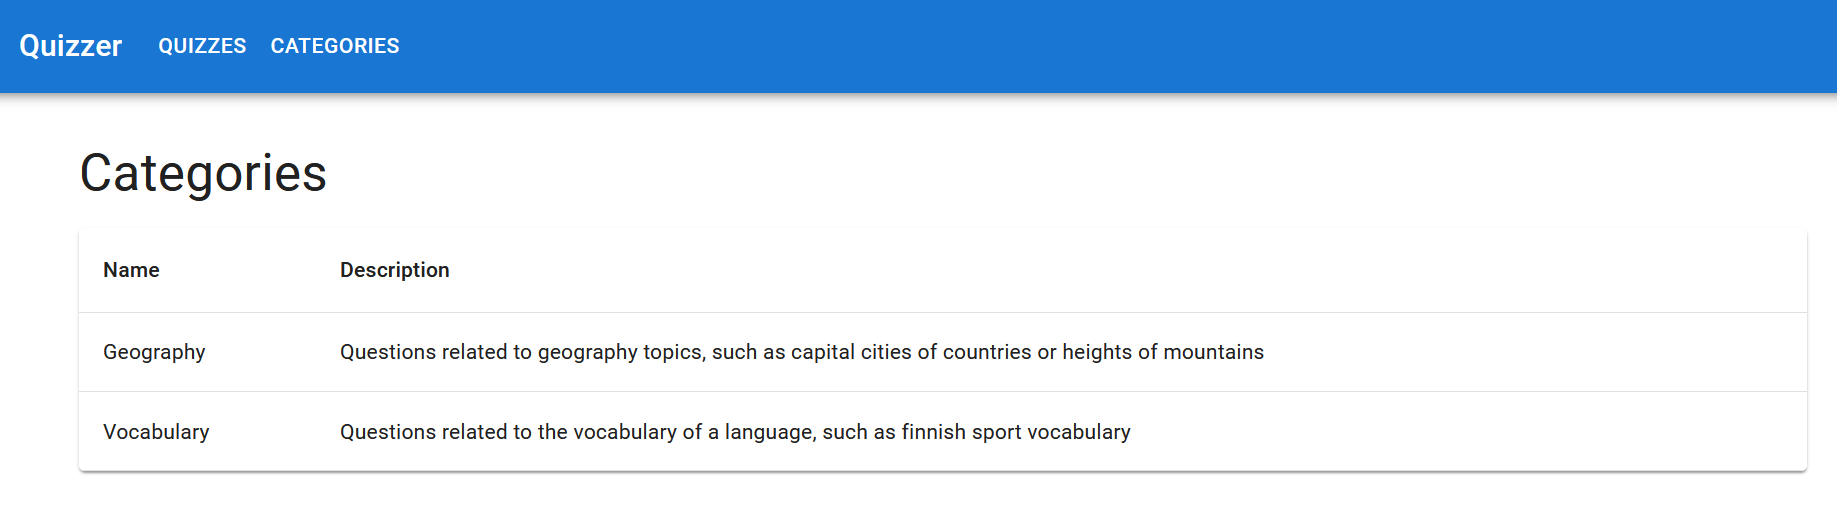
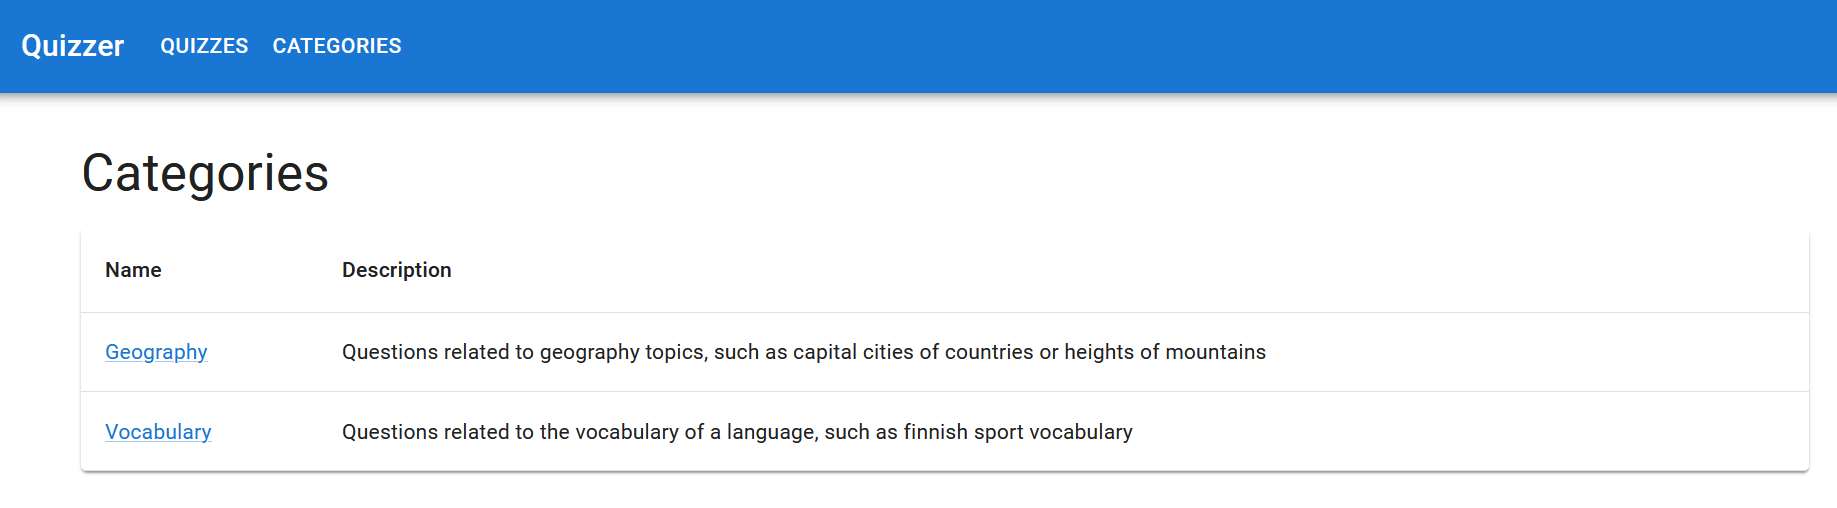
To be able to categorize quizzes, the teacher should be able to add a category. A category has a name, for example “Agile” and a description, for example “Quizzes related to the Agile principles and project management frameworks”. There should be a form for adding a category and a separate page for listing the added categories. The category list should have a delete button next to each category, which can be clicked to delete the category.
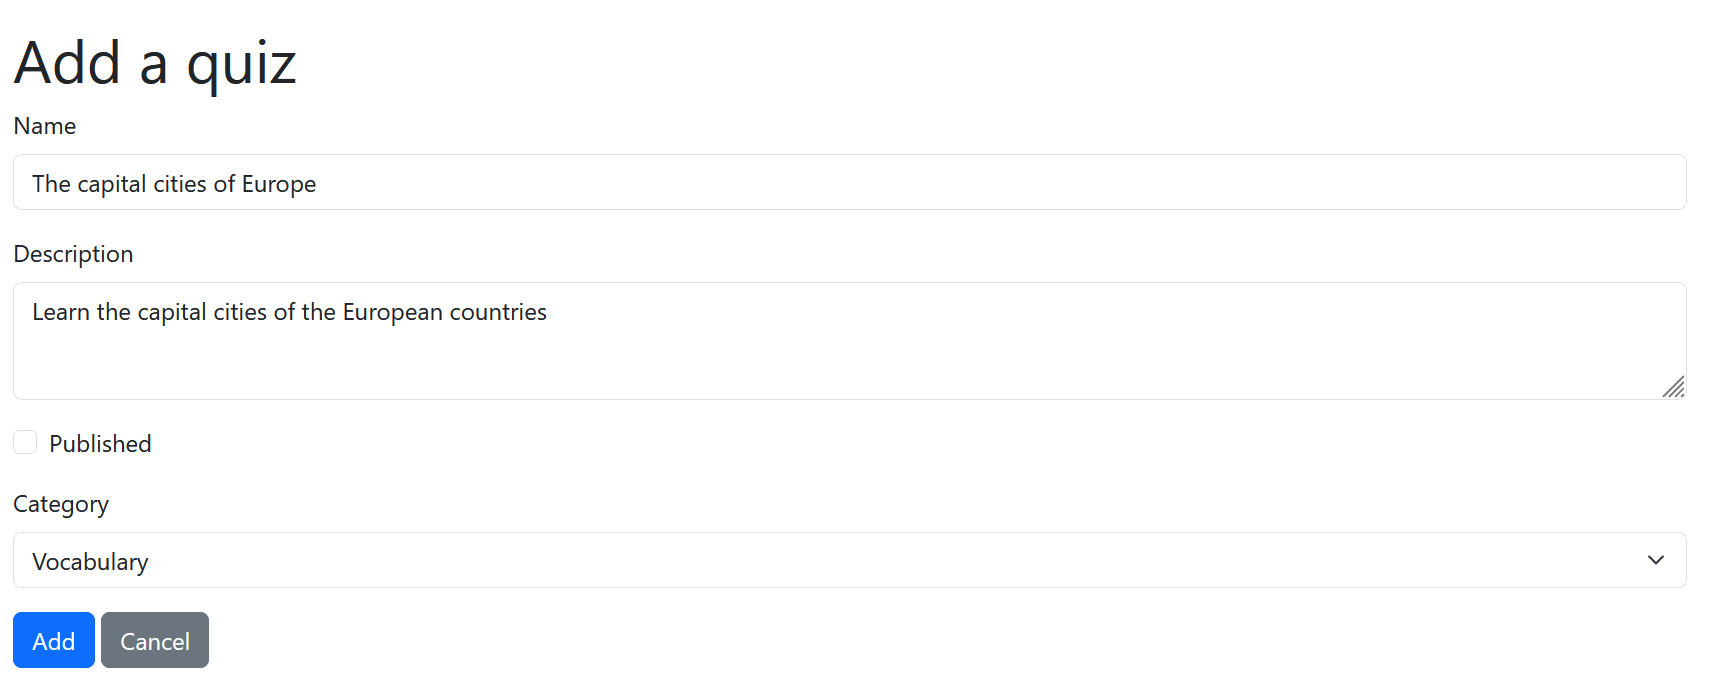
The teacher should be able to choose the quiz’s category while adding or editing a quiz. There could be a dropdown menu listing all the categories in both forms, from which the teacher can choose the quiz’s category.
Once we have this basic set of features for the teachers, we can start working on the student dashboard application. The student dashboard should have a page that lists the published quizzes with the quiz name, description, course code, category and the date when it was added.
Each quiz name on the quiz list should be a link to a separate page where the quiz name, description and the questions are displayed. There should also be some kind of navigation menu from which the student can navigate to the quiz list page.
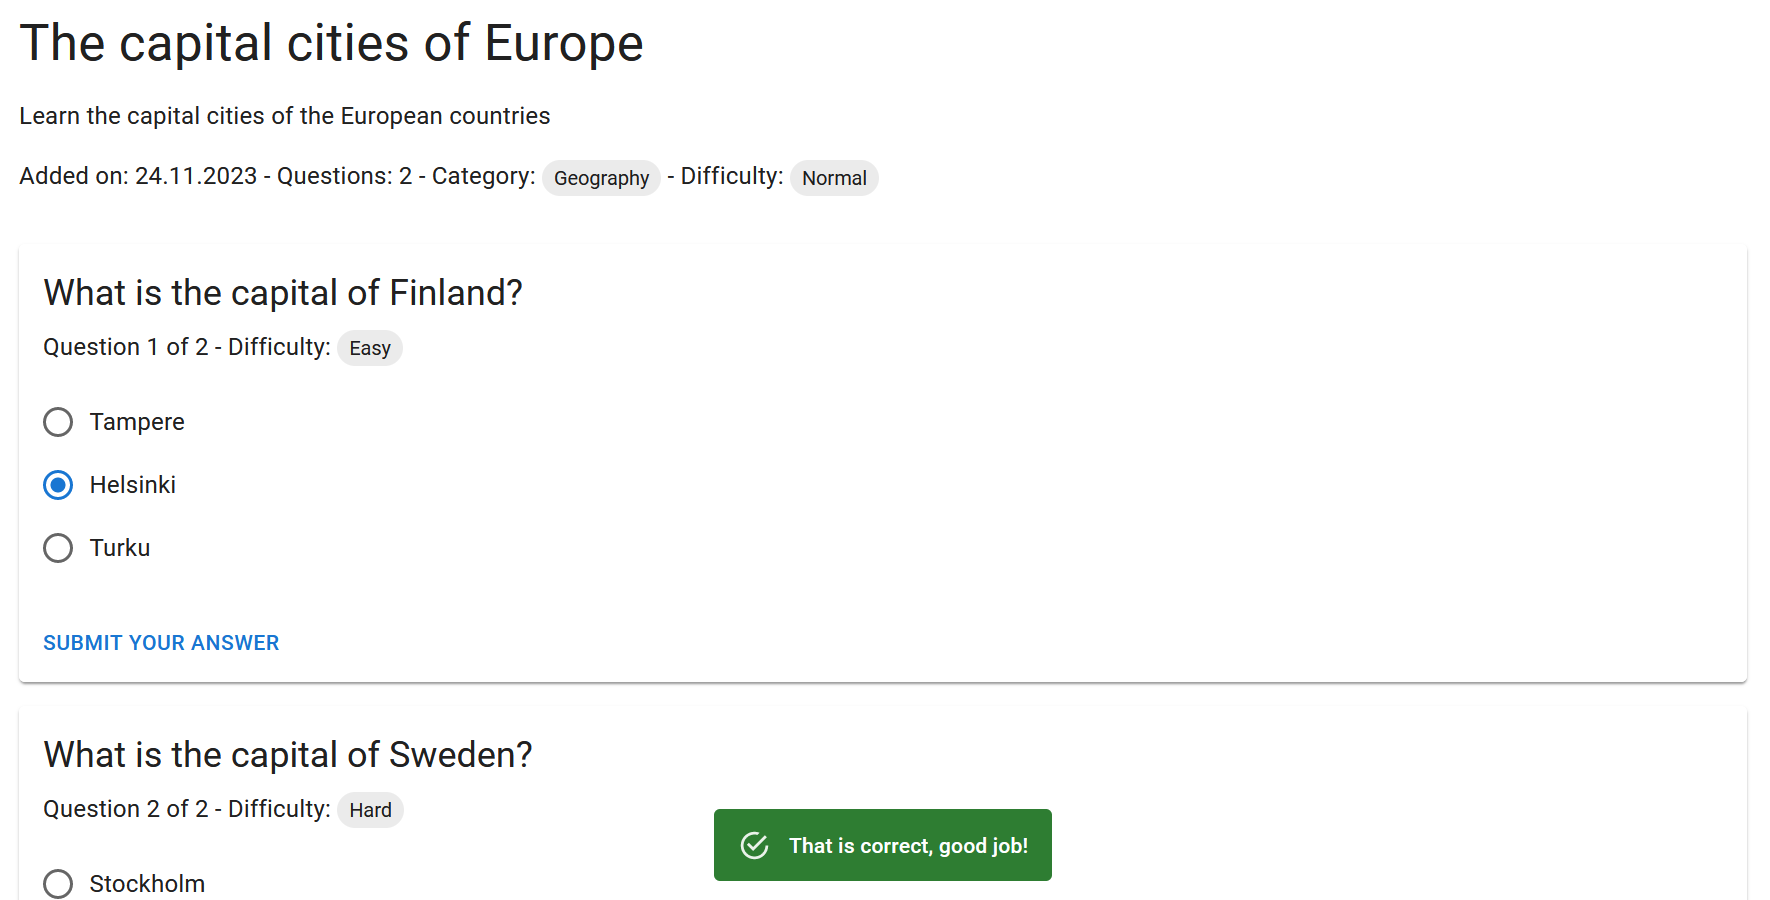
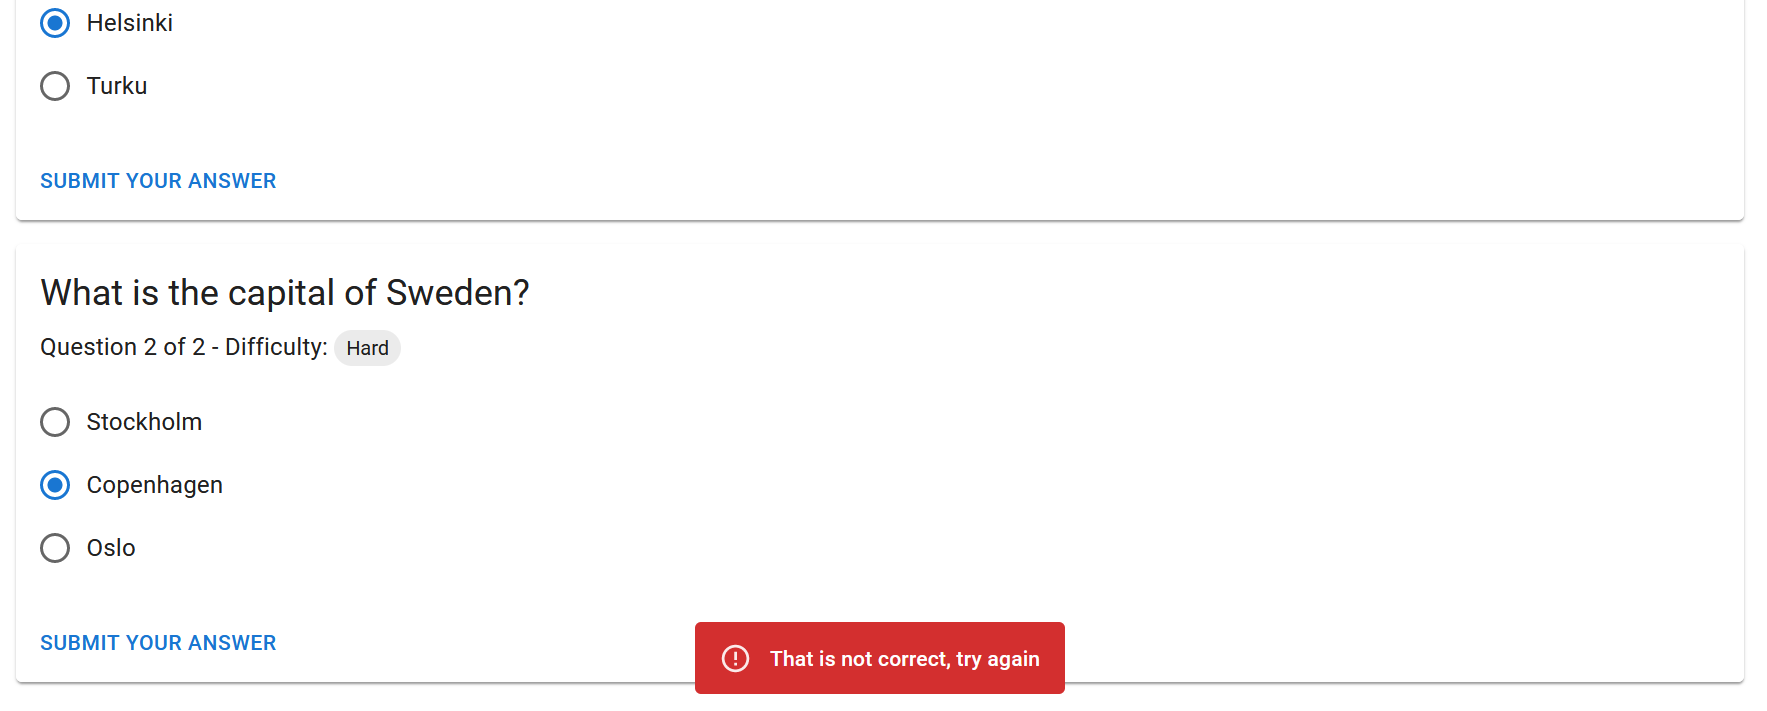
In the quiz page the student should be able to take a published quiz by answering the questions. The questions should be listed and the student should be able to choose an answer option and submit their answer for each question. When the student submits their answer, there should be some kind of feedback dialog which tells the student if their answer was correct or not. For example, “That is correct, good job!”, or “That is not correct, try again”.
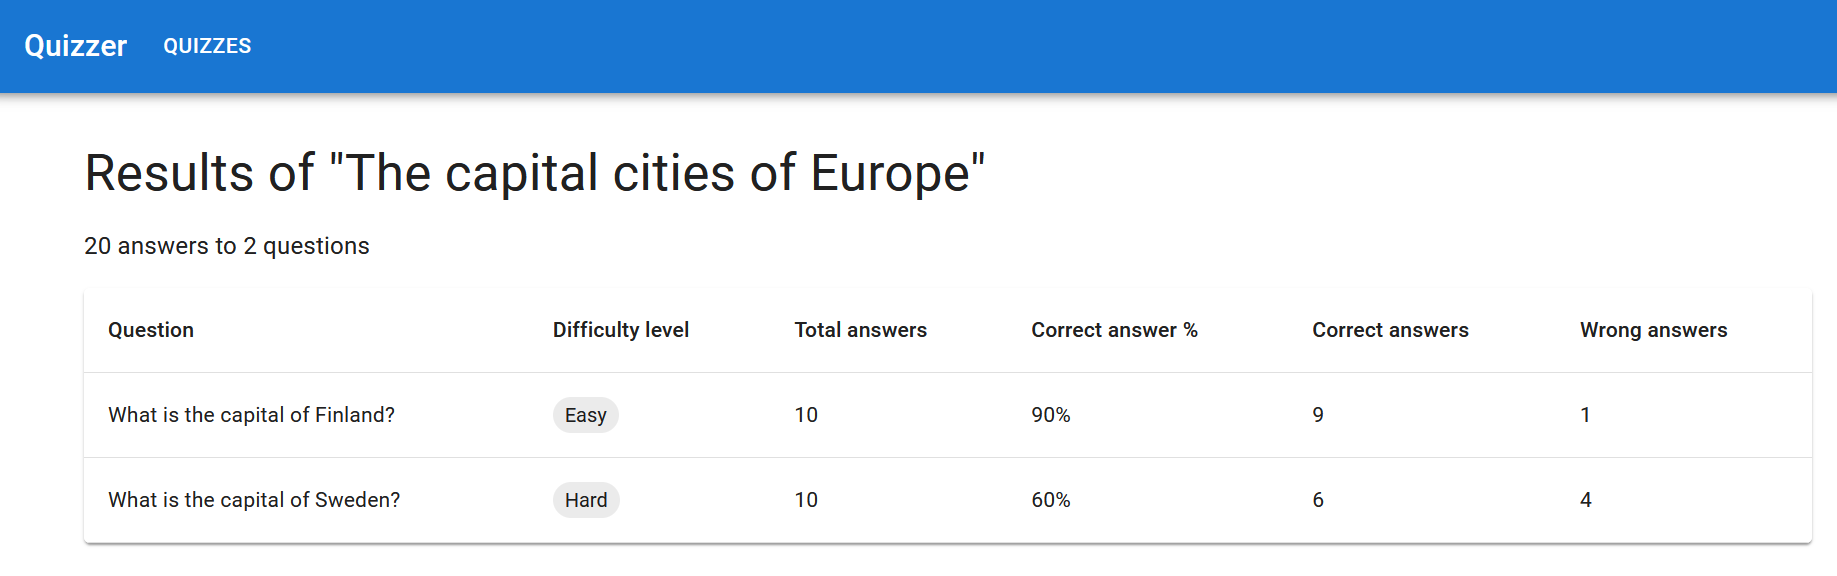
There should be a page in the student dashboard where the results of a quiz are summarized. The results summarize all the answers submitted by different students to provide the teacher with an overview of how well the students know the quiz’s topic. The page should display the question text, the difficulty level, the total number of answers, the correct answer percentage and the number of correct and wrong answers for each question of the quiz. Also the total number of answer and questions of a quiz should be displayed. There should be a link to the results page next to the quiz in the quiz list page.
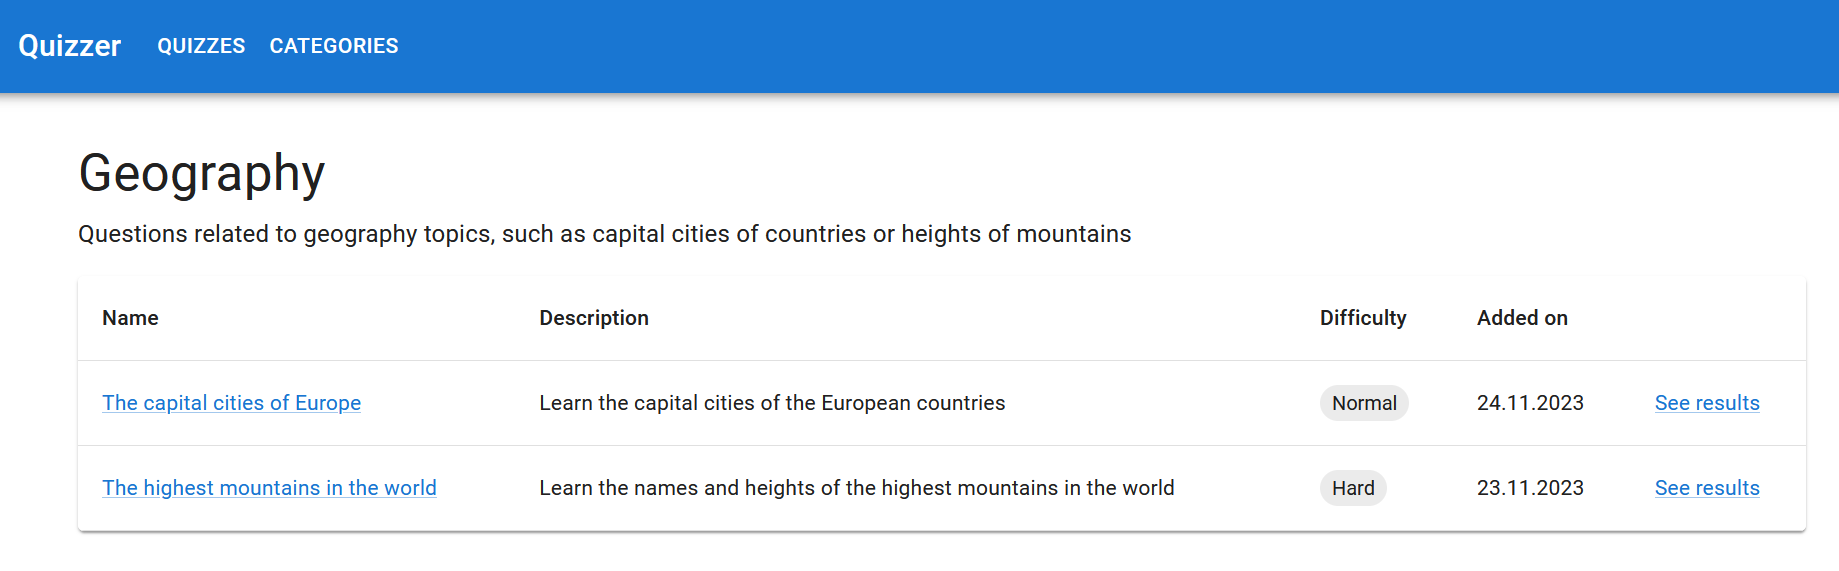
Different students are interested in different quiz categories. To find interesting quizzes quickly, there should be page that lists all the categories. The category list page should be accessible from the navigation menu. Clicking the category’s name on the list should take the student to a page that lists the quizzes in the category.”
– The Product Owner
After some discussion the Scrum Team planned the following user stories for the teacher dashboard application:
- As a teacher, I want to add a category so that I can categorize quizzes
- As a teacher, I want to see a list of added categories so that I know which categories are added
- As a teacher, I want to choose a category for a quiz so that I can categorize quizzes
- As a teacher, I want to delete a category so that I can get rid of categories I don’t need
And the following user stories for the student dashboard application:
- As a student, I want to see a list of published quizzes so that I know which quizzes I can take
- As a student, I want to see the questions of a quiz so that I know the contents of the quiz
- As a student, I want to answer the questions of a quiz so that I can know if my answers are correct
- As a user, I want to see the number of correct and wrong aswers of each question of a quiz so that I can know the results of a quiz
- As a student, I want to see a list of added categories so that I can browse quizzes in different categories
- As a student, I want to see a list of quizzes of a category so that I can browse the quizzes of a category
Exercise 3
Make sure that all task related issues that have been completed during the Sprint 1 are closed and their status is “Done” in the Backlog project. Do the same with the user story related issues accepted by the Product Owner during the Sprint Review event.
Create a new milestone for the second Sprint. If you didn’t manage to implement all user stories during the previous Sprint, set the second Sprint’s milestone for the unfinished user story and task issues. If the Sprint Review brought up implementation improvements or flaws (e.g. bugs), create appropriate issues for the tasks.
You can create labels such as “frontend” and “backend” to indicate which part of the project an issue relates to.
Exercise 4
Create an issue for each user story. Add the “user story” label for each issue. Set the Sprint milestone and add the issues to the backlog.
Exercise 5
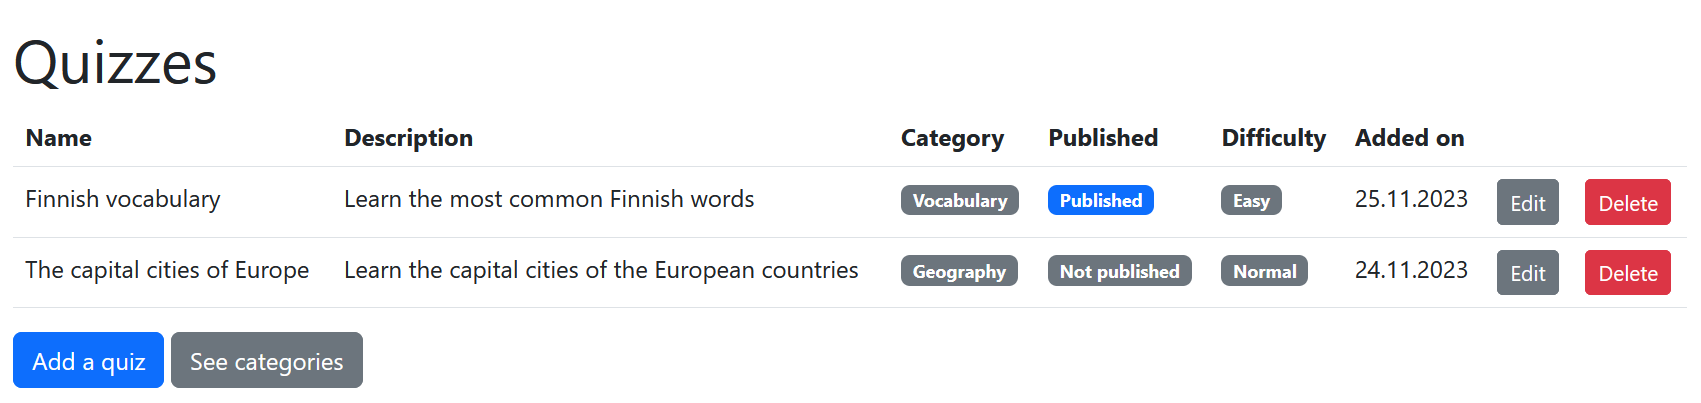
Plan the tasks for the first user story, “As a teacher, I want to add a category so that I can categorize quizzes”. Read the Product Owner’s Sprint Planning description regarding the user story again and split it into small coding tasks.
Create an issue for each task. Set the Sprint milestone and add the issues to the backlog.
The Scrum Team’s UI Designer’s vision is that the implementation could look something like this:
Exercise 6
Plan the tasks for the second user story, “As a teacher, I want to see a list of added categories so that I know which categories are added”. Read the Product Owner’s Sprint Planning description regarding the user story again and split it into small coding tasks.
Create an issue for each task. Set the Sprint milestone and add the issues to the backlog.
The Scrum Team’s UI Designer’s vision is that the implementation could look something like this:
Exercise 7
Plan the tasks for the third user story, “As a teacher, I want to choose a category for a quiz so that I can categorize quizzes”. Read the Product Owner’s Sprint Planning description regarding the user story again and split it into small coding tasks.
Create an issue for each task. Set the Sprint milestone and add the issues to the backlog.
The Scrum Team’s UI Designer’s vision is that the implementation could look something like this:
Exercise 8
Plan the tasks for the fourth user story, “As a teacher, I want to delete a category so that I can get rid of categories I don’t need”. Read the Product Owner’s Sprint Planning description regarding the user story again and split it into small coding tasks.
Create an issue for each task. Set the Sprint milestone and add the issues to the backlog.
Exercise 9
Write the first version of the project’s data model documentation. Implement an entity relationship diagram and write a description of the application’s data model, which documents the application’s entities, their attributes, their relationships and the relationship types (one-to-one, one-to-many, or many-to-many). The description should explain the purpose of each entity and their relationship to other entities. Add the documentation under a “Data model” subheading in the
README.mdfile.GitHub supports including different kind of diagrams to Markdown files using the Mermaid syntax. Mermaid makes it easier to update diagrams, when for example new entities or attributes need to be added to an entity relationship diagram. Mermaid’s entity relationship diagram documentation can be found here.
NB: Keep this documentation (like all other documentation) up-to-date when you add new entities or attributes for the application’s data model.
REST APIs
In a fully backend-based application (e.g., Spring Boot with Thymeleaf) the user interacts with the web application in the following manner:
- The user opens a page at certain path, for example
/, in a web browser. - The web browser sends a request to the server (the backend) for the resource of that path.
- On the server, the request is delegated to the controller method responsible for handling requests for the path.
- The controller method retrieves the required data from the database and based on the data creates an HTML page.
- The HTML page is sent as a response and the browser displays the page for the user.
So, the representation of the application’s data is an HTML page. To provide other applications, such as JavaScript frontend applications, a better access to our data we need to represent it in a format that is easier to consume, such as the JSON format.
Instead of sending a response as an HTML page, we can serialize Java objects into text-based JSON format and send it as a response. Let’s consider a MessageRestController controller class as an example:
@RestController
@RequestMapping("/api")
public class MessageRestController {
    private final MessageRepository messageRepository;

    // ...

    @GetMapping("/messages")
    public List<Message> getAllMessages() {
        return messageRepository.findAll();
    }
}
The @RestController annotation on the MessageRestController class specifies that each method of the controller class produces a JSON response body. Instead of returning the name of the template, we can directly return Java objects. For example the getAllMessages method returns a list of Message objects. In this example, the JSON list would be available at http://localhost:8080/api/messages.
By using JSON as the data representation format we can separate the client (the user interface application) from the server. This allows as to implement many different kinds of client applications with different programming languages. This separation of server and client is one of the corner stones of the the REST architectural style.
flowchart LR
    client(Client) -- GET /api/messages --> server(Server)
    server -- "[{ #quot;id#quot;: 1, #quot;content#quot;: #quot;Hello world!#quot; }]" --> client
REST, or REpresentational State Transfer, is an architectural style for providing standards between computer systems on the web, making it easier for systems to communicate with each other. REST-compliant systems, often called RESTful systems, are characterized by how they are stateless and separate the concerns of client and server.
In a RESTful system, the requests must contain a path to a resource that the operation should be performed on. In RESTful APIs, paths should be designed to help the client know what is going on. For example, the path /users/29/messages is a resource for messages of a user with a specific id. These paths are also referred to as endpoints.
The request should also contain the HTTP method, that determines the operation itself. The GET method is used for endpoints that retrieve data, and never manipulate it. The POST, PUT and DELETE methods on the other hand are used for endpoints that manipulate data. The POST method is commonly used for endpoints that create database entries, the PUT method for endpoints that update and the DELETE method for endpoints that delete them.
The resource path has certain naming conventions. The path starts with the resource collection name in plural, for examples “users”. The collection name is followed by resource specifiers, for example the id of the resource. Here’s example of RESTful API paths for the “users” collection:
| HTTP method | Path | Request mapping | Description |
|---|---|---|---|
GET | /users | @GetMapping("/users") | List all users |
GET | /users/{id} | @GetMapping("/users/{id}") | Get the user with the provided id |
POST | /users | @PostMapping("/users") | Create a user |
PUT | /users/{id} | @PutMapping("/users/{id}") | Update the user with the provided id |
DELETE | /users/{id} | @DeleteMapping("/users/{id}") | Delete the user with the provided id |
Collections are commonly entities which we are storing in the database (for example quizzes and questions). The REST API endpoints provide ways to access and manipulate these entities.
The {id} part of the /users/{id} path is a path variable. For example, the path for user with id 2 would be /users/2.
The “id” refers to the id attribute (the primary key) of the entity. The attribute’s name doesn’t necessarily have to be “id”.
A collection can have sub-collections. For example, a path for a user’s messages resource would be /users/{id}/messages, where “messages” is a sub-collection. This guide has more information about the resource path naming conventions.
When we design and implement REST API endpoints we should consider the use-case. We don’t implement endpoints arbitrary, there should be a need for the endpoint first, for example a certain feature in a frontend application needs to display some data in the database. Based on the feature we consider what kind of data and operations the REST API needs to provide. These requirements will determine the endpoints we will implement.
We can create a separate controller class for each collection. The @RequestMapping annotation can be applied to the controller class to define the collection name prefix of the path. Each method will automatically get the prefix in the path, so we don’t need to repeat it in the method’s request mapping annotations:
@RestController
@RequestMapping("/api")
@CrossOrigin(origins = "*")
public class MessageRestController {
    // ...

    @GetMapping("/messages/{id}")
    public Message getMessageById(@PathVariable Long id) {
        return messageRepository.findById(id).orElseThrow(
            () -> new ResponseStatusException(HttpStatus.NOT_FOUND, "Message with id " + id + " does not exist"));
    }

    @PostMapping("/messages")
    public Message createMessage(@Valid @RequestBody CreateMessageDto message, BindingResult bindingResult) {
        // Check if message object violates any validations defined by the CreateMessageDTO class
        if (bindingResult.hasErrors()) {
            throw new ResponseStatusException(HttpStatus.BAD_REQUEST, bindingResult.getAllErrors().get(0).getDefaultMessage());
        }

        Message newMessage = new Message(message.getContent());
        return messageRepository.save(newMessage);
    }
}
It’s handy to use some prefix, such as “api” to distinguish paths that produce JSON response from paths that produce HTML pages.
In this case, the getMessageById method will handle GET request to the path /api/messages/{id} and the createMessage method will handle POST request to the path /api/messages.
In the createMessage method, the CreateMessageDto object annotated with the @RequestBody annotation contains the data in the request body. For example with JavaScript, the request body can be set with the fetch function call in the following way:
fetch("http://localhost:8080/api/messages", {
  method: "POST",
  headers: {
    Accept: "application/json",
    "Content-Type": "application/json",
  },
  // This is the data in the request body
  body: JSON.stringify({ content: "Hello world!" }),
});
Controlling the request and response body format with DTO classes
To have full control over the format of the request and response body we can use DTO classes (or records). Especially with the request body annotated by the @RequestBody annotation, we should in general use a DTO class object instead of an entity class object. This is because using an entity class object might accidently allow users to update undesired attributes of an entity.
For example, let’s assume that we have a User entity with id, username, password and isAdmin (determines if user is an admin user or not) attributes. We want the user to be able to register with an username and password, but they aren’t suppose to be able to define their id or admin status. To define the available attributes for the request body, we can create a CreateUserDto DTO class:
public class CreateUserDto {
    // @NotBlank and @Size annotations are used for validation
    @NotBlank(message = "Username is required")
    private String username;
    @Size(min = 8, message = "Password should be at least 8 characters long")
    private String password;

    // constructors, getters and setters
}

// Or using a record
public record CreateUserDto(
    @NotBlank(message = "Username is required") String username,
    @Size(min = 8, message = "Password should be at least 8 characters long") String password
) {}
In the controller method, the request body is mapped to a CreateUserDto object:
@PostMapping("/users")
// The CreateUserDto class defines the request body
public User createUser(@Valid @RequestBody CreateUserDto user, BindingResult bindingResult) {
    // Check if user object violates any validations defined by the CreateUserDto class
    if (bindingResult.hasErrors()) {
        throw new ResponseStatusException(HttpStatus.BAD_REQUEST, bindingResult.getAllErrors().get(0).getDefaultMessage());
    }

    User newUser = new User(user.getUsername(), authenticationService.createPasswordHash(user.getPassword()));
    userRepository.save(newUser);

    // The PublicUserDto class (covered in the next example) defines the response body
    return new PublicUserDto(newUser.getId(), newUser.getUsername(), newUser.getIsAdmin())
}
This corresponds to the following JSON format for the request body:
{ "username": "kalle", "password": "supersecret9000" }
Similarly, we can use DTOs to control the attributes in the response body (as in the previous example). For example, we don’t want to send the user’s password hash in the response. We can control the desired attributes using a PublicUserDto class:
public class PublicUserDto {
    // The id, username and admin status are public information
    private Long id;
    private String username;
    private Boolean isAdmin;

    // constructors, getters and setters
}
In the controller method, we transform the User objects into PublicUserDto objects:
@GetMapping("/users")
public List<PublicUserDto> getAllUsers() {
    return userRepository.findAll()
        .stream()
        .map(user -> new PublicUserDto(user.getId(), user.getUsername(), user.getIsAdmin()))
        .toList()
}
This corresponds to the following JSON format for the response body:
[{ "id": 1, "username": "kalle", "isAdmin": false }]
In the example above we could also use the
@JsonIgnoreannotation. With a DTO class we can get more fine grained control over the request and response body, if needed. However, this doesn’t mean that every single request requires the use of a DTO class.
HTTP status codes and REST API error handling
Previously we have handled errors in requests by sending a redirect or rendering a template with some error messages. With REST API endpoints we communicate errors with HTTP status codes and JSON formatted error objects containing details about the error. HTTP status codes are numeric codes that describe whether the request was successful or not.
Successful status codes are in range 200 - 299. Most common successful status code is 200 OK, which is a generic way to inform the client that the request succeeded. Client error status codes are in range 400 - 499. These status codes indicate that there’s something wrong with the client’s request. Most common client error status codes are:
- 404 Not Found: the server cannot find the requested resource
- 400 Bad Request: there was something wrong with the user’s request. For example the request body of a POST request is not valid
- 403 Forbidden: the user lacks the required authorization for the request. For example the user tries to update a resource that they don’t have access to
- 401 Unauthorized: the user is not authenticated, meaning that the server can’t identify the user. For example the user is not signed in and tries to access a resource which requires authentication
As in the previous example, we can use the ResponseStatusException exception class to send HTTP status code with the response in case of errors. The exception should be thrown with an appropriate HTTP status code and an error message. For example, the line:
throw new ResponseStatusException(HttpStatus.BAD_REQUEST, bindingResult.getAllErrors().get(0).getDefaultMessage());
In the createMessage method will send a 400 Bad Request status code with the response in case the request body is not valid. The second parameter of the ResponseStatusException constructor is the error message which will be displayed in the error response object:
{
  "timestamp": "2023-11-20T07:55:10.918+00:00",
  "status": 400,
  "error": "Bad Request",
  "trace": "...",
  "message": "Content is required",
  "path": "/api/messages"
}
If we don’t throw a ResponseStatusException exception, the 200 OK status code will be sent with the response, which indicates the that request succeeded:
@GetMapping("/messages")
public List<Message> getAllMessages() {
    // HTTP status 200 OK will be used in the response by default
    return messageRepository.findAll();
}
To get more control over the response, we can use the ResponseEntity class:
@PostMapping("")
public ResponseEntity<?> createMessage(@Valid @RequestBody CreateMessageDto message, BindingResult bindingResult) {
    if (bindingResult.hasErrors()) {
        List<String> errorMessages = bindingResult.getAllErrors().stream().map((error) -> error.getDefaultMessage())
                .toList();

        return ResponseEntity.status(HttpStatus.BAD_REQUEST).body(errorMessages);
    }

    Message newMessage = new Message(message.getContent());
    messageRepository.save(newMessage);

    // HTTP status 201 Created will be used in this response
    return ResponseEntity.status(HttpStatus.CREATED).body(newMessage);
}
The error messages won’t be visible by default. We can change this behavior by adding the following property to the application.properties file:
server.error.include-message=always
Omitting attributes from the JSON response body
By default all the attributes are present in the JSON response body. We can omit attributes from the JSON response body by using the @JsonIgnore annotation on an attribute. We usually want to omit attributes that hold private information, for example user’s password hash, or attributes that can potentially contain lots of data, for example, the @OneToMany annotated attributes. We can, for example omit the messages attribute of a User entity class in the following way:
@JsonIgnore
@OneToMany(mappedBy = "user")
private List<Message> messages;
To have more control over the attributes in the JSON response, DTO classes can be used instead of returning the entity classes directly from the controller methods.
REST API endpoints for the user stories
Next, let’s consider what kind of REST API endpoints we need for the remaining user stories. Implement the following endpoints by following the REST API naming conventions for the endpoint path names.
GET method endpoints are easy to test with a web browser by just visiting the endpoint URL. POST method endpoints can be tested with tools such as Postman.
Exercise 10
Implement a REST API endpoint for getting a quiz by id. Return an appropriate HTTP status code and error message in the following error case:
- Quiz with the provided id does not exist
Create an issue for each task. Set the Sprint milestone and add the issues to the backlog.
Exercise 11
Implement a REST API endpoint for getting the questions of a quiz. In this case, instead of using the
@JsonIgnoreannotation, you can use @JsonManagedReference and @JsonBackReference annotations to include the question’s answer options in to the JSON response. Return an appropriate HTTP status code and error message in the following error case:
- Quiz with the provided id does not exist
Create an issue for each task. Set the Sprint milestone and add the issues to the backlog.
Exercise 12
Implement a REST API endpoint for creating an answer for a question (or more specifically, for an answer option of a question). Before implementing the endpoint itself, consider what kind of data requirements the endpoint has. The student should be able to choose an answer option (e.g. “Helsinki”) for a question (e.g. “What is the capital of Finland?”) and submit their answer. The information, which answer option the student submitted for the question should be stored to the database.
Return an appropriate HTTP status code and error message in the following error case:
- Answer option id is not provided (for example the
{ "answerOptionId": null }request body)- Answer option with the provided id does not exist
- Quiz is not published
You can define the request body format with a DTO class. The frontend can send a JSON request body for example in the following format:
{
  "answerOptionId": 1
}
Create an issue for each task. Set the Sprint milestone and add the issues to the backlog.
Exercise 13
Implement a REST API endpoint for getting the results of a quiz. Return an appropriate HTTP status code and error message in the following error case:
- Quiz with the provided id does not exist
The endpoint should return the total number of answers, the number of correct answers and the number of wrong answers for each question of the quiz based on the submitted answers of the students. You can for example consider the following structure for the response body:
[
  {
    "questionId": 1,
    "questionText": "What is the capital of Finland?",
    "questionDifficulty": "Easy",
    "totalAnswers": 10,
    "correctAnswers": 9,
    "wrongAnswers": 1
  }
]
You can implement an appropriate DTO class for the question results object and use it to construct the response body.
Create an issue for each task. Set the Sprint milestone and add the issues to the backlog.
Exercise 14
Implement a REST API endpoint for getting all categories.
Create an issue for each task. Set the Sprint milestone and add the issues to the backlog.
Exercise 15
Implement a REST API endpoint for getting a category by id. Return an appropriate HTTP status code and error message in the following error case:
- Category with the provided id does not exist
Create an issue for each task. Set the Sprint milestone and add the issues to the backlog.
Exercise 16
Implement a REST API endpoint for getting the quizzes of a category. Only published quizzes of the category should be returned by the endpoint. Return an appropriate HTTP status code and error message in the following error case:
- Category with the provided id does not exist
Create an issue for each task. Set the Sprint milestone and add the issues to the backlog.
The GET method endpoint error responses will be displayed as a HTML error page in a web browser. To see what the JSON error response looks like, use Postman to send the request.
REST API documentation with Swagger
Now that we have implemented REST API endpoints for our application, we should describe to our fellow developers what these endpoints are and what kind of data they provide. We could write this documentation by hand, but there’s a high risk that the documentation will become stale in the future. For example, if we make some alteration to the structure of the provided data and forget to update the documentation. That is why API documentation is commonly generated automatically by tools such as Spring Doc.
Spring Doc is a library for generating a JSON-formatted description of a REST API from our controller classes and their methods. This description follows a common format called the OpenAPI Specification format. Once the OpenAPI formatted description is generated, there are tools to display the information in a user-friendly way as a user interface. One of such tools is Swagger.
Swagger provides documentation for the API endpoints we define in the controller methods. The documentation is a user interface that lists the endpoints and provides information for each one, such as what the request for the endpoint looks like and what’s in the response. We can also easily send requests and inspect the response using the user interface. Swagger Petstore is an example of a Swagger documentation.
Let’s start documenting our API by adding the Spring Doc dependency to the <dependencies> list in the pom.xml file:
<dependency>
    <groupId>org.springdoc</groupId>
    <artifactId>springdoc-openapi-starter-webmvc-ui</artifactId>
    <version>2.8.15</version>
</dependency>
Then, let’s start our application and open http://localhost:8080/v3/api-docs in a browser. We should see the JSON formatted description of our REST API in the OpenAPI format. For a more user-friendly description, the Swagger documentation can be found at http://localhost:8080/swagger-ui/index.html. In the Swagger documentation, we can see a documentation for the REST controller classes.
We can find documentation for each REST API endpoint under the section named by the REST controller class. We see all relevant information about the endpoint: the path, path parameters, and an example of the response. We can send a test request by clicking the “Try it out” button on the right. This is handy while we are exploring an API that we aren’t familiar with.
We can provide more details about the endpoints by using specific annotations for the controller classes and methods. We can also provide more information about a specific endpoint using the @Operation annotation:
@RestController
@RequestMapping("/api")
@CrossOrigin(origins = "*")
public class MessageRestController {
    // ...

    @Operation(
        summary = "Get a message by id",
        description = "Returns the message with the provided id"
    )
    @GetMapping("/messages/{id}")
    public Message getMessageById(@PathVariable Long id) {
        // ...
    }
}
The @ApiResponses and @ApiResponse annotations can be used to document different kind of success and error responses and their corresponding HTTP status codes:
@Operation(
    summary = "Get a message by id",
    description = "Returns the message with the provided id"
)
@ApiResponses(value = {
    // The responseCode property defines the HTTP status code of the response
    @ApiResponse(responseCode = "200", description = "Message with the provided id retrieved successfully"),
    @ApiResponse(responseCode = "404", description = "Message with the provided id does not exist")
})
@GetMapping("/messages/{id}")
public Message getMessageById(@PathVariable Long id) {
    // ...
}
We cannot define more than one
@ApiResponseannotation with the sameresponseCodeproperty (HTTP status code) inside a@ApiResonsesannotation.
The @Tag annotation can be used to group endpoints, usually based on the REST API collection name, such as “messages” or “users”:
@Tag(name = "Messages")
@Operation(/* ... */)
@ApiResponses(/* .. */)
@GetMapping("/messages")
public Message getAllMessages(@PathVariable Long id) {
    // ...
}

@Tag(name = "Messages")
@Operation(/* ... */)
@ApiResponses(/* .. */)
@GetMapping("/messages/{id}")
public Message getMessageById(@PathVariable Long id) {
    // ...
}

@Tag(name = "Users")
@Operation(/* ... */)
@ApiResponses(/* .. */)
@GetMapping("/users")
public Message getAllUsers(@PathVariable Long id) {
    // ...
}

@Tag(name = "Users")
@Operation(/* ... */)
@ApiResponses(/* .. */)
@GetMapping("/users/{id}")
public Message getUserById(@PathVariable Long id) {
    // ...
}
In this example, the Swagger documentation would have two separate sections, “Messages” and “Users”, which would contain the endpoints in the specific group. Grouping the endpoints using the @Tag operation makes it easier to find relevant endpoints in the Swagger documentation more easily.
It is also possible to have separate REST API controller classes for each collection and apply the @Tag annotation to the class instead of individual methods:
@RestController
@RequestMapping("/api/messages")
@CrossOrigin(origins = "*")
@Tag(name = "Messages", description = "Operations for retrieving and manipulating messages")
public class MessageRestController {
    // ...
}

@RestController
@RequestMapping("/api/users")
@CrossOrigin(origins = "*")
@Tag(name = "Users", description = "Operations for retrieving and manipulating users")
public class UserRestController {
    // ...
}
Having separate REST controller class for each collection also improves the code quality by making it easier to find relevant endpoints.
Exercise 17
Generate a Swagger documentation for the project as described above. For each REST controller method add a proper summary and description using the
@Operationannotation. Also add the@ApiResponsesannotation with an@ApiResponseannotation for each success and error response. Group the endpoints based on the endpoint’s collection name using the@Tagannotation.Test all the REST API endpoints you have implemented by opening the endpoint’s documentation and clicking the “Try it out” button. Remember to also test that the error responses work properly. For example send a request to the endpoint wich returns the questions of a quiz with an id path parameter value of a non-existing quiz. Add a link to the Swagger documentation deployed to the production environment in Rahti (link format is https://nameofyourrahtiapp.2.rahtiapp.fi/swagger-ui/index.html) under a “REST API” subheading in the
README.mdfile.
Communication between frontend and backend
With REST APIs we can separate the client application from the server application. In web applications these client applications are commonly called frontend applications. Together these components construct a full stack application.
The communication between the frontend application and the backend application is performed using the JavaScript’s Fetch API. The Fetch API provides the fetch function, which can be used to send a HTTP request to a specific URL:
fetch("http://localhost:8080/api/messages")
  .then((response) => response.json())
  .then((messages) => {
    console.log(messages);
  });
The default request method is GET. We can use a different request method, such as POST, by providing addional options for the fetch call:
fetch("http://localhost:8080/api/messages", {
  method: "POST",
  headers: {
    Accept: "application/json",
    "Content-Type": "application/json",
  },
  body: JSON.stringify({ content: "Hello world!" }),
})
  .then((response) => response.json())
  .then((newMessage) => {
    console.log(newMessage);
  });
The
fetchcalls require somewhat boilerplate code, especially while sending JSON formatted data to the server with a POST request. Different HTTP client libraries such as Axios are used to reduce this boiplerate code and to provide useful additional features.
As an example, the logic of fetching and creating messages could be extracted into getAllMessages and createMessage functions:
const BACKEND_URL = "http://localhost:8080";

export function getAllMessages() {
  return fetch(`${BACKEND_URL}/api/messages`).then((response) =>
    response.json()
  );
}

export function createMessage(message) {
  return fetch(`${BACKEND_URL}/api/messages`, {
    method: "post",
    body: JSON.stringify(message),
    headers: {
      Accept: "application/json",
      "Content-Type": "application/json",
    },
  }).then((response) => {
    if (!response.ok) {
      throw new Error("Failed to create the message");
    }

    return response.json();
  });
}
These are simple abstractions for fetching and creating messages, but they are quite handy. If for example the logic for fetching the messages (for example the API URL) changes, we only need to change the logic inside the getAllMessages function and nowhere else. This will become relevant for example, when we deploy the frontend.
As an example, we could call the getAllMessages function to display the messages list in a MessageList component in the following way:
import { useEffect, useState } from "react";
import { getAllMessages, createMessage } from "../services/message";

export default function MessageList() {
  const [messages, setMessages] = useState([]);

  function fetchMessages() {
    getAllMessages().then((messages) => {
      setMessages(messages);
    });
  }

  useEffect(() => {
    fetchMessages();
  }, []);

  // ...
}
The remaining user stories are related to the student dashboard application and they should be implemented as a frontend application which uses REST API endpoints implemented in the backend.
Exercise 18
Plan the tasks for the fifth user story, “As a student, I want to see the questions of a quiz so that I know the contents of the quiz”. Read the Product Owner’s Sprint Planning description regarding the user story again and split it into small coding tasks.
Create an issue for each task. Set the Sprint milestone and add the issues to the backlog.
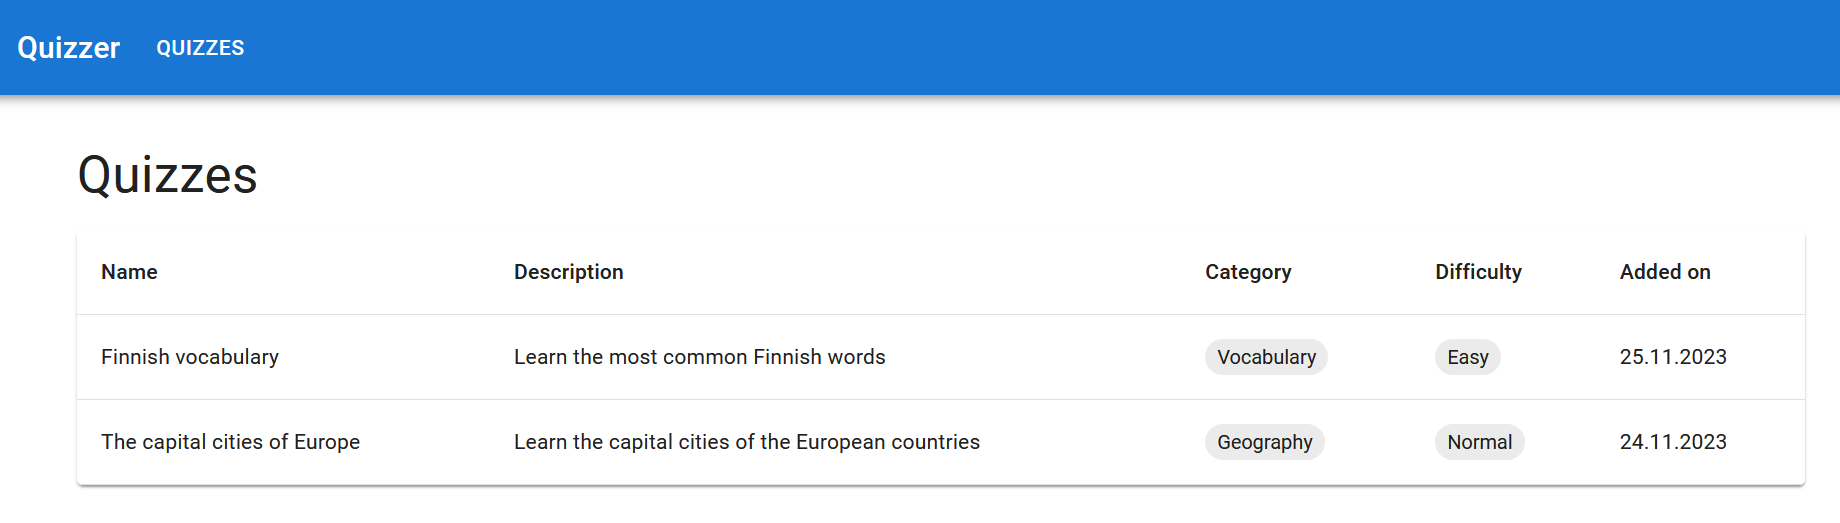
The Scrum Team’s UI Designer’s vision is that the implementation could look something like this:
Exercise 19
Plan the tasks for the sixth user story, “As a student, I want to see the questions of a quiz so that I know the contents of the quiz”. Read the Product Owner’s Sprint Planning description regarding the user story again and split it into small coding tasks.
Create an issue for each task. Set the Sprint milestone and add the issues to the backlog.
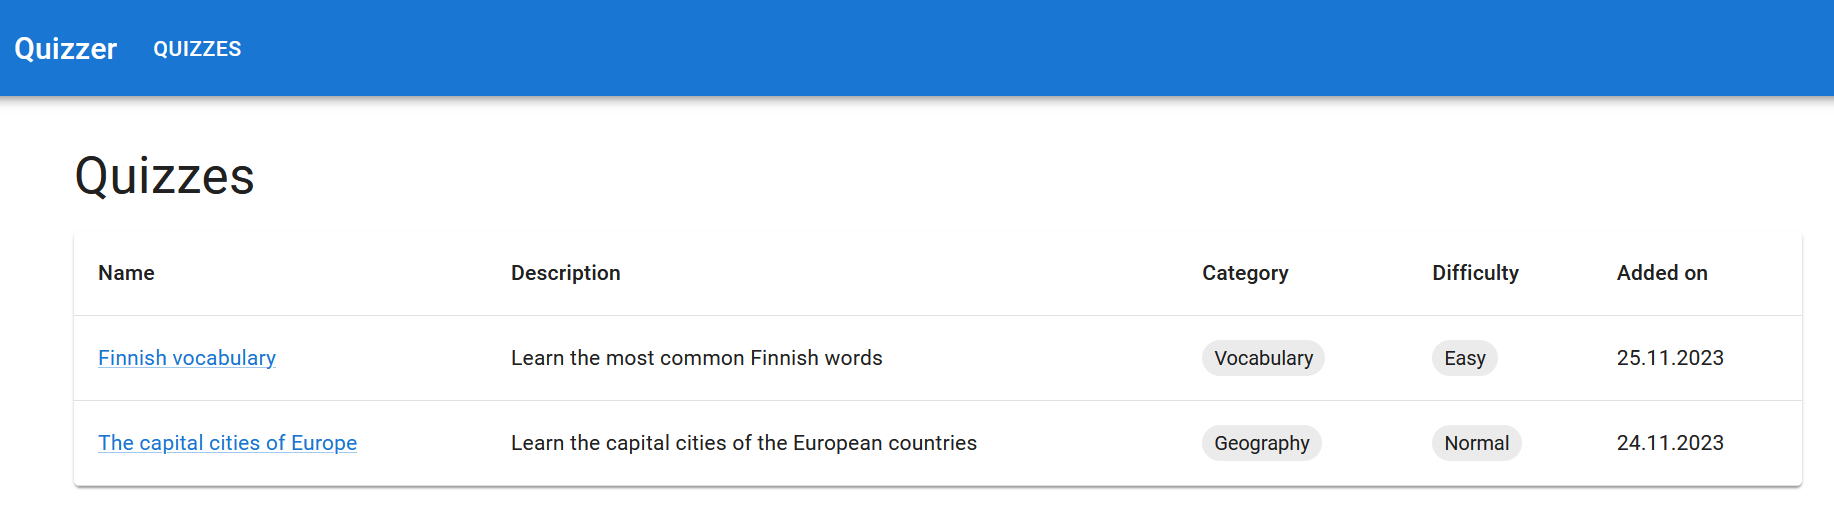
The Scrum Team’s UI Designer’s vision is that the implementation could look something like this:
Exercise 20
Plan the tasks for the seventh user story, “As a student, I want to answer the questions of a quiz so that I can know if my answers are correct”. Read the Product Owner’s Sprint Planning description regarding the user story again and split it into small coding tasks.
Create an issue for each task. Set the Sprint milestone and add the issues to the backlog.
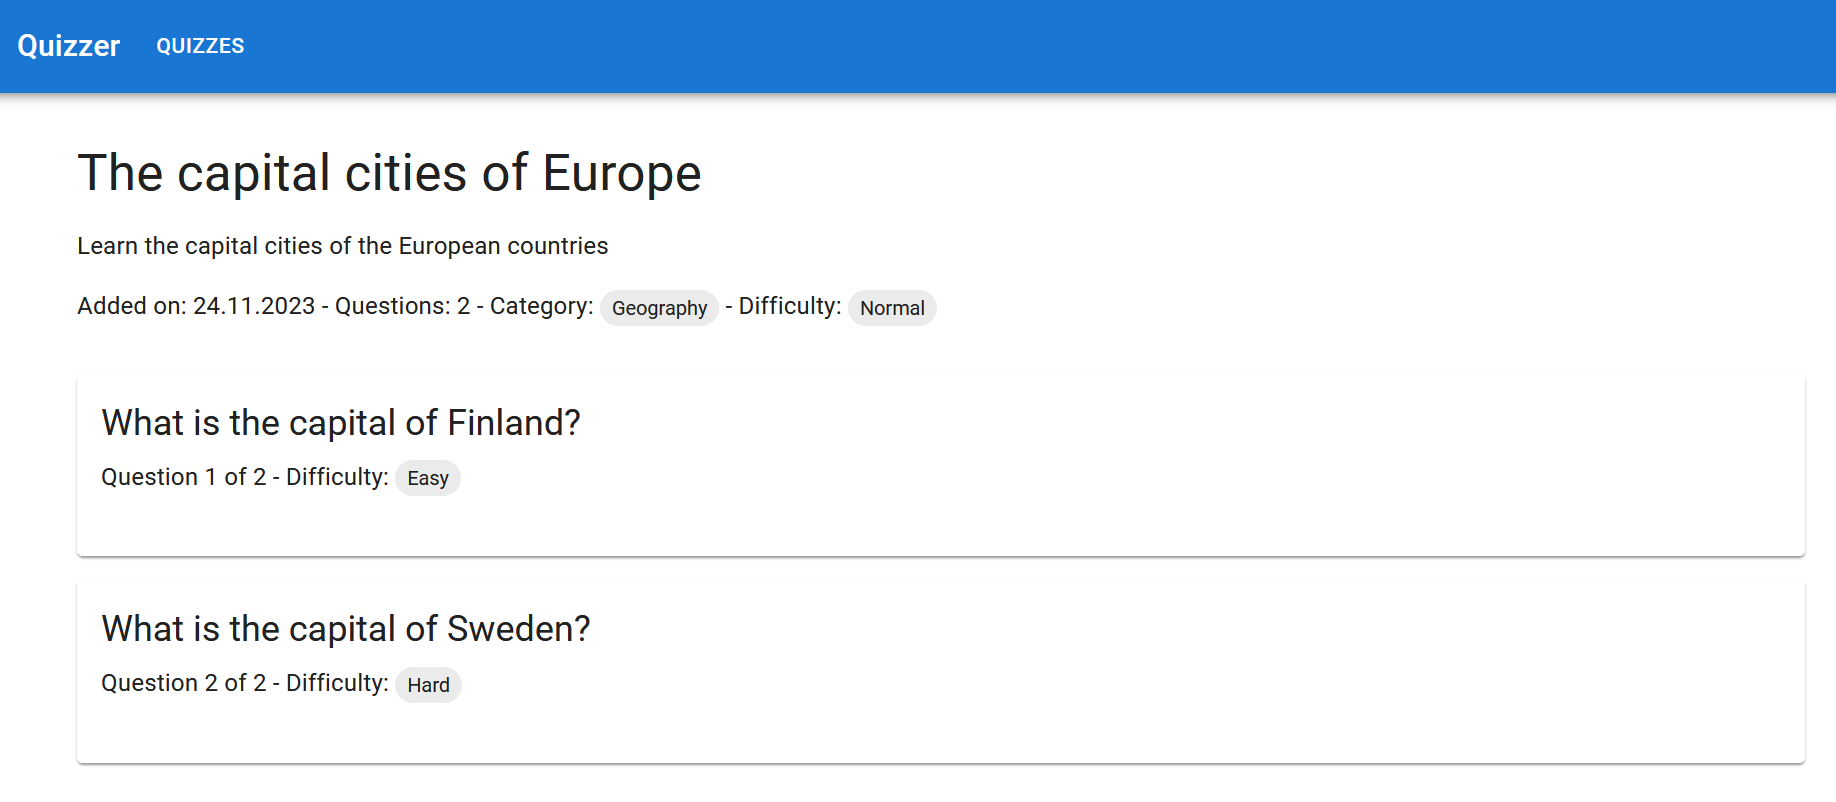
The Scrum Team’s UI Designer’s vision is that the implementation could look something like this:
Exercise 21
Plan the tasks for the eight user story, “As a user, I want to see the number of correct and wrong aswers of each question of a quiz so that I can know the results of a quiz”. Read the Product Owner’s Sprint Planning description regarding the user story again and split it into small coding tasks.
Create an issue for each task. Set the Sprint milestone and add the issues to the backlog.
The Scrum Team’s UI Designer’s vision is that the implementation could look something like this:
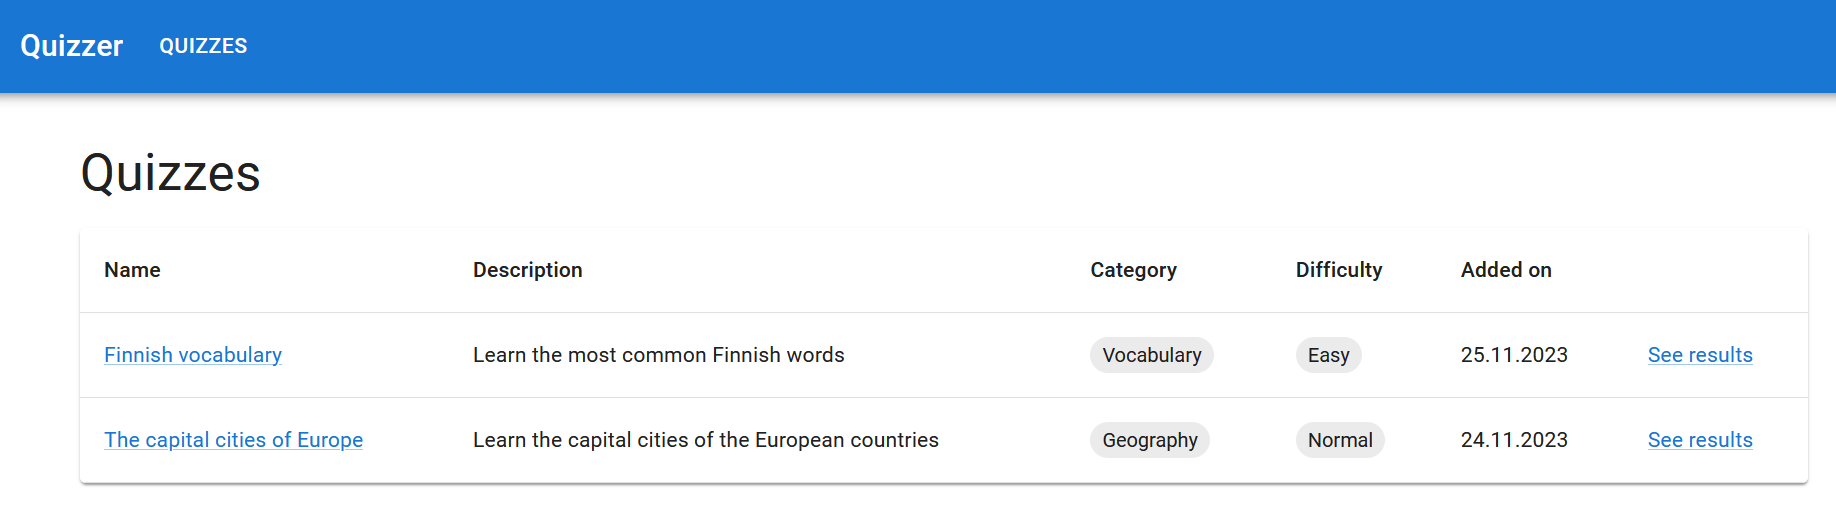
Exercise 22
Plan the tasks for the ninth user story, “As a student, I want to see a list of added categories so that I can browse quizzes in different categories”. Read the Product Owner’s Sprint Planning description regarding the user story again and split it into small coding tasks.
Create an issue for each task. Set the Sprint milestone and add the issues to the backlog.
The Scrum Team’s UI Designer’s vision is that the implementation could look something like this:
Exercise 23
Plan the tasks for the tenth user story, “As a student, I want to see a list of quizzes of a category so that I can browse the quizzes of a category”. Read the Product Owner’s Sprint Planning description regarding the user story again and split it into small coding tasks.
Create an issue for each task. Set the Sprint milestone and add the issues to the backlog.
The Scrum Team’s UI Designer’s vision is that the implementation could look something like this:
Deploying the frontend
We managed to deploy the backend during the previous Sprint, but we still haven’t deployed the frontend. We can deploy the frontend to the Render platform, which provides simple deployment for static sites for free.
Exercise 24
Deploy the frontend application to a production environment by following these instructions. Test that the application works in the production envinronment by e.g. answering a few quizzes and taking a look at their results. Add the production environment URL of the frontend application (the static site URL in the Render dashboard) to the project description section in the
README.mdfile.
Exercise 25
Add instructions on how to start the frontend application on the command-line to the “Developer guide” section in the
README.mdfile. Don’t forget important details, such as in which folder the commands should be run in an how to install the frontend dependencies.To improve the documentation structure, you can consider separate subheadings for backend’s and frontend’s developer guide:
## Developer guide

The implementation technologies and other common technical details go here.

### Backend

The backend developer guide goes here.

### Frontend

The frontend developer guide goes here.
For the sake of readability, code and command-line command text is commonly highlighted in Markdown files. Here’s how that is done in Markdown syntax.
Also, include the following information about the project’s implementation technologies:
- Which programming language, frameworks and major libraries are used in the backend implementation?
- Which database platforms are used in different environments (development and production environment)?
- Which programming language, frameworks and major libraries are used in the frontend implementation?
Sprint Review
We have all kinds of cool stuff to show for the Product Owner at the end of this Sprint. Prepare for the upcoming Sprint Review event, similarly as in the previous Sprint.
Exercise 26
Once you have implemented the user stories of the Sprint and the main branch has a working version of the application, create a GitHub release for the project as instructed in the GitHub’s documentation. Create a new tag called “sprint2”. The release title should be “Sprint 2”. Give a brief description for the release that describes the features implemented during the Sprint.
Exercise 27
The Scrum Master should prepare the Sprint Review demonstration at the beginning of the next Sprint. The Scrum Master should make sure that they have a working version of the teacher dashboard and the student dashboard applications on their computer and is able to show how the new features work in the user’s perspective. If possible, demonstrate both teacher and student dashboard’s features in the production environment. As in the previous Sprint Review, prepare some sensible test data for the Sprint Review.
Make sure that you have pushed your work to the project’s GitHub repository before the Sprint 2 deadline on Before the Wed 29.4.2026 session.